Optimizing a ShareASale Affiliate Program with Internal Logos

There are numerous ways ShareASale merchants can optimize their program to increase their brands awareness to prospective affiliates. In the past I, have discussed various program optimization tips on ShareASale to help recruit affiliates, but today I am going to outline a free ways to get the word out there about your affiliate program on ShareASale. It is called “Internal Logo Files.”

ShareASale uses merchant’s logos in various places within their interface to help attract affiliates to merchant’s affiliate programs, and now I will describe where those places are and the requirements.

First, to navigate to this section of their interface you will go to “My Account” -> “Internal Logo Files.”  It will bring you to a page that looks similar to this (see below)
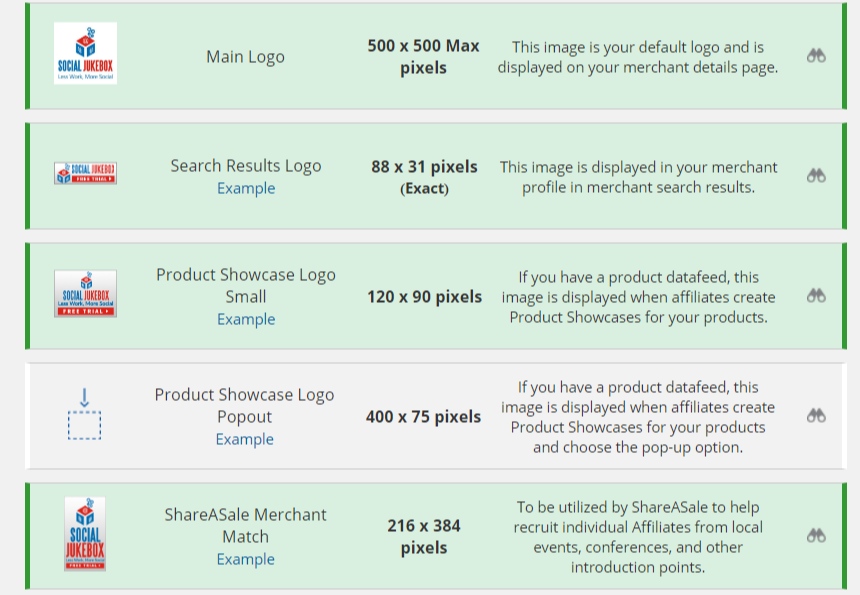
Main Logo

ShareASale uses this logo on the merchant details page, or better known as the page where affiliates sign up to an affiliate program. It can be up to 500 x 500 px, but make sure it is not too large and doesn’t overtake the page. Here is an example:

Search Results Logo

This logo is used on the merchant search results page. When affiliates are looking for new merchants to promote a merchant will stand out more with their 88 x 31 logo shown along with vital statistics of the affiliate program. Having a logo there gives a merchant a better opportunity to be seen and seriously considered. Here is an example of a merchant with one and without:

Product Showcase Logo (small)

If a merchant has a data feed their logo will be displayed when affiliates create product showcases for specific products. This logo should be 120 x 90 px. Here is an example:

Product Showcase Logo (Pop-up)

This logo is very similar to the one right above, but it will be shown when an affiliate chooses the pop-up option. It should be 400 x 75 px Here is an example:

ShareASale Merchant Match

This particular logo helps ShareASale to recruit individual affiliates from local marketing events (Meet-Ups), conferences, and other interactions (magazine, email newsletters, etc.) This logo should be 216 x 384 px. Here is an example:

Merchants, there are up to 5 additional ways to spread the word about your programs via logos within the ShareASale interface (free of charge). It is highly recommended to take advantage of as many of them as possible because you never know what you could be missing out on.

Adding Banners in Rakuten Affiliate Network

Continuing the series of articles on the Rakuten Affiliate Network interface, today will be centered around adding banners. We are back discussing links, but more specifically, how to add banners to the account for affiliates to use. A step-by-step guide will be outlined to complete the task of uploading banners in your Rakuten Affiliate Network account.

Step # 1 – Click the “Links” button in the main navigation

In a similar way to adding text links, you will click the “links” button in the main navigation. You will be shown all the different types of links available, then click “banners”.

LS 2

Step # 2 – Add New Banners

You have the option to add banners manually or import them via a csv file. Click the “add new banners” button. If there are any banners currently in your inventory you have the ability edit them here too.

LS 4

Step # 3 – Add New Banners (Con’t)

This is part where you add the details of the banners. You have the option to host the banners on your server or have RAN (Rakuten Affiliate Network) host them, the choice is yours, but fees may apply if RAN hosts them. First, choose the banner file you want to load, name the banners (e.g. Labor Day Sale – 250×250), landing page URL (could be homepage or a specific dedicated page to the sale), size of the banner, start and end date, and who the banner will be assigned to. You can assign the banner to all affiliates, a group, or individual affiliates (just like text links).

If there are multiple banners to upload simply hit the button “add another”. It will add another box where you place the details of the banner, just like you did with the first one. You do that until all the banners have been input and hit save. You will then be directed to the entire live inventory of banners to view and edit if necessary.

LS 3

Another quick guide to navigating the Rakuten Affiliate Network interface is complete. Providing creatives to affiliates is a must do task, but also must be done correctly. If you are having trouble with what sizes to create please ask me in the comment section and I will provide a list of popular banner sizes.

Top 5 ShareASale Affiliate Program Setup Mistakes

As an Outsourced Program Manager (OPM), I manage accounts in a variety of verticals and on all the major affiliate networks, but merchants seem to encounter the same issues when setting up their affiliate program on their own. Whenever we (AM Navigator) get a new client (with an affiliate program) we perform an audit to determine what needs to be fixed in order promote the affiliate program in the proper light and there seems to be the same items most (not all) merchants either neglect or complete partially. This post will cover the top 5 items merchants on the ShareASale affiliate network neglect to include or complete partially when setting up their affiliate program.

#1 – Program Agreement (AKA Terms of Serivce)

This document is probably the most important as it is the “rules” by which affiliates need to follow. Important points to include are:

  • PPC (Pay-Per-Click) guidelines – Be specific on what words are off limits and what words can be used.
  • FTC policy
  • Coupon policy (if applicable)
  • Fraud policy

#2 – Emails sent to affiliates during the sign-up process

This is another piece that many merchants do not capitalize on. The 3 emails affiliates receive from ShareASale on the merchant’s behalf are:

  • Apply Email – This is sent to an affiliate once they apply to join a merchants affiliate program. This should tell the affiliate that their application is being reviewed and they will be contacted within 24 hours with a decision.
  • Decline Email – This is similar to the apply email. It only gets sent to affiliates that merchants reject from their program, but in fairness to the affiliate it should include reasons why they may have been declined and give them an opportunity to contact the program manager and/or re-apply .
  • Approval Email – Merchants get this one wrong the most of the three (3). This email should include information about the program (description of the company and main selling points of the affiliate program), PPC guidelines (like outlined in the program agreement), links for them to use immediately (have the code available for them to simply copy and paste), and contact information for the affiliate manager.

#3 – 88×31 Logo

You may be asking yourself, a logo? The 88×31 button banner is important because it is one of the most popiular sizes affiliates use, but it also provides additional exposure when affiliates are looking for merchants to promote. In the merchant search section affiliates view potential matches and a logo is included with many of them and it helps to “convert” the prospect into an affiliate. A simple logo can be the difference.

#4 – Banners

I have seen merchants have over 50 banners available and then I have seen a few that have 5. There is no “magic number” for banners, but having the most popular sizes available is critical. Merchants need to provide sizes that affiliates can use. I have seen obscure sizes and then the most popular sizes are missing and I scratch my head, but here is a link to the most popular banner sizes.

#5 – Newsletters

Last, but certainly not least, newsletters. A good majority of merchants I have done audits for either send newsletters out infrequently or not at all. The latter is most common. How are merchants supposed to communicate with affiliates? The newsletters should be sent out bi-weekly, but at the very least monthly. They should include any news about the program, coupons/deals, links to creatives, and contact information.

I could have gone on forever, but I gave the top 5 items many merchants either neglect or do halfhearted when setting up their affiliate programs. Every aspect of an affiliate program should be completed fully, no matter how relevant a merchant thinks it is. Affiliate managers jobs are to “WOW” affiliates and get them to promote their products/services and having a fully integrated and set up program is the first impression to all.

A Step-By-Step Guide to Adding Affiliate Creatives to CJ Affiliate

As I mentioned in my last article on adding creatives to ShareASale, having a nice selection for affiliates to use is essential and optimal. Allowing the affiliates to choose which banners or links to put up will allow them to market your products more effectively. Recently I have set up and launched a number of affiliate programs on CJ Affiliate By Conversant and I thought I would provide a step-by-step guide to uploading creatives to your program on CJ Affiliate.

Step 1 – Locate the Links tab on the Main Navigation Menu of the Merchant Interface.

Once logged in you will need to click on the “Links” tab to begin the process of uploading new creatives (banners/text links) or modifying current creatives.

CJ - 1

Step 2 –  Select “Add New Link”

Click on the “Add New Link” button, a drop down menu will appear and you will then choose which new link (or banner) you want to upload.

CJ - 2

Step 3 – Select Text Link or Banner

As you can see in the image below you have a number of options as it pertains to creatives, but for the purpose of this tutorial we are going to focus our attention on text links and banners only.  Depending on what type of creative you are uploading you will then make the appropriate selection, either text link or banner.

CJ - 3

Step 4 – Uploading Text Links

You will want to give your link a name to differentiate it from others, as well as include the ad copy, a description, relevant keywords for affiliate to search with, a destination URL, and filling in the other fields shown in the image below. Make sure to include as much information about the link as possible in order to get full optimization with your affiliates.

CJ - 5

Step 5 – Uploading Banners

Similar to uploading text links you will want to name the banner, provide a description, include a destination URL, search keywords, and most importantly upload the banner.

CJ - 4

You will want to repeat the same process for each additional banner and text link. Unfortunately, CJ Affiliate does not have a mass banner/link option like ShareASale does, but it is still a straight forward process that is essential in daily affiliate program management.  Whether you have an affiliate program on CJ Affiliate, ShareASale, or another network your creative inventory should be taken seriously and showcased in professional manner.