Advanced Affiliate Transaction Metrics via ShareASale

As a ShareASale merchant you have access to an array of tools to help manage and grow your affiliate program, but they also offer a robust reporting solution for transactions that occur. In one place ShareASale visually explains each transaction (important details of them) to help you (the merchant) determine if it is a legit sale or one that needs to be reviewed and reversed. This post will go over what you do not see on the ShareASale transaction reports and how you can access that information.

Here is a sample affiliate transaction from the “Reports”—”Transaction Detail”:

Transaction 1

As you can see it includes many of the details of the sale including: The date it occurred, sales amount, commission paid (to both the affiliate and ShareASale), the affiliate who referred the sale, the page the banner/link was clicked from, and creative ID. This is all great information, but what if I told you there is other information (just as important) that you can access about every transaction. How, you may ask?

It is very simple. First, you must download a file of the transactions you want more information for. Once it is downloaded and opened you will be shown information that many merchants do not even know exists.

The advanced metrics shown include the banner name (not ID) so that you can see exactly what banner converted instead of looking via the banner ID, if a coupon was used and the code associated with it, and if it is a new or existing customer (this only works if you have the ability to track new v. existing).

Showing the coupon code used can be helpful in determining if affiliates are “harvesting coupons”. If you only have specific coupons for the affiliate program then you can easily void the transaction or contact the affiliate to let them know that they cannot promote the code(s) being used.

Enabling ShareASale to track new v. existing customers can also be beneficial to the program. It will help determine who is adding value and plan to help increase sales that will lead to incremental business.

It was nice to share a little hidden gem within the transaction report of ShareASale. They provide great data, but cannot include it all in the visual breakdown in the “Reports”—“Transaction Detail” section. What is shown in the advanced data can be just as, if not more, beneficial than the actual sales amount and affiliate referrer.

How to Create Program Terms on CJ Affiliate Network

A very important aspect of a starting and maintaining a successful affiliate is program terms. “Program terms” is a phrase/term used by CJ Affiliate network to help merchants relay the affiliate program rules (and pay out structure) to affiliates. As important as they are to the success of a program, many merchants do not invest enough time into creating them to ensure affiliates understand and therefore, play by the rules. In this post I will go over step-by-step on how to create them and what should be included.

Step # 1 – Navigate to Program Terms Page

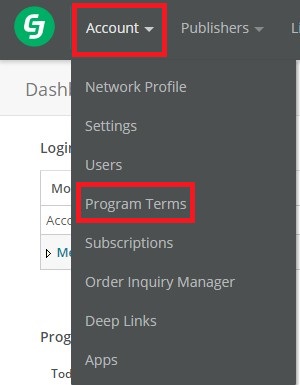
Once logged into your CJ Affiliate account you will navigate under the “Account” tab and click the “Program Terms” link. You will then be directed to the page where you will start to create the program terms for your affiliate program.

CJ 1

Step # 2 – Create New Program Terms

Click the button “Create New Program Terms”. If program terms have already been created  they will be listed and have the date created, the amount of publishers in each program term, pending offers, and pending applications (if any). Once the “Create New Program Terms” is clicked a new window will open and that is where you start adding the details and rules you want your affiliates to follow.

CJ 2

Step # 3 – Name Program Terms

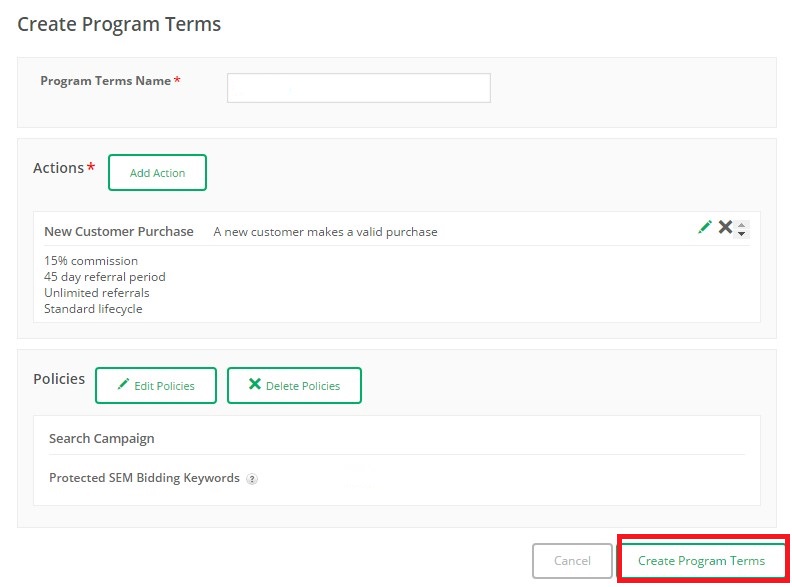
Here is where you will name the program terms, add actions (which includes the commission to be paid, cookie life, etc.), and add policies (SEM and other brand related rules).

CJ 3

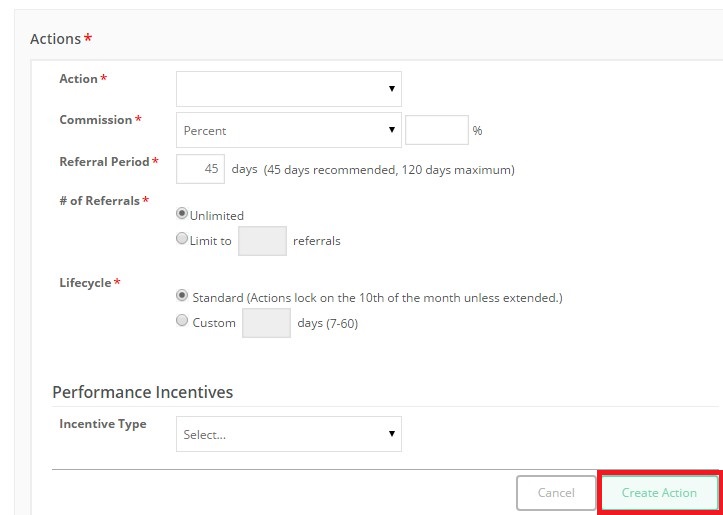
Step 4 – Add Actions to Program Terms

First, select an action from the “Action” drop down box. Here you may find various options like new customers, existing customers, or if you are paying by lead. Select the action you want to use. Note: If you want to pay commission at different levels for new vs. existing customers you will need to create an “action” for each. Next select the “Commission”. It could be in the form of a percentage or a flat dollar amount. You will then want to input the cookie life and the number of referrals you want to allow. The “Lifecycle” option is when the transactions that took place lock and cannot be edited. If you are going to offer performance incentives (i.e. tiered commission structure) you will make those additions.

CJ 4

Step # 5 – Create Policies

Now that the affiliate program actions are added, next you will add policies. This is where you will set your search engine marketing policies (including restricted keywords and recommended keywords for affiliates to use), website policy (URL policies, domain policies, etc.), additional promotional methods, and miscellaneous policies. You want to fill in as many of the policies as possible to ensure your affiliates understand what they can and cannot do.

CJ 5

Step # 6 – Finalize Program Terms

You are almost at the finish line. You named your program terms, added actions, added policies and reviewed everything for accuracy, now it is time to make them official. Click “Create Program Terms” and now they are live. If they are the first set of program terms created they will be your default terms, if there are multiple ones already there then you will want to make the new one your default (if you want).

CJ 6

Having up to date programs terms is critical so that affiliates can change their promotional methods if needed and to adjust to previous affiliate behavior. The key is to make sure you put everything affiliates cannot do in terms of promoting, so if an issue comes up you can simply reference the program terms and discuss it accordingly with the affiliate.