How To Create and Send ShareASale Affiliate Newsletters

Affiliate newsletters are an important component in managing relationship with your affiliates. Communicating with your affiliates is extremely important to keeping them engaged and active. Newsletters should have a personal touch and provide affiliates with information they can use to further promote your products. In January I wrote a post on writing effective newsletters, but today I am going to show you how to send a newsletter through the ShareASale interface. I will provide a step-by-step guide to this very important, but sometimes overlooked piece.

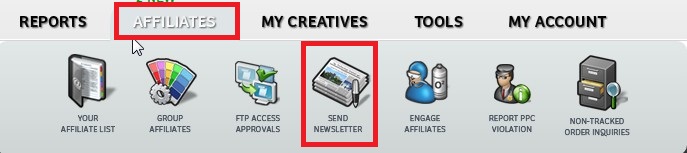
Step 1 – Locate the “Send Newsletter” Icon

After you log in to your ShareASale merchant account, hover over the “Affiliates” tab and you will see a “Send Newsletter” icon (looks like a stack of newspapers). Click the “Send Newsletter” icon.

Blog Post 1

Step 2 – Choose the Format You Want to Send the Newsletter In

You have three (3) options on how to send the newsletter to your affiliates:

  1. Text
  2. HTML
  3. Split Campaign.

When I send newsletters out for clients I use the HTML option because it allows me to create a robust newsletter with images and clickable links. The split campaign option is available when you want to maximize your open rate.

Blog Post 2

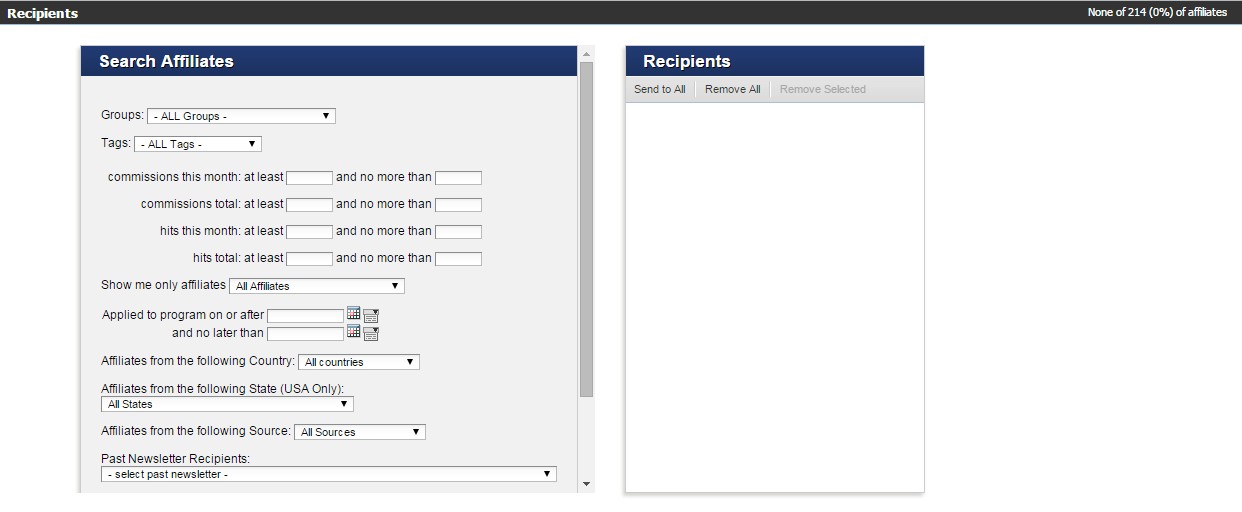
Step 3 – Determine the Recipients of the Newsletter

By default is provides a list of ALL affiliates to send to, but if you do not want to send it to all affiliates ShareASale allows you to search affiliates in many ways including: groups, tags, commissions earned, clicks, country they reside in, or even past newsletter recipients. Once you determine who is getting the newsletter you will see them in the recipients section to the right.

Blog Pst 3

Step 4 – Compose your Newsletter

This is the section where you actually compose your newsletter. For this articles purpose I have chosen the HTML format. You must enter a compelling subject line (you want affiliates to open it) and the body of the newsletter. ShareASale offers ways to customize and personalize newsletter using Macros. You can insert a Macro and have the affiliates name automatically populate when it is sent to them and also include specific creatives that will embed the affiliates ID automatically.

Blog Post 4

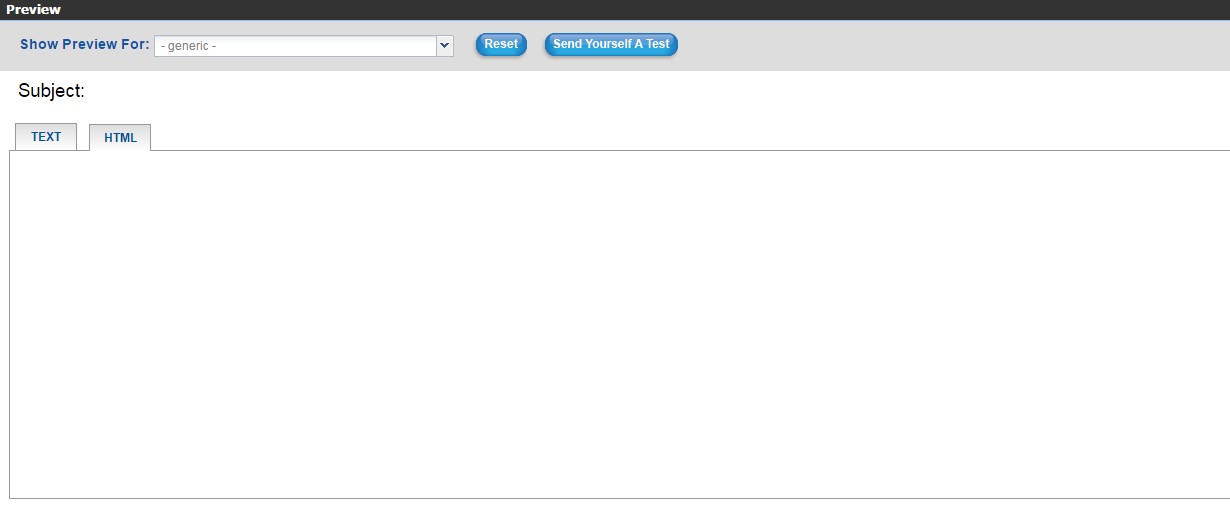
Step 5 – Preview your Newsletter

Once the subject line and body of the affiliate newsletter are complete you can preview it and make sure it is formatted the way you want and it is mistake free. In this step you can send a test to yourself to make sure all is good.

Blog Post 5

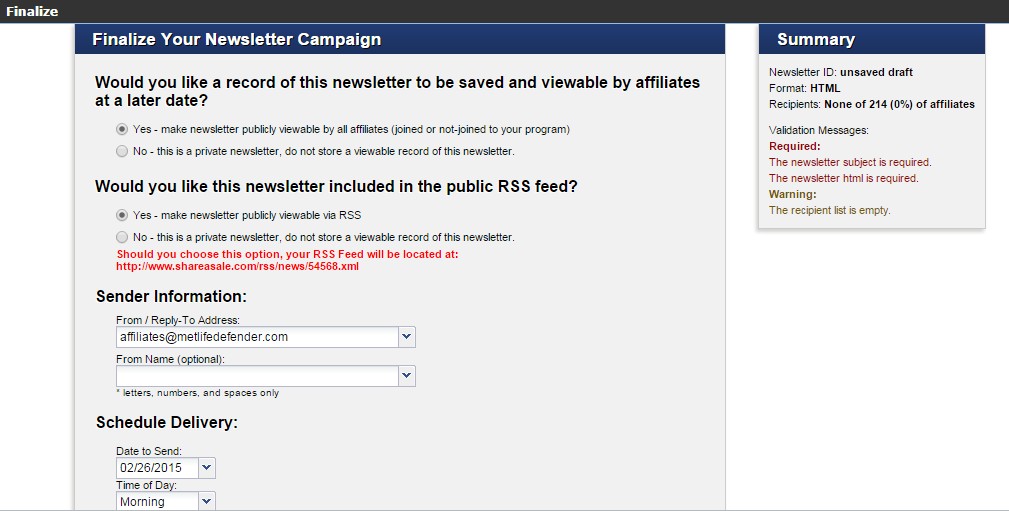
Step 6 – Finalize the Newsletter and Prepare to Send

This is the final step before the newsletter is sent to your affiliates. To the right you will see a summary that will include any items that need your attention. The ones that require your attention will be in red. Here you will choose a From/Reply-to address and the delivery date and time. You have the option to schedule it, but not for a specific time, only certain times during the day. Please note that Friday’s are not a recommended day to send newsletters.

Blog Post 6

There you have it, a guide to sending an affiliate newsletter through ShareASale. Like many of the other tasks in ShareASale it is straight forward. Next week I will show you how to locate affiliate newsletter open rate information.

A Step-By-Step Guide to Adding Affiliate Creatives to CJ Affiliate

As I mentioned in my last article on adding creatives to ShareASale, having a nice selection for affiliates to use is essential and optimal. Allowing the affiliates to choose which banners or links to put up will allow them to market your products more effectively. Recently I have set up and launched a number of affiliate programs on CJ Affiliate By Conversant and I thought I would provide a step-by-step guide to uploading creatives to your program on CJ Affiliate.

Step 1 – Locate the Links tab on the Main Navigation Menu of the Merchant Interface.

Once logged in you will need to click on the “Links” tab to begin the process of uploading new creatives (banners/text links) or modifying current creatives.

CJ - 1

Step 2 –  Select “Add New Link”

Click on the “Add New Link” button, a drop down menu will appear and you will then choose which new link (or banner) you want to upload.

CJ - 2

Step 3 – Select Text Link or Banner

As you can see in the image below you have a number of options as it pertains to creatives, but for the purpose of this tutorial we are going to focus our attention on text links and banners only.  Depending on what type of creative you are uploading you will then make the appropriate selection, either text link or banner.

CJ - 3

Step 4 – Uploading Text Links

You will want to give your link a name to differentiate it from others, as well as include the ad copy, a description, relevant keywords for affiliate to search with, a destination URL, and filling in the other fields shown in the image below. Make sure to include as much information about the link as possible in order to get full optimization with your affiliates.

CJ - 5

Step 5 – Uploading Banners

Similar to uploading text links you will want to name the banner, provide a description, include a destination URL, search keywords, and most importantly upload the banner.

CJ - 4

You will want to repeat the same process for each additional banner and text link. Unfortunately, CJ Affiliate does not have a mass banner/link option like ShareASale does, but it is still a straight forward process that is essential in daily affiliate program management.  Whether you have an affiliate program on CJ Affiliate, ShareASale, or another network your creative inventory should be taken seriously and showcased in professional manner.

Adding Affiliate Creatives to ShareASale: Step-By-Step Guide

Having a good selection of creatives for your affiliates to use is important. Banner ads and text links are the two most common forms of creatives given to affiliates to market products/services. Designing them and making them affiliate friendly is one thing, but how do you make them available to affiliates? I will show you a step-by-step guide to uploading banners and text links in ShareASale.

Step 1 –  Locating the My Creatives tab

After logging into to your ShareASale merchant account you want to locate the “My Creatives” tab on the top navigation.

SaS Creative 1

Step 2 – Select Add Creative

You will need to hover your mouse over the “My Creatives” tab, it will provide a drop down menu. The drop down menu will show the various options like “Add Creative”, “View Creative Inventory”, “Post Coupon Deals”, etc. You want to click on “Add Creative”. You will then be directed to the page where you can start uploading your newly created banners/text links.

SaS Creative 2

Step 3 – Uploading Banners

Whether you are uploading one banner or one hundred it is still a straight-forward process. ShareASale has made uploading banners extremely easy. Make sure that you are on the “Upload Banner” page and then you can either drag and drop the banner where it directs you or you can choose the file from your computer. If you want to upload multiple banners at once ShareASale has a “Mass Banner Upload” option that will save you time. Next, you will want to add the URL to where the banner will be linked, provide a name for the banner, assign a category, add alternative text (if applicable), and set the privacy option. The privacy option allows you to make the banner(s) public to all affiliates or to select affiliates of your choice. Once complete hit “Send to Us” and it will be ready for affiliates to use.

SaS Creative 3

Step 4 – Uploading Text Links

This is a very similar process to uploading banners. Make sure you are on the “Upload a Text Link” page. There is a drop-down box to toggle between uploading banners and text links. First, add the URL where the text link is going to be directed to. In the square you want to put exactly what you want your text link to say (i.e. 50% Off Widgets). As with uploading banners you want to name the link, assign it a category and set your privacy settings (i.e. public to all affiliates or specific ones). Once all the details of the text link have been added click “Send to Us” and it will be available in your creative inventory.

SaS Creative 4

Step 5 – Check Uploaded Banners/Text Links

Once you have uploaded all your banners and text links you should check to make sure they loaded properly.  On the top navigation you want to click “My Creatives” and then “View Creative Inventory”. From there scroll down and you will see two tabs titled “Banners” and Text Links”. This will tell you how many banners and text links you have.

ScreenHunter_423 Feb. 05 10.44

There you have it, a quick guide to uploading banners and text links in ShareASale. It is not difficult, but if you are not familiar with the interface it can be time consuming and tedious. Providing a thorough inventory of banners and text links is essential, therefore, knowing the most popular sizes to create is imperative. Want to know the most popular affiliate banner sizes? Check out my post on affiliate banner ads.