Meaning of Postback: Affiliate Marketing Program Context

When setting up an affiliate program, one of the key decisions an advertiser/merchant has to make is what tracking method to use.

Most present-day affiliate programs rely on a pixel embedded into the confirmation/”thank you” page. This (somewhat of an industry default method) is meant to close the loop between the initial end user click on an affiliate link and the end user’s reaching the thank-you-for-your-business page. The affiliate commission is then triggered by (and credited upon) the pixel firing at the moment the customer reaches their confirmation page.

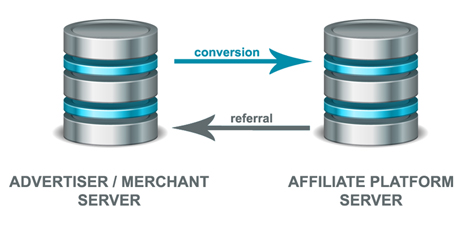
Postback tracking, on the other hand, represents a slightly more technically sophisticated of a method of crediting affiliates for the business they refer. Its essence is grounded in server-to-server posting, whereby instead of relying on the pixel firing, the conversion record (and consequential affiliate commission crediting) is triggered by the advertiser’s server passing the necessary data to the affiliate program’s platform’s server.

Server-to-server affiliate postback

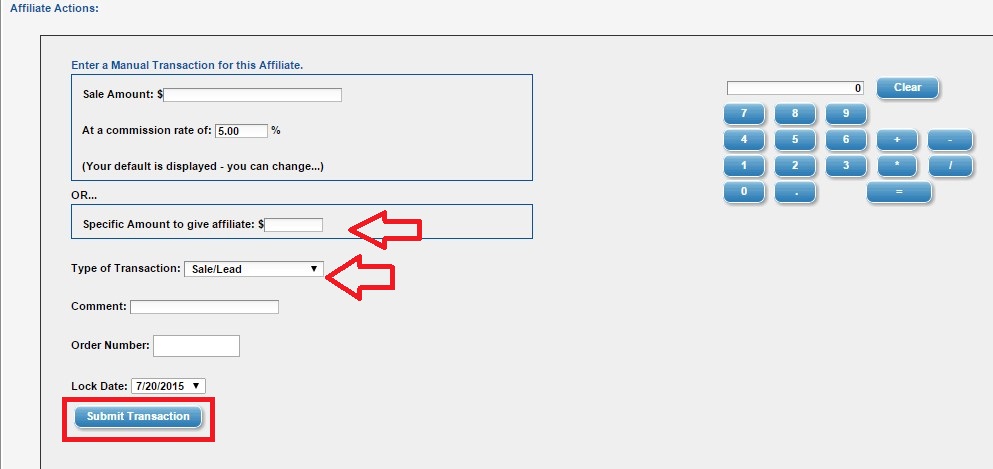
Let me give you a real-life example. We have a client who employs two affiliate payment models within the same affiliate program: PPL (pay-per-lead) and PPS (pay-per-sale). The affiliate program is run on an affiliate network which supports both pixel-based tracking, and postback tracking. The advertiser in question is paying affiliates $X per lead when a referred user signs up for a free account, and (on top of the PPL amount) Y% of the sale amount, should the lead convert into a paying customer. For the PPL part this affiliate program relies on pixel firing on the confirmation page, whereas the PPS payout is posted (to the affiliate network’s server) by the advertiser once/if the sale occurs.

While implementation of postback requires a higher level of technical expertise (than the simpler-to-integrate pixel-based tracking), it’s a method that is widely supported by affiliate platforms of all types: including all types of affiliate networks and affiliate software for in-house-based affiliate tracking/programs.

How to Recruit Affiliates in CJ Affiliate Network

In a previous post titled, “How to Find Affiliates to Recruit into Affiliate Program”, I showed you where you can go to find affiliates for your affiliate programs and today I am going to show you how to use CJ Affiliate (if you are a merchant on their network) to recruit affiliates into your program. Using CJ Affiliate’s network recruiting tool should not replace active outreach to prospective affiliates, but can be a nice compliment to your overall recruiting efforts. Here is a step-by-step guide to recruit affiliates in CJ Affiliate.

Step 1 – Navigate to the “Manage Publishers” Tab

Once you are logged into your CJ Affiliate account you will need to navigate to “Manage Publishers” tab.CJ 1

Step 2 – Go to Publisher Recruitment Tab

Once on the “Manage Publishers” page you will then have to navigate to the “Publisher Recruitment (beta)” sub tab.

CJ 2

Step 3 – Start Recruiting Affiliates

This is where it gets fun! You have an array of options to use in recruiting potential affiliates to your program. You can use the “keyword” function as well publishers by category, country, network earnings, geographic source, and publisher classification. Regardless of the option you use to filter out prospective affiliates you will have to “check” the box to the left of the publisher’s name. By checking the box you are going to be sending them an invitation to join your affiliate program. Once you have selected the affiliates you want to invite to join your program you will have to hit the “Make Offer” button.

CJ 3

Step 4 – Confirm Your Offer(s) to Affiliates

Once the “Make Offer” button is hit, a pop-up will appear and you will have to confirm the offers to the affiliates. If you are satisfied you will then click “Ok”, but if you want to modify anything simply hit cancel and you can go back and make any necessary changes.

CJ 4

Step 5 – Accompany Offer Push with Email  Invite

When asked how they “prefer to be contacted by affiliate managers” (as part of Affiliate Summit’s 2014 AffStat Report questionnaire), nearly 82% of affiliates respond: email.

2014 AffStat Report

While most affiliate managers in charge of CJ-based affiliate programs quit the process at Step 4, we at AM Navigator encourage you to go further and reach out to the affiliates who now have a pending offer (from you) to review. Accompanying your offer push(es) with email outreach dramatically maximizes the effectiveness of this affiliate recruitment method.

As I mentioned at the beginning of this post, you should not use this as your only recruitment activity. This is a compliment to your other activities geared at onboarding new affiliates. The positive aspect of using CJ to recruit affiliates is that they are already a member of the network and it will take a simple click on their end to accept your offer. We actively use this tool when managing clients programs and it has been a very successful initiative.

How to Give an Affiliate a Bonus Using ShareASale

A few weeks ago I wrote a post that showed advertisers that operate their affiliate program on CJ Affiliate how to provide their affiliates a bonus. In today’s post I am going to show merchants how to manually bonus their affiliates that operate on the ShareASale affiliate network. I will provide a step – by – step guide to follow during the process.

Step 1 – Log in to Merchant Account and Click “Affiliate List” under the tab of “Affiliates”

After logging into your ShareASale merchant account you want to hover over the “Affiliates” tab in the main navigation and click “Affiliate List.” The affiliate list will show you all your current affiliates in order of performance to date. The top performers will be at the top of the list.SaS 1

Step 2 – Locate Affiliate You Want to Bonus

Once you are in your affiliate list scroll down the list until you locate the one to manual bonus. Once located click the “Details” link under their name. It will take you to their individual affiliate page where the bonus activity will take place.

SaS 2

Step 3 – Submit the Bonus

Once you are on the affiliates ShareASale page you will need to scroll down until you get to the section titled “Affiliate Actions”. From there you will put the desired bonus amount and the type of transaction. You will fill in the field “Specific Amount to Give Affiliate” (i.e. the dollar amount) and change the drop down box to “Bonus”. Once complete you must hit “Submit Transaction” for it to be complete.

Please note: Even though it is not a sale/lead tracked through ShareASale there will still be a 20% fee charged to you for the manual bonus transaction.

SaS 3

Using the manual bonus feature in ShareASale is straight forward process and necessary for rewarding performance, paying for placements with affiliates, and even correcting transactions (I will dive into this next week).