Top 4 Compensation Models in Affiliate Marketing Programs

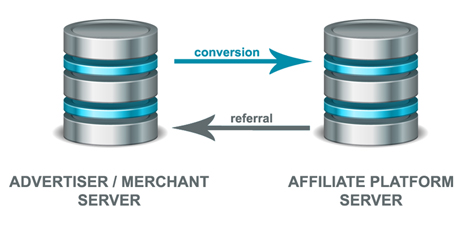
If you want to promote your goods through affiliate marketing, you need to understand the main principle: being performance-based, affiliate marketing’s essence can be defined by an “action-leads-to-payment” scenario. There are several compensation models, which merchants apply when interacting with affiliates. Let’s look at them and sort them out in the context of your business. We will also provide real-life examples for each of the four models listed.

Pay per Sale (PPS)

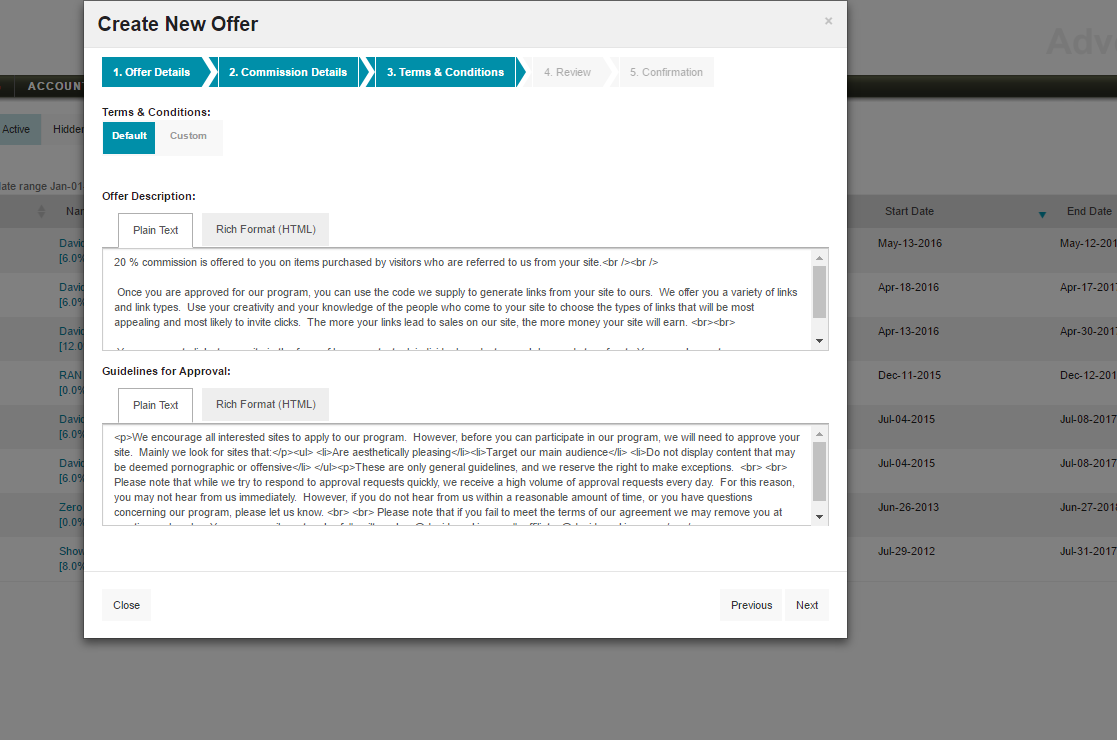
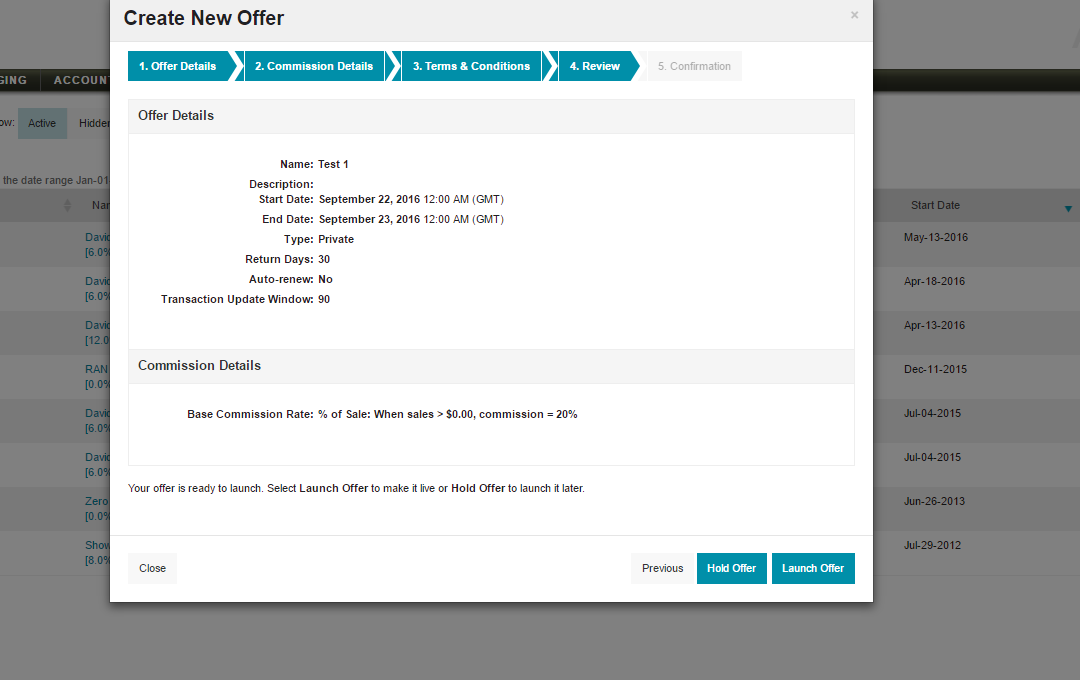
Sometimes also called “cost per sale”, PPS is, by far, the most frequently used compensation model by affiliate programs. In this case, a merchant pays the agreed commission percentage of the sale closed as a consequence of the affiliate’s action.

Pay per sale model
Amazon’s pay per sale commission example

Pay per Lead (PPL)

In the PPL scenario, we’re talking about a flat amount that is paid to affiliates for the leads (or potential customers) that are driven as a result of their activity. It isn’t unusual to see Pay per Lead used in combination with the aforementioned Pay per Sale model.

Pay per lead model
Deluxe Payroll pay per lead affiliate compensation

Pay per Click (PPC)

PPC is a model of remunerating affiliates for clicks leading visitors to the merchants’ websites. As it tends to be more susceptible to fraudulent activity, we do not recommend using this method unless you have strong fraud prevention tools that can analyze the ways in which the clicks (that direct traffic to your website) are generated.

Pay per click model
Examples of affiliate programs that pay for clicks

Pay per Call (PPCall)

Finally, PPCall is a model of compensating affiliates for the leads / prospects generated by calling the merchant directly. This model facilitates offline sales and provides for the affiliates to earn on phone calls avoiding phone number “leaks”. This happens when the affiliate-referred customers can see the phone number on the merchant’s website and place orders over the phone but not through the affiliate links — thus, depriving affiliates of their earnings. That is the case when Pay per Call is the best solution to prevent phone leakage (PPCall platforms use the dedicated toll-free phone numbers to track PPCall traffic and compensate affiliates accordingly).

Pay per call model
Examples of pay-per-call programs

Comparing all affiliate compensation methods, we see that the PPS model is the most popular so far and is often successfully used conjointly with the PPL model. However, you need to be careful with low-quality leads, which may be driven by incentive affiliates or result from fraudulent activity.

As for the PPCall model, it is usually not considered by affiliate programs as the only compensation option and is good in combination with PPS or PPL for closing phone sales or subscriptions.

Whatever method you choose, make sure you carry out deep analysis and list all the advantages and disadvantages to define which model may work best for you.

ShareASale Auto-Deposit Feature: How to Make the Most of It

Managing an affiliate program requires careful attention to details. Effective program management is not only about recruiting, activating, and compliance policing, but also little details that keep the program operating and functional at all times. Having all affiliate communication documents uploaded, an email address where affiliates can contact the program manager anytime, but for ShareASale merchants maybe the most important detail is enabling the auto-deposit function in the ShareASale interface.

Why It Is Important

ShareASale gives merchants the option to auto-deposit funds into their account when the balance hit a certain threshold. It is recommended that all merchants set up this feature before launching. Having an account balance go negative will result in all affiliate links being turned off (until the account balance is positive) and you can guess what that means; unhappy affiliates.

How to Enable It

In this post, I will explain step-by-step how to set it up to ensure your program never goes offline due to a low or negative account balance.

Step # 1 – Navigate to the Deposit Center

After logging in to the ShareASale merchant interface go to “My Account” and then “Deposit Center”.

Step # 2 – Make a deposit or set up auto-deposit

This step a merchant can either make a deposit with a credit card or set-up the auto deposit feature. Merchants can make a deposit at any time even if the auto-deposit feature is enabled. For example, if they anticipate increased traffic and sales during a given period the deposit can be done at this step. To set up the auto-deposit feature click the “Update Auto-Deposit Settings” button.

ShareASale Affiliate Program - Funds Deposit

Step # 3 –  Setup Primary and Secondary Payment Methods

Merchants should have two methods (if possible setup the backup gateway) in case one does not work. Input credit card # 1 in the primary payment method and credit card # 2 in the secondary payment method. The next step is to turn the auto deposit on and set up the low balance trigger and how much to deposit once the low balance trigger has been enabled. It is recommended to not let a merchant account dip below $100, but the more in the account the better. Once all sections are complete, hit “Update Settings”.

ShareASale Auto-Deposit

Step # 4 – Setup Complete

Now the auto deposit setting is enabled. Merchants can now see their current settings and the last four digits of the primary payment method. All of the settings can be adjusted at any time. Simply follow the same steps.


Attention to details in managing affiliate programs is vital. Making sure the affiliate account is fully funded and has backup options is also critical to the success of a program. If an affiliate sees the auto deposit feature is off they may be hesitant to apply to join. Sometimes it is the little things that matter the most.

Optimizing a ShareASale Affiliate Program with Internal Logos

There are numerous ways ShareASale merchants can optimize their program to increase their brands awareness to prospective affiliates. In the past I, have discussed various program optimization tips on ShareASale to help recruit affiliates, but today I am going to outline a free ways to get the word out there about your affiliate program on ShareASale. It is called “Internal Logo Files.”

ShareASale uses merchant’s logos in various places within their interface to help attract affiliates to merchant’s affiliate programs, and now I will describe where those places are and the requirements.

First, to navigate to this section of their interface you will go to “My Account” -> “Internal Logo Files.”  It will bring you to a page that looks similar to this (see below)

Main Logo

ShareASale uses this logo on the merchant details page, or better known as the page where affiliates sign up to an affiliate program. It can be up to 500 x 500 px, but make sure it is not too large and doesn’t overtake the page. Here is an example:

Search Results Logo

This logo is used on the merchant search results page. When affiliates are looking for new merchants to promote a merchant will stand out more with their 88 x 31 logo shown along with vital statistics of the affiliate program. Having a logo there gives a merchant a better opportunity to be seen and seriously considered. Here is an example of a merchant with one and without:

Product Showcase Logo (small)

If a merchant has a data feed their logo will be displayed when affiliates create product showcases for specific products. This logo should be 120 x 90 px. Here is an example:

Product Showcase Logo (Pop-up)

This logo is very similar to the one right above, but it will be shown when an affiliate chooses the pop-up option. It should be 400 x 75 px Here is an example:

ShareASale Merchant Match

This particular logo helps ShareASale to recruit individual affiliates from local marketing events (Meet-Ups), conferences, and other interactions (magazine, email newsletters, etc.) This logo should be 216 x 384 px. Here is an example:

Merchants, there are up to 5 additional ways to spread the word about your programs via logos within the ShareASale interface (free of charge). It is highly recommended to take advantage of as many of them as possible because you never know what you could be missing out on.

Adding a Product Data Feed to Rakuten Affiliate Network

It is simply amazing how many merchants we have worked with over the years that neglect important aspects of their affiliate program. When we take over management of programs it is disturbing to see the number of advertisers that do not utilize product feeds. There are some advertisers that cannot due to their limited number of products, but it should be a priority for advertisers.

When advertisers do not utilize a product feed they are neglecting a powerful segment of affiliates. Those include price comparison and product engine sites, but also content affiliates can utilize product feeds in the course of their marketing. In today’s post, I am going to include and discuss product feeds on Rakuten Affiliate Network, the requirements for advertisers and how to upload a feed file.

Creating a product feed file for Rakuten Affiliate Network is pretty straight forward, but has to include specific fields in order for it to be approved. The required fields include: product name (link text), image URL, product URL, assigned to all (affiliates), retail price, SKU, primary category, long description, discount, is deleted (in stock or out of stock), currency (USD). All fields titles in the file provided by Rakuten must be included in the file, but only the ones listed above need to be filled in. If there is an issue with the file when uploading a message will be sent.

Once the csv file is created with all the products to be available to affiliates you need to upload it within the advertiser interface. Go to LINKS –> PRODUCT LINKS. You will then click the “Import Product Links” button (see image below). This will take you to the screen where you will upload the file and submit it.

linkshare-product-links

To make sure the file you are about to upload has all the correct fields, just reference the table on the page. All the bold text is required, so if it is not in the file correct it before uploading. Next, hit “Browse”, find the file on your computer and hit “upload”.  Note: there is a sample csv file available to download here as well.

linkshare-import-product-links

That’s it. The file has been uploaded and an email will be sent to the person who is on file within the advertiser interface when complete. If there are any issues the person will be contacted as well. Give it about 30 minutes and check the “Product Links” section to make sure the file is there and all images are working. Below is a shot of how the product links (feed) should look when loaded properly.

linkshare-product-links-1


Creating an Affiliate Offer in Rakuten Affiliate Network

You are launching your affiliate program on Rakuten Affiliate Network and the set-up process is just about complete with the exception of one item, the affiliate offer (baseline offer). The offer is perhaps the most important part of the program. It houses the program details (e.g. payouts, cookie life, and terms of service). I will be providing a step-by-step guide to creating and publishing offers for your affiliate program on the Rakuten Affiliate Network.

Step 1 – Go to Create Offer Page

Once logged in to your RAN account move over to the “Offers” tab and select “Create Offer”

linkshare-offers-1

Step # 2 – Begin Creating the Default Offer

This is the first step in actually creating it. Name the offer (if you plan to have multiple offers add a V1 or add commission percentage to the name so it can be differentiated), add a start an end date, select if it will be private or public, and cookie length. Once those pieces of information have been added click “Next”.

linkshare-offers

Step # 3 – Add Commission Details

This section is where you will add the payout details for the affiliates. There are four different options, but you must select the one that best fits your business. The most common is “% per sale”. After the percentage is added tiers can be added like if there are 25 sales in a given month from a specific affiliate then the percentage will be X%. Click “Next” when ready for the following step.

linkshare-offers-2

Step # 4 – Adding Terms and Conditions

This is a vital step and needs to be as detailed as possible. RAN provides generic terms and conditions, but I recommend creating your own that include exactly what affiliates can and cannot do and the penalties if they fail to comply. This is where the PPC rules will be added, coupon policy, FTC statement, and any other rules you want the affiliates to follow. Click “Next”.

linkshare-offers-3

Step # 5 –Review Created Offer

Almost complete! Now, review the offer to ensure accuracy. Once reviewed and verified you can either hold the offer or launch it. By hitting launch, it will go live immediately and holding it will save it and when ready it can be launched.

linkshare-offers-4

When the offer is officially launched go to the main navigation and hover over “Offers” and click “Offers”. It will take you to a page to view all current live offers, any hidden offers, expired offers, or upcoming offers. Here you can also edit the offers, and change the designated default offer to the one of your choosing.

*Note- In order to extend private offers of the baseline to affiliates through the RAN interface a copy (mirror) of the baseline offer needs to be created or else offers cannot be extended using the baseline offer. However, if custom offers are made they can be extended without creating a “mirror” offer. 

Setting up offers is not difficult, but it is a task that need to be completed with precision. Once you set up one the rest are easy (if you decide to have multiple).

Adding Banners in Rakuten Affiliate Network

Continuing the series of articles on the Rakuten Affiliate Network interface, today will be centered around adding banners. We are back discussing links, but more specifically, how to add banners to the account for affiliates to use. A step-by-step guide will be outlined to complete the task of uploading banners in your Rakuten Affiliate Network account.

Step # 1 – Click the “Links” button in the main navigation

In a similar way to adding text links, you will click the “links” button in the main navigation. You will be shown all the different types of links available, then click “banners”.

LS 2

Step # 2 – Add New Banners

You have the option to add banners manually or import them via a csv file. Click the “add new banners” button. If there are any banners currently in your inventory you have the ability edit them here too.

LS 4

Step # 3 – Add New Banners (Con’t)

This is part where you add the details of the banners. You have the option to host the banners on your server or have RAN (Rakuten Affiliate Network) host them, the choice is yours, but fees may apply if RAN hosts them. First, choose the banner file you want to load, name the banners (e.g. Labor Day Sale – 250×250), landing page URL (could be homepage or a specific dedicated page to the sale), size of the banner, start and end date, and who the banner will be assigned to. You can assign the banner to all affiliates, a group, or individual affiliates (just like text links).

If there are multiple banners to upload simply hit the button “add another”. It will add another box where you place the details of the banner, just like you did with the first one. You do that until all the banners have been input and hit save. You will then be directed to the entire live inventory of banners to view and edit if necessary.

LS 3

Another quick guide to navigating the Rakuten Affiliate Network interface is complete. Providing creatives to affiliates is a must do task, but also must be done correctly. If you are having trouble with what sizes to create please ask me in the comment section and I will provide a list of popular banner sizes.

A Guide to Affiliate Program Competitive Intelligence Research

When introducing an affiliate program to your marketing mix it is essential to treat it the same as your other channels (i.e. search, paid search, email, retargeting, etc.) because it is just as important, and in some cases the most important piece to a company’s marketing mix.  Why do I say that? Simple, I have seen many occasions where a company will just throw an affiliate program up on a network without doing any competitive research and they hope for the best. An affiliate program can be a very profitable avenue if set up and managed correctly. Conducting a comprehensive competitive intelligence review is vital and should be done when starting (it should also be done periodically once the program is live)a new affiliate program so that you are competitive and attract the desired affiliates. There are eight (8) main components to a competitive intelligence report and they include: competitor’s name, affiliate platform, CPA, incentives, cookie life, action locking period, ranking, and EPC. I will go over each component in detail to ensure you capture all the necessary information.

#1 – Competitor’s Name

This may seem pretty obvious, but you may discover that they operate under multiple names or have multiple affiliate programs, so getting their name and the URL’s they use for any and all affiliate programs.

#2 – Affiliate Platform

Once you gather the competitors name (s) the next step is to see what platforms or affiliate networks they currently run their affiliate programs on. They may run their program on a major network (CJ Affiliate, ShareASale, Rakuten LinkShare, etc.), but they may also run it on a private software (CAKE, Post Affiliate Pro, HasOffers). A major affiliate network may not be the best place for every merchant, so finding where your competition operates helps in making a platform decision.

#3 – CPA (Cost Per Action)

This is an important component of the intelligence gathering. As a merchant you want to make sure your CPA (or Cost per Lead) is competitive with the competition because affiliates take payout into consideration when promoting merchants and if you are totally off line with the competition it is less likely you will have high quality affiliates promoting your product/service. With that being said, determining the CPA must also make sense financially, not just because the competition is doing it.  Remember if you are on a major network they take a percentage of every sale too, so keep that in the back of your mind when determining payouts.

#4 – Incentives Offered

Does your competition offer incentives to affiliates? If so, take note of them and try and incorporate them into the affiliate strategy. For example, a merchant is offering a $50 first sale bonus, or a tiered commission structure (default is 10%, but based on sales it can increase to 15%). The examples mentioned will also help in determining the CPA for the program, but also helps to increase affiliate activation once approved.

#5 – Cookie Life

Affiliates like to see a longer cookie life, but in reality a majority of affiliate sales occur within the first couple days. If the competition has a 30 day cookie the best bet is to have your cookie length at least 30 days, but can be higher. For an activation tip you can offer select affiliates a cookie life increase if they perform a certain action (i.e. 2 sales in the next 7 days and their cookie will be bumped two-fold ).

#6 – Action Locking Period

This is important for the fact that product returns happen and merchants want to protect themselves from paying commissions on returned merchandise.  ShareASale’ s default locking period is the 20th of the following month in which the transaction took place, where CJ Affiliate’s default is the 10th of the month. However, the locking period can be customized to a merchants return policy. If a private label platform is chosen then the merchant selects the day transactions lock and payments are made.

#7 – Program Ranking

Checking how your competition ranks on a particular networks will show you the amount of success they are having (or not) and if they have an affiliate base that will be substantial in promoting your products/services. As examples, CJ Affiliate uses a 1 – 5 bar system. 1 being the lowest and 5 being the highest, whereas ShareASale ranks their top 100 merchants.

#8 – EPC (Earnings per 100 Clicks)

This metric is important because it shows merchants if affiliates are actually making money promoting the competitors’ products/services. Merchants with a high EPC shows that affiliates are making money and its offers are effective. On the other hand, merchants with low or no EPC numbers show the offers and program are not performing well and affiliates are not making money. These numbers will help aid in the decision of what platform to choose. One network may have high EPC numbers, and the other may have lower numbers, which means the network with the high numbers has affiliates that cater to that specific market and should be considered.

Creating and managing an affiliate program takes deep competitive intelligence in order to be successful. The eight components of a competitive intelligence report should be compiled and reviewed intensively and then based on the data create an attractive, yet competitive affiliate program that has the chance to be successful for years to come.

Top 5 ShareASale Affiliate Program Setup Mistakes

As an Outsourced Program Manager (OPM), I manage accounts in a variety of verticals and on all the major affiliate networks, but merchants seem to encounter the same issues when setting up their affiliate program on their own. Whenever we (AM Navigator) get a new client (with an affiliate program) we perform an audit to determine what needs to be fixed in order promote the affiliate program in the proper light and there seems to be the same items most (not all) merchants either neglect or complete partially. This post will cover the top 5 items merchants on the ShareASale affiliate network neglect to include or complete partially when setting up their affiliate program.

#1 – Program Agreement (AKA Terms of Serivce)

This document is probably the most important as it is the “rules” by which affiliates need to follow. Important points to include are:

  • PPC (Pay-Per-Click) guidelines – Be specific on what words are off limits and what words can be used.
  • FTC policy
  • Coupon policy (if applicable)
  • Fraud policy

#2 – Emails sent to affiliates during the sign-up process

This is another piece that many merchants do not capitalize on. The 3 emails affiliates receive from ShareASale on the merchant’s behalf are:

  • Apply Email – This is sent to an affiliate once they apply to join a merchants affiliate program. This should tell the affiliate that their application is being reviewed and they will be contacted within 24 hours with a decision.
  • Decline Email – This is similar to the apply email. It only gets sent to affiliates that merchants reject from their program, but in fairness to the affiliate it should include reasons why they may have been declined and give them an opportunity to contact the program manager and/or re-apply .
  • Approval Email – Merchants get this one wrong the most of the three (3). This email should include information about the program (description of the company and main selling points of the affiliate program), PPC guidelines (like outlined in the program agreement), links for them to use immediately (have the code available for them to simply copy and paste), and contact information for the affiliate manager.

#3 – 88×31 Logo

You may be asking yourself, a logo? The 88×31 button banner is important because it is one of the most popiular sizes affiliates use, but it also provides additional exposure when affiliates are looking for merchants to promote. In the merchant search section affiliates view potential matches and a logo is included with many of them and it helps to “convert” the prospect into an affiliate. A simple logo can be the difference.

#4 – Banners

I have seen merchants have over 50 banners available and then I have seen a few that have 5. There is no “magic number” for banners, but having the most popular sizes available is critical. Merchants need to provide sizes that affiliates can use. I have seen obscure sizes and then the most popular sizes are missing and I scratch my head, but here is a link to the most popular banner sizes.

#5 – Newsletters

Last, but certainly not least, newsletters. A good majority of merchants I have done audits for either send newsletters out infrequently or not at all. The latter is most common. How are merchants supposed to communicate with affiliates? The newsletters should be sent out bi-weekly, but at the very least monthly. They should include any news about the program, coupons/deals, links to creatives, and contact information.

I could have gone on forever, but I gave the top 5 items many merchants either neglect or do halfhearted when setting up their affiliate programs. Every aspect of an affiliate program should be completed fully, no matter how relevant a merchant thinks it is. Affiliate managers jobs are to “WOW” affiliates and get them to promote their products/services and having a fully integrated and set up program is the first impression to all.

How to Create Program Terms on CJ Affiliate Network

A very important aspect of a starting and maintaining a successful affiliate is program terms. “Program terms” is a phrase/term used by CJ Affiliate network to help merchants relay the affiliate program rules (and pay out structure) to affiliates. As important as they are to the success of a program, many merchants do not invest enough time into creating them to ensure affiliates understand and therefore, play by the rules. In this post I will go over step-by-step on how to create them and what should be included.

Step # 1 – Navigate to Program Terms Page

Once logged into your CJ Affiliate account you will navigate under the “Account” tab and click the “Program Terms” link. You will then be directed to the page where you will start to create the program terms for your affiliate program.

CJ 1

Step # 2 – Create New Program Terms

Click the button “Create New Program Terms”. If program terms have already been created  they will be listed and have the date created, the amount of publishers in each program term, pending offers, and pending applications (if any). Once the “Create New Program Terms” is clicked a new window will open and that is where you start adding the details and rules you want your affiliates to follow.

CJ 2

Step # 3 – Name Program Terms

Here is where you will name the program terms, add actions (which includes the commission to be paid, cookie life, etc.), and add policies (SEM and other brand related rules).

CJ 3

Step 4 – Add Actions to Program Terms

First, select an action from the “Action” drop down box. Here you may find various options like new customers, existing customers, or if you are paying by lead. Select the action you want to use. Note: If you want to pay commission at different levels for new vs. existing customers you will need to create an “action” for each. Next select the “Commission”. It could be in the form of a percentage or a flat dollar amount. You will then want to input the cookie life and the number of referrals you want to allow. The “Lifecycle” option is when the transactions that took place lock and cannot be edited. If you are going to offer performance incentives (i.e. tiered commission structure) you will make those additions.

CJ 4

Step # 5 – Create Policies

Now that the affiliate program actions are added, next you will add policies. This is where you will set your search engine marketing policies (including restricted keywords and recommended keywords for affiliates to use), website policy (URL policies, domain policies, etc.), additional promotional methods, and miscellaneous policies. You want to fill in as many of the policies as possible to ensure your affiliates understand what they can and cannot do.

CJ 5

Step # 6 – Finalize Program Terms

You are almost at the finish line. You named your program terms, added actions, added policies and reviewed everything for accuracy, now it is time to make them official. Click “Create Program Terms” and now they are live. If they are the first set of program terms created they will be your default terms, if there are multiple ones already there then you will want to make the new one your default (if you want).

CJ 6

Having up to date programs terms is critical so that affiliates can change their promotional methods if needed and to adjust to previous affiliate behavior. The key is to make sure you put everything affiliates cannot do in terms of promoting, so if an issue comes up you can simply reference the program terms and discuss it accordingly with the affiliate.

Meaning of Postback: Affiliate Marketing Program Context

When setting up an affiliate program, one of the key decisions an advertiser/merchant has to make is what tracking method to use.

Most present-day affiliate programs rely on a pixel embedded into the confirmation/”thank you” page. This (somewhat of an industry default method) is meant to close the loop between the initial end user click on an affiliate link and the end user’s reaching the thank-you-for-your-business page. The affiliate commission is then triggered by (and credited upon) the pixel firing at the moment the customer reaches their confirmation page.

Postback tracking, on the other hand, represents a slightly more technically sophisticated of a method of crediting affiliates for the business they refer. Its essence is grounded in server-to-server posting, whereby instead of relying on the pixel firing, the conversion record (and consequential affiliate commission crediting) is triggered by the advertiser’s server passing the necessary data to the affiliate program’s platform’s server.

Server-to-server affiliate postback

Let me give you a real-life example. We have a client who employs two affiliate payment models within the same affiliate program: PPL (pay-per-lead) and PPS (pay-per-sale). The affiliate program is run on an affiliate network which supports both pixel-based tracking, and postback tracking. The advertiser in question is paying affiliates $X per lead when a referred user signs up for a free account, and (on top of the PPL amount) Y% of the sale amount, should the lead convert into a paying customer. For the PPL part this affiliate program relies on pixel firing on the confirmation page, whereas the PPS payout is posted (to the affiliate network’s server) by the advertiser once/if the sale occurs.

While implementation of postback requires a higher level of technical expertise (than the simpler-to-integrate pixel-based tracking), it’s a method that is widely supported by affiliate platforms of all types: including all types of affiliate networks and affiliate software for in-house-based affiliate tracking/programs.