Having a good selection of creatives for your affiliates to use is important. Banner ads and text links are the two most common forms of creatives given to affiliates to market products/services. Designing them and making them affiliate friendly is one thing, but how do you make them available to affiliates? I will show you a step-by-step guide to uploading banners and text links in ShareASale.
Step 1 – Locating the My Creatives tab
After logging into to your ShareASale merchant account you want to locate the “My Creatives” tab on the top navigation.
Step 2 – Select Add Creative
You will need to hover your mouse over the “My Creatives” tab, it will provide a drop down menu. The drop down menu will show the various options like “Add Creative”, “View Creative Inventory”, “Post Coupon Deals”, etc. You want to click on “Add Creative”. You will then be directed to the page where you can start uploading your newly created banners/text links.
Step 3 – Uploading Banners
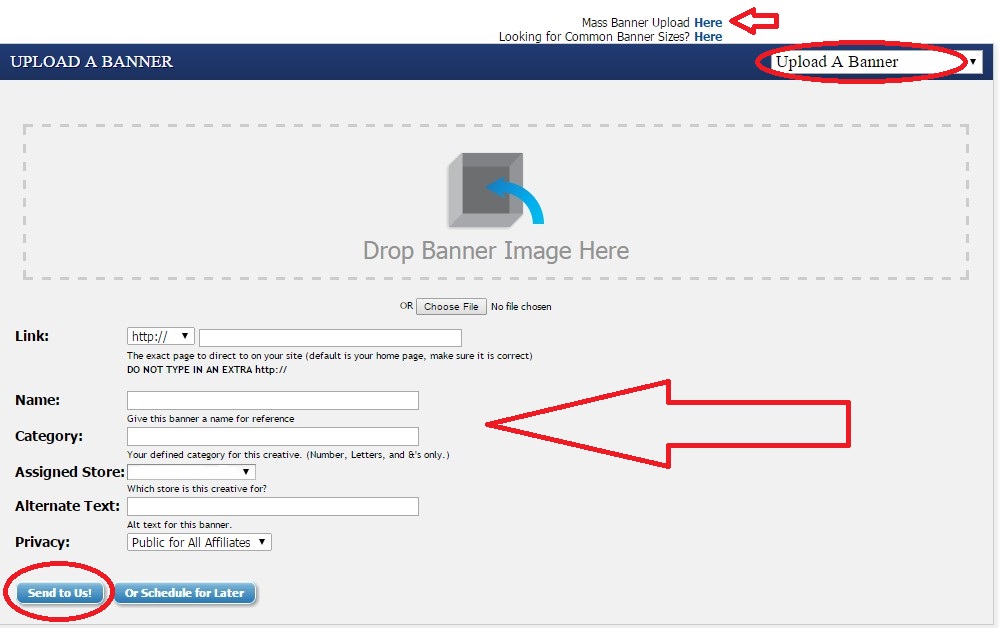
Whether you are uploading one banner or one hundred it is still a straight-forward process. ShareASale has made uploading banners extremely easy. Make sure that you are on the “Upload Banner” page and then you can either drag and drop the banner where it directs you or you can choose the file from your computer. If you want to upload multiple banners at once ShareASale has a “Mass Banner Upload” option that will save you time. Next, you will want to add the URL to where the banner will be linked, provide a name for the banner, assign a category, add alternative text (if applicable), and set the privacy option. The privacy option allows you to make the banner(s) public to all affiliates or to select affiliates of your choice. Once complete hit “Send to Us” and it will be ready for affiliates to use.
Step 4 – Uploading Text Links
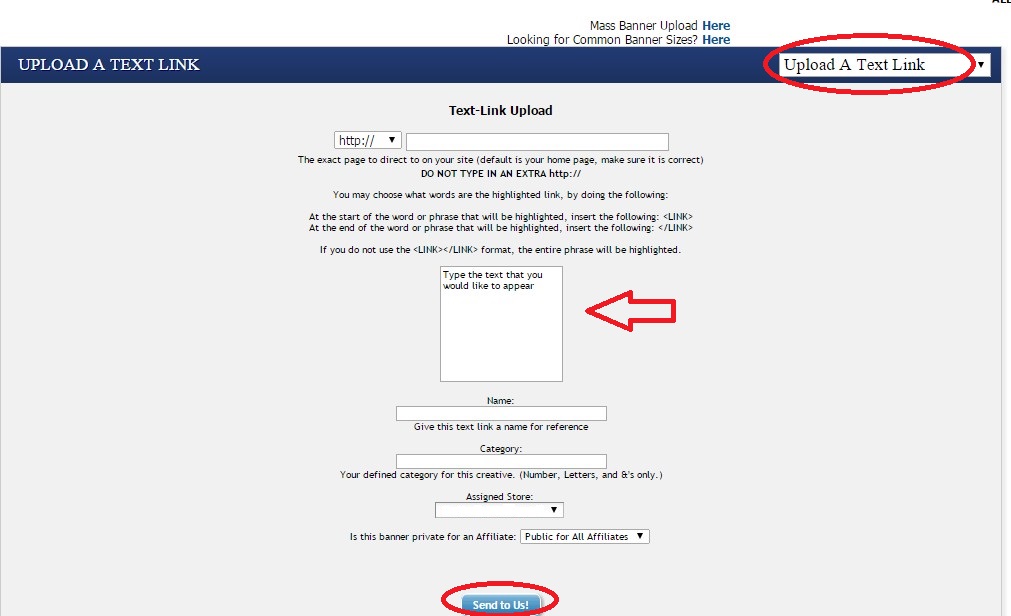
This is a very similar process to uploading banners. Make sure you are on the “Upload a Text Link” page. There is a drop-down box to toggle between uploading banners and text links. First, add the URL where the text link is going to be directed to. In the square you want to put exactly what you want your text link to say (i.e. 50% Off Widgets). As with uploading banners you want to name the link, assign it a category and set your privacy settings (i.e. public to all affiliates or specific ones). Once all the details of the text link have been added click “Send to Us” and it will be available in your creative inventory.
Step 5 – Check Uploaded Banners/Text Links
Once you have uploaded all your banners and text links you should check to make sure they loaded properly. On the top navigation you want to click “My Creatives” and then “View Creative Inventory”. From there scroll down and you will see two tabs titled “Banners” and Text Links”. This will tell you how many banners and text links you have.
There you have it, a quick guide to uploading banners and text links in ShareASale. It is not difficult, but if you are not familiar with the interface it can be time consuming and tedious. Providing a thorough inventory of banners and text links is essential, therefore, knowing the most popular sizes to create is imperative. Want to know the most popular affiliate banner sizes? Check out my post on affiliate banner ads.


