Creating Publisher Groups in CJ Affiliate Network

Do you have trouble communicating with your affiliates? Do you have messages for different types of affiliates? Are you unsure of how to send different messages to different affiliates? If you answered yes to any of the three questions I am here to help. I have seen it numerous times when we take over management of affiliate programs for clients and their affiliate database is a complete mess, but it doesn’t have to be. If you are a merchant with your affiliate program on CJ Affiliate I am going to show you how to create groups for your affiliates and how to put them in the appropriate group(s). After you read this article you will have one of the most organized affiliate databases out there.

Step # 1 – Go to “Groups” tab

CJ 1

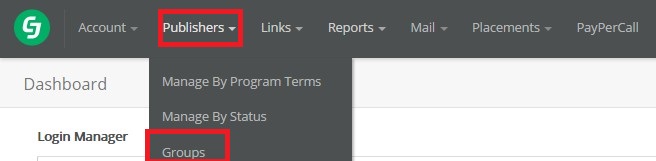
After you are logged in to your CJ Affiliate account click the “Publishers” tab and then click the “Groups” tab. This will take you to the page where you will create groups to place your affiliates in.

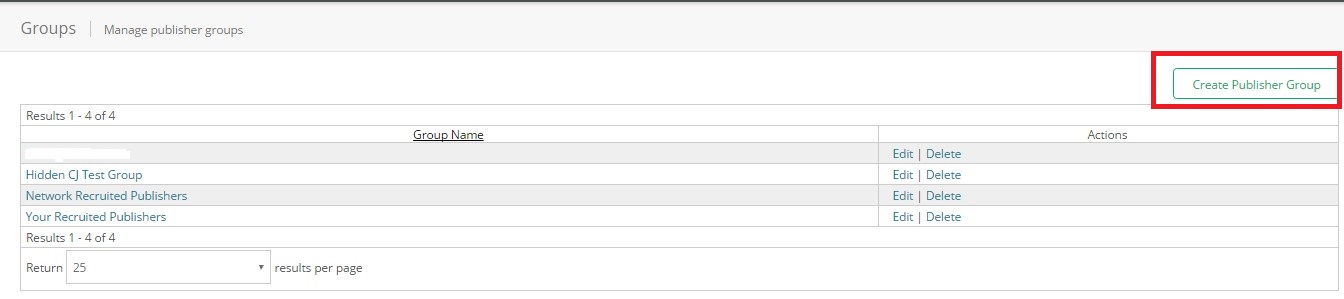
Step # 2 – Create Affiliate Group

There will be groups already created, but they were done so by CJ Affiliate. To create a new group click the “Create Publisher Group” button to the far right of the screen. A pop-up box will appear next.

CJ 2

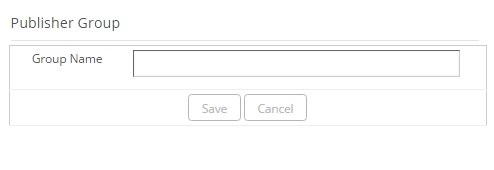
Step # 3 – Name your new publisher group

This is where you name the group. You want to be as clear as possible so in the future you know exactly who is in the group. Once you complete inputting the name click “Save”. Your new group has been created and the next step is filling it with affiliates.

CJ 3

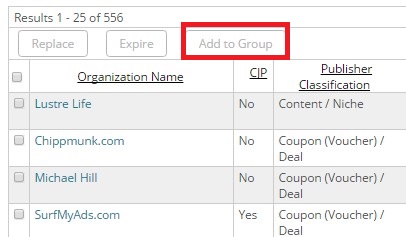
Step # 4 – Add affiliate to a group

Go to your affiliate list (through “Publishers” – Manage by Program Terms”) and check affiliates that you want to include in your newly created group and then click “Add to Group”.

CJ 4

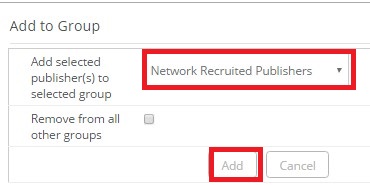
After you click “Add to Group” a pop-up window will appear and you will select the group to place the affiliate in from the drop down box. After the group is selected click “Add” and then you are finished.

CJ 5

That is it. Instead of sending all your affiliates the same message, this functionality allows you to now segment message to specific affiliates. You may have a bonus opportunity for content affiliates, but do not want coupon/deal affiliates to see this, so having groups set up will allow you to send to the audience you want.

How to Use the ShareASale’s “Group Affiliates” Tool

Your affiliate recruitment efforts are yielding fruit and your program is doing well, but you are having trouble managing your growing affiliate list. What do you do? As an affiliate manager you may want to send a specific group of affiliates a message, but do not want to include all your affiliates, or you want to try and activate your stagnant affiliates, but are not sure how to do this. In this post I am going to show you how to group your affiliates using the tool in ShareASale (next post will cover CJ Affiliate). This step-by-step guide will make it easy for you to group your affiliates however you want.

Step # 1 – Navigate to “Group Affiliates”

Once you have logged in to your ShareASale merchant account you will go to the “Affiliates” tab and then click the “Group Affiliates” sub tab. This will take you to the screen where you can start creating, modifying, and even deleting existing groups (if you have any, of course).

Step # 2 – View, Create, or Delete Groups

Once on the affiliate groups page you will see first the option to view any current groups created. To view any group, hit the drop down arrow and select the group and hit “view”.  The next section is creating a new group. Here you will name the group (i.e. Sales in last 30 days, No sales ever, Coupon Affiliates, etc.), then briefly describe the group. Next you are going to select the commission rate for each group (per sale and/or per lead). You may want to pay certain groups a different commission, so this is the place to implement that. Every time you add an affiliate to a group they will be paid the commission for that group.

SaS 1

Step # 3 – Adding Affiliate to Groups

Now that the groups are now created and ready to be utilized, you have to add affiliates to them. You will go to the “Affiliates” tab and then click “Your Affiliate List”. This will bring you to your list of affiliates (starting from top performers and working backwards). Under the affiliates information you will see a drop down box titled “Affiliate Group”, select the appropriate group and then there will be a pop up to “save all”. Click “save all” and then that affiliate will be included in that group.

Grouping affiliates is a great way to manage the hundreds (even thousands) of affiliates that may be in your program. As I mentioned earlier, grouping affiliates may be necessary for a variety of reasons. It could be you want to send a certain deal to a certain group of top performers or you want to get your inactive affiliates active and referring traffic. Whatever it may be, grouping them and messaging them accordingly will help keep your program organized and save you a great deal of time in the long run.