Manually Crediting Affiliate Payouts in Rakuten Affiliate Network

Not every affiliate relationship is the same. Since I started managing affiliate programs almost 5 years ago I found out that the standard relationships are not always the most successful ones, but rather the ones where an outside the box idea is utilized tend to be the most fruitful. Not every affiliate is using affiliate links in their marketing, but use the affiliate network for payment processing. When a relationship like this is in place you need to know how to manually credit the affiliate(s) to ensure they get paid properly and timely. I will provide a step-by-step guide to manually crediting affiliates in the Rakuten Affiliate Network.

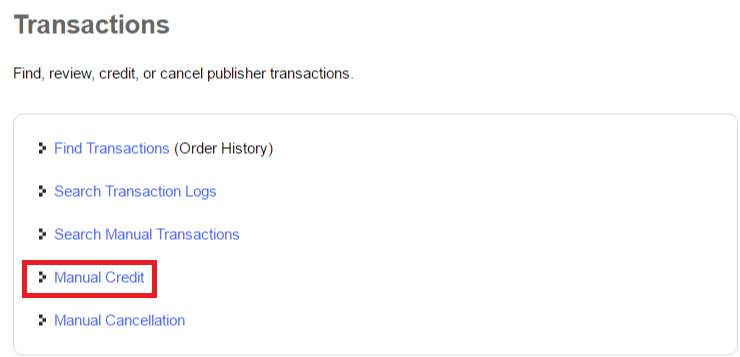
Step 1 – Navigate to the Transactions tab

Once logged in to your Rakuten Affiliate Network account you will want to navigate to the “Account” tab and then the “Transactions” sub-tab.

ran-1

Step 2 – Select Manual Credit to Begin the Process

Next, you will click the “Manual Credit” link to begin the process of crediting an affiliate or affiliates.

ran-2

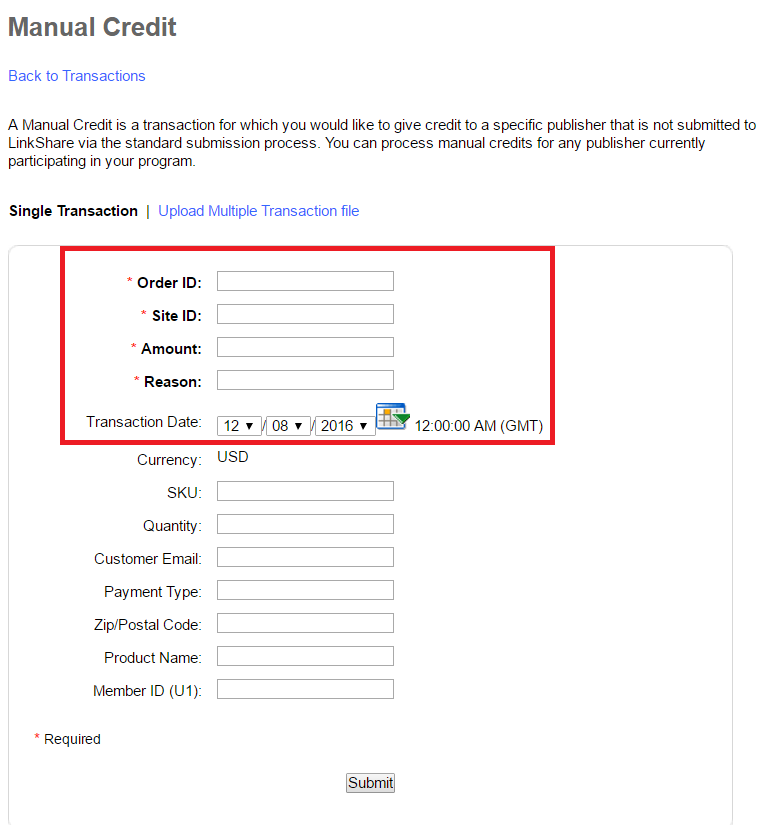
Step 3 – Input Affiliate(s) + Transaction(s) Information

There are a few fields that are mandatory (indicated by an asterisk). The first is order ID (if it is a single transaction), but if you are reconciling a few weeks or a months’ worth of transactions you can make up an ID for your internal data. Next is site ID, this is the affiliate’s ID so that RAN can pay them accordingly. Third, the amount (total revenue NOT commissions). Lastly, the reason for doing this. Make it something that you can recognize and other people within your organization will not question. After the mandatory fields are filled in, hit submit.

ran-3

Step 4 – Confirm Data Entered is Correct

Final step is to confirm that all the data entered is correct. If something is incorrect you can still go back and change. Hit the confirm button and the manual transaction credit is complete.

ran-4

Adding manual transactions is not a daily task, but those affiliate relationships that require it should be nurtured and done as frequently as possible. Some of the best affiliate relationships I have do not use affiliate links, but use the affiliate network for payment processing. These types of relationships do require a little extra time, but can be worth the extra effort in the long run.

Booking Paid Placements Through CJ Affiliate

Getting additional exposure for your brand is the number one goal when employing various marketing strategies, but some work better than others. Affiliate marketing is a marketing strategy that has numerous ways to get your brand exposure, it could be through content, social media, and/or coupon deals. The three strategies mentioned are popular among affiliates, but there is one that is often over looked by advertisers and it is paid placements. Paid placements allow advertisers to become more visible on affiliate sites and assist in the brand reaching a wider audience. Paid placements can either be paid in a flat dollar amount, a commission increase, or a hybrid of both fee and commission increase.

Where do you go to get paid placements? In the past, you would have to look up the affiliate and their site, reach out to them and then ask them if they are accepting paid placements and get all the information that way. Recently, CJ Affiliate has added a tool to their merchant interface that will allow you (advertisers) to locate and book paid placements without leaving the merchant interface. This is truly an innovative move, which will make the lives of all affiliate managers easier. Please keep in mind that this is still a new tool/service, but I am going to show you how to use it to book future paid placements. You still may have to reach out to affiliates, but this new tool is to aid in booking placements.

Step #1 – Go to “Placements” Tab within the CJ Affiliate Interface

CJ 1

Once you are logged in to your CJ Affiliate merchant account, click the “Placements” tab. A drop down menu will then appear and you will then select where to go next.

Step #2 – Select What Section of Placements to Visit

CJ 2

This next step allows you to look up opportunities that affiliates are offering, review insertion orders from previously booked placements, and review reports from past placements (if any were booked).

Step #3 – Review Placement Opportunities Available

CJ 3

Instead of contacting the affiliate directly to get all the information about the placement, it is all here is one place for an easy analysis. Not all affiliates use paid placements and even some of the larger affiliates have not participated yet, so you still may have to reach out to an affiliate if they are not listed.

As you can see, the available placements are listed with the amount of money it will cost, the start/end dates, and where it will be placed (mobile, email, social, etc.). On the left side there are filters to help find attractive placement opportunities. You can narrow it down to your publishers only, opportunity type, date range, promotions, price, and affiliate network earnings. I would strongly encourage using the filters, especially the affiliate network earnings because you want to be working with affiliate that have a following and have earned commission in the past.

Step #4 – Review Total Cost of Paid Placements

CJ 4

Once the placements are booked and run you can you the “Reports” tab to view the exact cost of the placements. The placement has a fee and CJ also collects a fee as well. This is a good place to review your overall spend and determine if the placements yielded ROI.

Booking placements with affiliates just became easier. CJ Affiliate created a much needed tool ot help merchants book placements without a lot of the tedious work. All the available placements are now visible within the CJ Affiliate merchant account. I just have some words of wisdom, do not just book a placement on any affiliate site. Do research and ask questions, because the last thing you want to do is throw a significant amount of money away to an affiliate that has no real following or ability to produce and yield a positive ROI.


How to Recruit Affiliates in CJ Affiliate Network

In a previous post titled, “How to Find Affiliates to Recruit into Affiliate Program”, I showed you where you can go to find affiliates for your affiliate programs and today I am going to show you how to use CJ Affiliate (if you are a merchant on their network) to recruit affiliates into your program. Using CJ Affiliate’s network recruiting tool should not replace active outreach to prospective affiliates, but can be a nice compliment to your overall recruiting efforts. Here is a step-by-step guide to recruit affiliates in CJ Affiliate.

Step 1 – Navigate to the “Manage Publishers” Tab

Once you are logged into your CJ Affiliate account you will need to navigate to “Manage Publishers” tab.CJ 1

Step 2 – Go to Publisher Recruitment Tab

Once on the “Manage Publishers” page you will then have to navigate to the “Publisher Recruitment (beta)” sub tab.

CJ 2

Step 3 – Start Recruiting Affiliates

This is where it gets fun! You have an array of options to use in recruiting potential affiliates to your program. You can use the “keyword” function as well publishers by category, country, network earnings, geographic source, and publisher classification. Regardless of the option you use to filter out prospective affiliates you will have to “check” the box to the left of the publisher’s name. By checking the box you are going to be sending them an invitation to join your affiliate program. Once you have selected the affiliates you want to invite to join your program you will have to hit the “Make Offer” button.

CJ 3

Step 4 – Confirm Your Offer(s) to Affiliates

Once the “Make Offer” button is hit, a pop-up will appear and you will have to confirm the offers to the affiliates. If you are satisfied you will then click “Ok”, but if you want to modify anything simply hit cancel and you can go back and make any necessary changes.

CJ 4

Step 5 – Accompany Offer Push with Email  Invite

When asked how they “prefer to be contacted by affiliate managers” (as part of Affiliate Summit’s 2014 AffStat Report questionnaire), nearly 82% of affiliates respond: email.

2014 AffStat Report

While most affiliate managers in charge of CJ-based affiliate programs quit the process at Step 4, we at AM Navigator encourage you to go further and reach out to the affiliates who now have a pending offer (from you) to review. Accompanying your offer push(es) with email outreach dramatically maximizes the effectiveness of this affiliate recruitment method.

As I mentioned at the beginning of this post, you should not use this as your only recruitment activity. This is a compliment to your other activities geared at onboarding new affiliates. The positive aspect of using CJ to recruit affiliates is that they are already a member of the network and it will take a simple click on their end to accept your offer. We actively use this tool when managing clients programs and it has been a very successful initiative.

A Step-By-Step Guide to Adding Affiliate Creatives to CJ Affiliate

As I mentioned in my last article on adding creatives to ShareASale, having a nice selection for affiliates to use is essential and optimal. Allowing the affiliates to choose which banners or links to put up will allow them to market your products more effectively. Recently I have set up and launched a number of affiliate programs on CJ Affiliate By Conversant and I thought I would provide a step-by-step guide to uploading creatives to your program on CJ Affiliate.

Step 1 – Locate the Links tab on the Main Navigation Menu of the Merchant Interface.

Once logged in you will need to click on the “Links” tab to begin the process of uploading new creatives (banners/text links) or modifying current creatives.

CJ - 1

Step 2 –  Select “Add New Link”

Click on the “Add New Link” button, a drop down menu will appear and you will then choose which new link (or banner) you want to upload.

CJ - 2

Step 3 – Select Text Link or Banner

As you can see in the image below you have a number of options as it pertains to creatives, but for the purpose of this tutorial we are going to focus our attention on text links and banners only.  Depending on what type of creative you are uploading you will then make the appropriate selection, either text link or banner.

CJ - 3

Step 4 – Uploading Text Links

You will want to give your link a name to differentiate it from others, as well as include the ad copy, a description, relevant keywords for affiliate to search with, a destination URL, and filling in the other fields shown in the image below. Make sure to include as much information about the link as possible in order to get full optimization with your affiliates.

CJ - 5

Step 5 – Uploading Banners

Similar to uploading text links you will want to name the banner, provide a description, include a destination URL, search keywords, and most importantly upload the banner.

CJ - 4

You will want to repeat the same process for each additional banner and text link. Unfortunately, CJ Affiliate does not have a mass banner/link option like ShareASale does, but it is still a straight forward process that is essential in daily affiliate program management.  Whether you have an affiliate program on CJ Affiliate, ShareASale, or another network your creative inventory should be taken seriously and showcased in professional manner.