Meaning of Postback: Affiliate Marketing Program Context

When setting up an affiliate program, one of the key decisions an advertiser/merchant has to make is what tracking method to use.

Most present-day affiliate programs rely on a pixel embedded into the confirmation/”thank you” page. This (somewhat of an industry default method) is meant to close the loop between the initial end user click on an affiliate link and the end user’s reaching the thank-you-for-your-business page. The affiliate commission is then triggered by (and credited upon) the pixel firing at the moment the customer reaches their confirmation page.

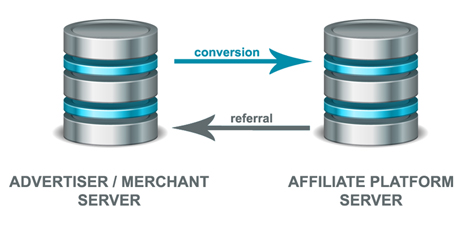
Postback tracking, on the other hand, represents a slightly more technically sophisticated of a method of crediting affiliates for the business they refer. Its essence is grounded in server-to-server posting, whereby instead of relying on the pixel firing, the conversion record (and consequential affiliate commission crediting) is triggered by the advertiser’s server passing the necessary data to the affiliate program’s platform’s server.

Server-to-server affiliate postback

Let me give you a real-life example. We have a client who employs two affiliate payment models within the same affiliate program: PPL (pay-per-lead) and PPS (pay-per-sale). The affiliate program is run on an affiliate network which supports both pixel-based tracking, and postback tracking. The advertiser in question is paying affiliates $X per lead when a referred user signs up for a free account, and (on top of the PPL amount) Y% of the sale amount, should the lead convert into a paying customer. For the PPL part this affiliate program relies on pixel firing on the confirmation page, whereas the PPS payout is posted (to the affiliate network’s server) by the advertiser once/if the sale occurs.

While implementation of postback requires a higher level of technical expertise (than the simpler-to-integrate pixel-based tracking), it’s a method that is widely supported by affiliate platforms of all types: including all types of affiliate networks and affiliate software for in-house-based affiliate tracking/programs.

5 Common Affiliate Banner Mistakes to Avoid

On December 19, 2014 I wrote a post that discussed affiliate banner ads, more specifically requirements, sizes, and examples of affiliate banners. With my first post of 2015 I would like to discuss 5 of the most common mistakes (I see) made when creating affiliate banners. The mistakes that are going to be discussed are ones seen most often when working with merchants and can be the difference for an affiliate to use a competitor’s banner ad.

Mistake # 1 – Poor Graphics

This one in particular can be the difference for an affiliate to market a competitor’s product. Graphics should be clear and not pixelated. Merchants should be sure that the version of the graphic they are using is high quality and looks good on the created banner.

Mistake # 2 – Font Unreadable

This is one mistake I see way too often. Why would you include text on a banner when it is not legible? Font that is either too small or blurry will do more harm than good, in fact it may hurt the conversion rate. If you want to include a tagline or some other text on banners that is fine, but including it on small banners (i.e. 88×31) is not recommended.

Mistake # 3 – Brand Not Included

How are the potential customers supposed know who the product is being marketed by? Including the brand should be a top priority and should never be omitted. In my time managing affiliate programs I have seen this mistake more than I would like to, so never forget to include your brand name/logo.

Mistake # 4 – No Call to Action

A clear call to action is a must for all affiliate banners. Do not assume that visitor knows to click the banner, so ASK them by including the appropriate call to action. Examples of calls to action include: Shop Now, Click Here, and Learn More.

Mistake # 5 – Missing a Border  

This is by far the most common mistake I see when merchants create affiliate banners. The banners can include amazing graphics, a concise message, and a call to action, but are missing a small, yet important detail: a border.

Banners created with white or very light backgrounds get lost in the white backgrounds of affiliate sites. Be sure to include a 1 pixel line around the border of all affiliate banners to ensure your banners stand out.

If you avoid making the 5 common mistakes referenced you will have quality affiliate banners that affiliates will be proud to display on their sites. Affiliate banners are another marketing tool, so make sure they represent your brand in the way you want.

How To Start an Affiliate Program on CJ Affiliate Network

On November 21st I wrote a post on setting up an affiliate program on ShareASale, now today I am going to walk you through setting up an affiliate program on CJ Affiliate By Conversant. Over my time managing affiliate programs I have seen the set-up process not complete or the merchant decided to shortcut the process. The set-up process should be done with careful precision to ensure you are presenting your affiliate program in the best possible light upon launch. The following guide will go step–by-step in setting up your CJ affiliate program. In total there are seven (7) steps that you must follow.

Step 1 – Technical/Tracking Implementation

Once the contract is signed it’s time to start getting your site ready to handle the affiliate traffic and sales.  CJ will send you a tracking integration questionnaire to complete and once complete they will create and send you all the conversion tags needed for your site.

The next step in the technical/tracking implementation process is to install the conversion tags provided. You will need to tag all pages of your site and all conversion pages. Once tracking implementation is complete then you must test to ensure everything is working properly.

Testing the tacking pixel involves 4 test purchases:

  • Test # 1 is without a discount
  • Test # 2 is with a discount (both whole order and item level)
  • Test # 3 is with discount (whole order)
  • Test # 4 is with a discount (item level)

Once all four tests have been complete next step is to confirm tests worked, cookie information and site tagging are functional.  Now you can move on to completing the program settings.

Step 2 – Program Settings

There are six pieces that need to be complete and they include:

  • Upload a logo (150×40)
  • Set up publisher accept/decline criteria

This is where you determine how you are going to manage affiliates that apply to your program. I recommend not auto-approving any affiliate, but manually reviewing each application. You can also add specific countries to the auto-decline and manually approve lists.

  • Enter Search Keywords

Add keywords related to your brand. This is what affiliates use to find programs to partner with

  • State Serviceable/Shipping Areas

Where do you ship your products to? What countries do you currently service?

  • Confirm category

CJ has a plethora of categories to choose, but make sure it is relevant to your business

  • Draft and upload Program Description

This should describe your company and the products/service being offered, the commission being offered, and any other details that affiliates will need to know prior to joining.

Step 3 – Branded Sign up Settings

This phase of the process involves three (3) aspects:

  •  Introductory Message

This should be crafted in a similar way to your program description

  • Application Response

This should be a short message to affiliates once they apply to inform them that their application is under review and a decision will be made shortly on their status.

  • Header graphic should be added: Size should be 468×60

Step 4 – Program Terms

This is where you determine your program policies and search guidelines. This is important because the information loaded will tell affiliates the “rules” they must play by. Also included here is the commission to be paid out, cookie life, and any other terms that affiliate partners should be aware of.

Creating customized program terms is also an option here. For example, if you partner with an affiliate that you are going to pay a different commission rate to they must be on their own program terms and not included in the “default” terms.

Step 5 – Add New Links

This step is where you upload all your freshly created banners and text links. Use the “links” tab to upload banners and text links.

Step 6 – New Publisher Email

This is where you create the email that is sent to affiliates upon acceptance. It should include information on your company, products/services, paid search guidelines, links to creatives to get them started with, and most important, contact information.

Step 7 – Request Activation

Once the six steps above have been complete you can request your affiliate program to live.

You go to: Support Center>The Basics / Getting Started

Whether you are launching an affiliate program on ShareASale or CJ, there are steps that need to be carefully completed in order to successfully launch.  Follow the above seven steps and you will have an affiliate program you can be proud of on CJ Affiliate By Conversant.