ShareASale Transaction Breakout Report and Why It Is Important

Want a quick way to analyze affiliate transactions to determine their sources? ShareASale merchants are now using the “Transaction Breakout Report”. This report is exactly what it sounds like. It breaks down affiliate transactions within a specific time frame and tells merchants if the transactions are new customers, mobile transactions, or coupon transactions. I will go into detail below on the report and how to access.

Step # 1 – Accessing the Transaction Breakout Report

Once logged in to the ShareASale merchant account, navigate to the “Reports” tab and then “Transaction Breakout” (second row).

Step # 2 –  Adjust Filters to Get Necessary Data

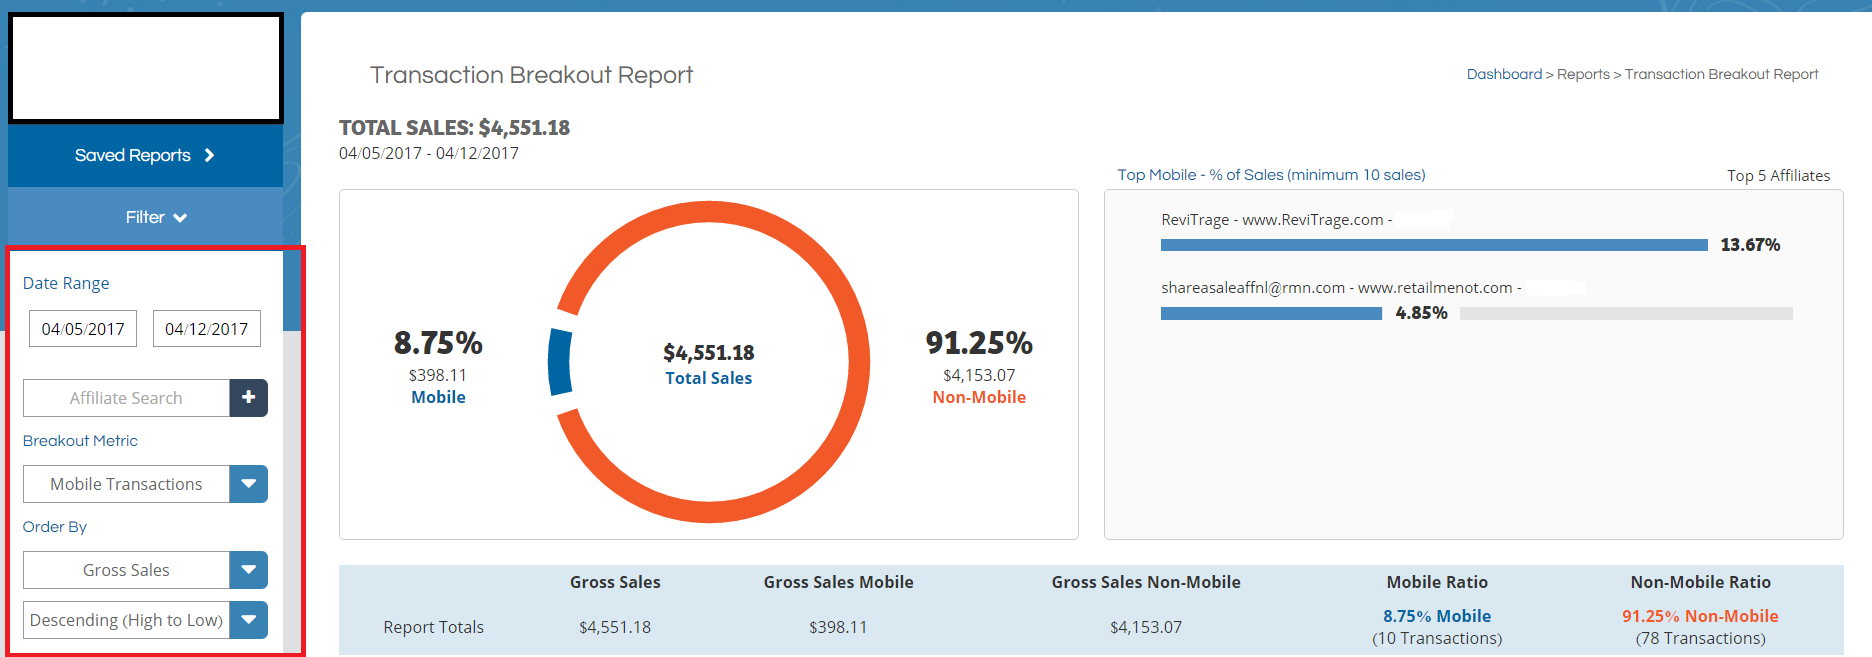
In the image below, the red box on the left has filter options to use. Select the date range you want to review (ShareASale defaults to the past 7 days), a specific affiliate, breakout metric (mobile transactions, new customer transactions, and coupon transactions. The mentioned filters can be ordered by gross sales, number of transactions, commission, or breakout ratio. Hit “Filter” and the results will appear to the right.

Step # 3 – Review Provided Data

As you can see in the image above, over 91% of the transaction during the week were “Non-Mobile”.

Below the graph will be a detailed breakdown publisher by publisher. This example is based on mobile transactions, but some merchants are concerned with the number of new customers being brought in, so when running the report, remember to change the “Breakdown Metric”.

This report is quite valuable. It can show merchants where time and effort should be focused as well as determine if more or less coupons/deals are needed. The report can also assist in affiliate recruitment. How is that? Merchants can determine that they want to spend more time gaining new customers, so reaching out to prospective affiliates that are similar to the ones currently performing in that category. The “Transaction Breakout Report” is not just a bunch of numbers, but a tool to help (or continue) to grow a ShareASale affiliate program.

Optimizing a ShareASale Affiliate Program with Internal Logos

There are numerous ways ShareASale merchants can optimize their program to increase their brands awareness to prospective affiliates. In the past I, have discussed various program optimization tips on ShareASale to help recruit affiliates, but today I am going to outline a free ways to get the word out there about your affiliate program on ShareASale. It is called “Internal Logo Files.”

ShareASale uses merchant’s logos in various places within their interface to help attract affiliates to merchant’s affiliate programs, and now I will describe where those places are and the requirements.

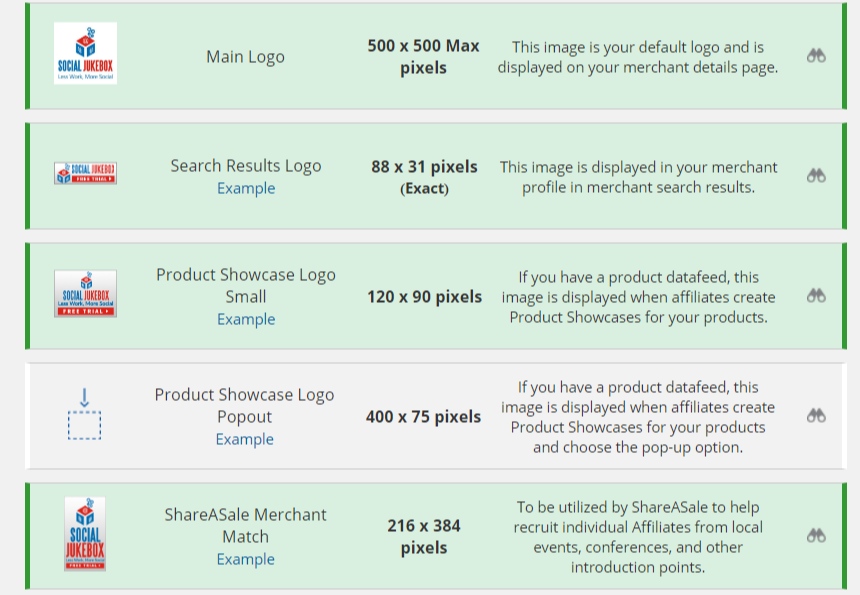
First, to navigate to this section of their interface you will go to “My Account” -> “Internal Logo Files.”  It will bring you to a page that looks similar to this (see below)

Main Logo

ShareASale uses this logo on the merchant details page, or better known as the page where affiliates sign up to an affiliate program. It can be up to 500 x 500 px, but make sure it is not too large and doesn’t overtake the page. Here is an example:

Search Results Logo

This logo is used on the merchant search results page. When affiliates are looking for new merchants to promote a merchant will stand out more with their 88 x 31 logo shown along with vital statistics of the affiliate program. Having a logo there gives a merchant a better opportunity to be seen and seriously considered. Here is an example of a merchant with one and without:

Product Showcase Logo (small)

If a merchant has a data feed their logo will be displayed when affiliates create product showcases for specific products. This logo should be 120 x 90 px. Here is an example:

Product Showcase Logo (Pop-up)

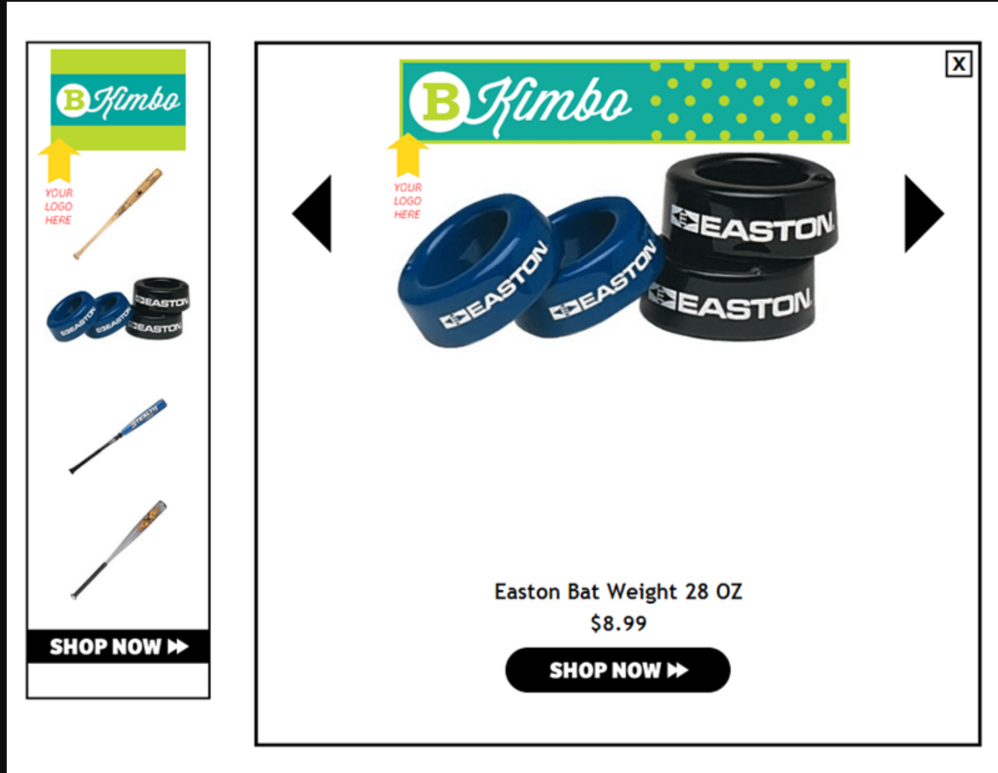
This logo is very similar to the one right above, but it will be shown when an affiliate chooses the pop-up option. It should be 400 x 75 px Here is an example:

ShareASale Merchant Match

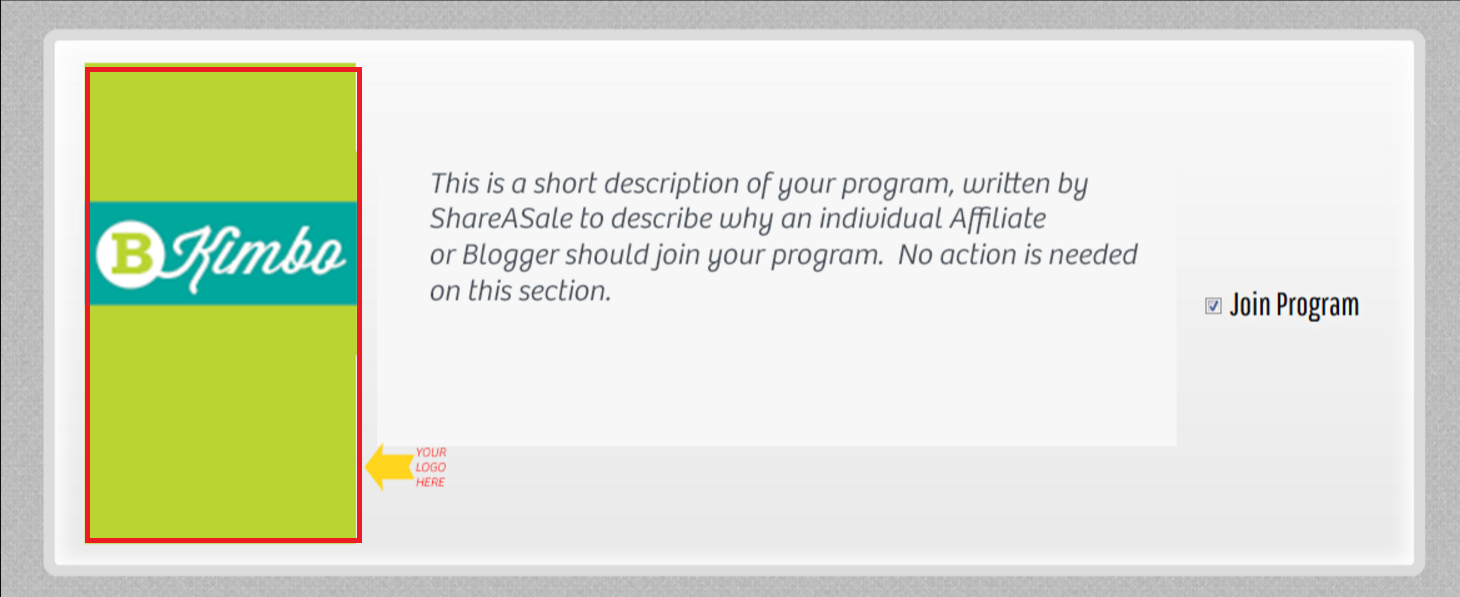
This particular logo helps ShareASale to recruit individual affiliates from local marketing events (Meet-Ups), conferences, and other interactions (magazine, email newsletters, etc.) This logo should be 216 x 384 px. Here is an example:

Merchants, there are up to 5 additional ways to spread the word about your programs via logos within the ShareASale interface (free of charge). It is highly recommended to take advantage of as many of them as possible because you never know what you could be missing out on.

How to Book a ShareASale Featured Program Placement

Are you a merchant with an affiliate program, but struggling to find quality affiliate to promote your brand? If so, you are not alone. One of the biggest struggles is to recruit quality affiliates. If you are a ShareASale merchant then most likely you tend to see an influx of coupon affiliates applying, but the more valuable affiliates are out there, but may need to discovered. What your affiliate program may need is additional exposure to those affiliates. ShareASale offers different ways, through paid placements to reach affiliates that may be a fit for your program. To help in this I am going to show you how to purchase and set up a ShareASale Featured Program of your Category placement. This particular placement displays a logo and description of your affiliate program at the top of the individual category page for which you belong.

Step 1 – Navigating to the Featured Program of your Category Placement

You will start by navigating to the “TOOLS” menu option, followed by “PROGRAM BOOST”. This will take you to the section where you will make the purchase.

Step 2 – Purchasing the Featured Program of the Category Placement

There will be multiple placement options, but you will scroll down and click the “BUY PROGRAM” button for the Featured Program of your Category. The next screen will be to select a month to have the placement run. To the right will be a list of the next 12 months. The green represents “available” and the pink represents “booked”. Click on the month you want to run the placement and click “CONFIRM DATES & PAY”. You will then be asked how you want to pay for it. It can be done from the current ShareASale balance (given there is enough to cover the $300) or credit card.

Step 3 – Setting up the Featured Program of the Category

Now the fun part! Navigate back to the Program Boost page. You will see a tab labeled “MY PROGRAMS”, click that and it will have the placement just purchased. There you will be able to edit the text and add the image needed.

To start creating the placement, click “EDIT”.

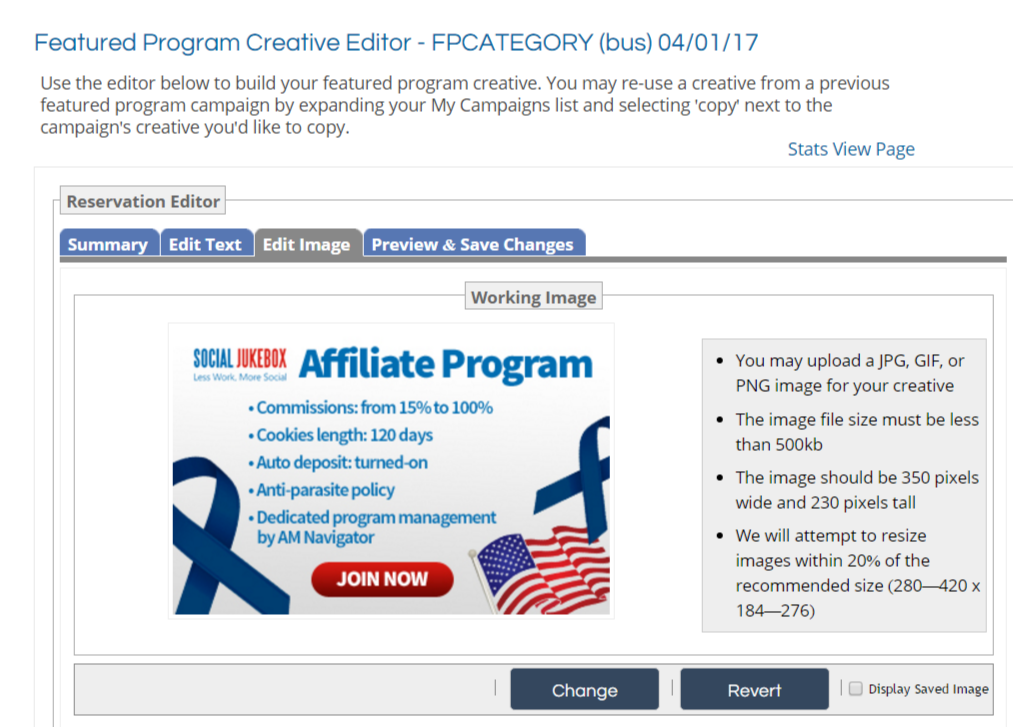
You will be brought to a screen that look like the image below. There are four (4) tabs. In the “EDIT TEXT” tab you will place a description of the program along with up to five (5) bullet points highlighting your affiliate program.

To add the banner image, click the “EDIT IMAGE” tab. The image should be in either JPG, GIF, or PNG form and be 350 px wide and 230 px tall. Once the image is loaded click the “PREVIEW & SAVE CHANGES” tab.

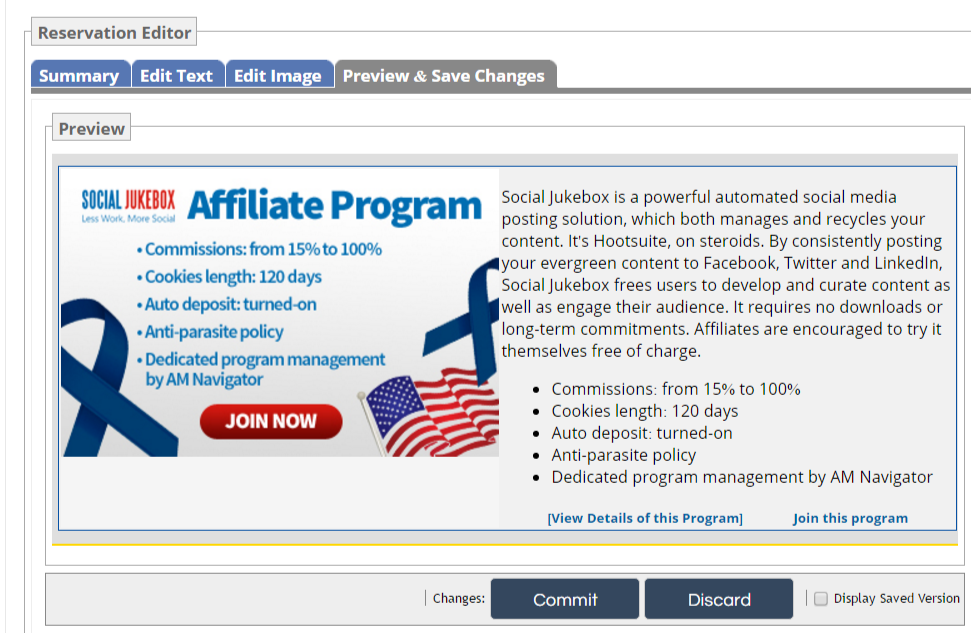
This is the final step. Review everything from the text to the banner. If there are any changes needed make them as soon as possible, but you do have up until the day before to modify the placement. Once all is good, click “COMMIT” and you are finished.

Creating brand awareness is a critical piece to a successful affiliate program, but also aids in attracting quality affiliates. For $300 the Featured Program of your Category can get you in front of highly influential affiliates and help take your program to the next level.

Manually Crediting Affiliate Payouts in Rakuten Affiliate Network

Not every affiliate relationship is the same. Since I started managing affiliate programs almost 5 years ago I found out that the standard relationships are not always the most successful ones, but rather the ones where an outside the box idea is utilized tend to be the most fruitful. Not every affiliate is using affiliate links in their marketing, but use the affiliate network for payment processing. When a relationship like this is in place you need to know how to manually credit the affiliate(s) to ensure they get paid properly and timely. I will provide a step-by-step guide to manually crediting affiliates in the Rakuten Affiliate Network.
Step 1 – Navigate to the Transactions tab

Once logged in to your Rakuten Affiliate Network account you will want to navigate to the “Account” tab and then the “Transactions” sub-tab.

ran-1

Step 2 – Select Manual Credit to Begin the Process

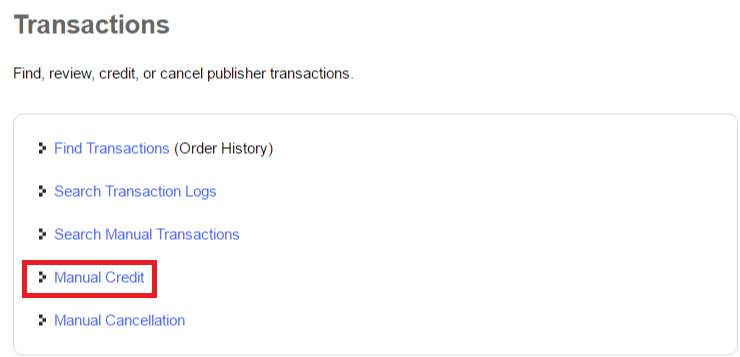
Next, you will click the “Manual Credit” link to begin the process of crediting an affiliate or affiliates.

ran-2

Step 3 – Input Affiliate(s) + Transaction(s) Information

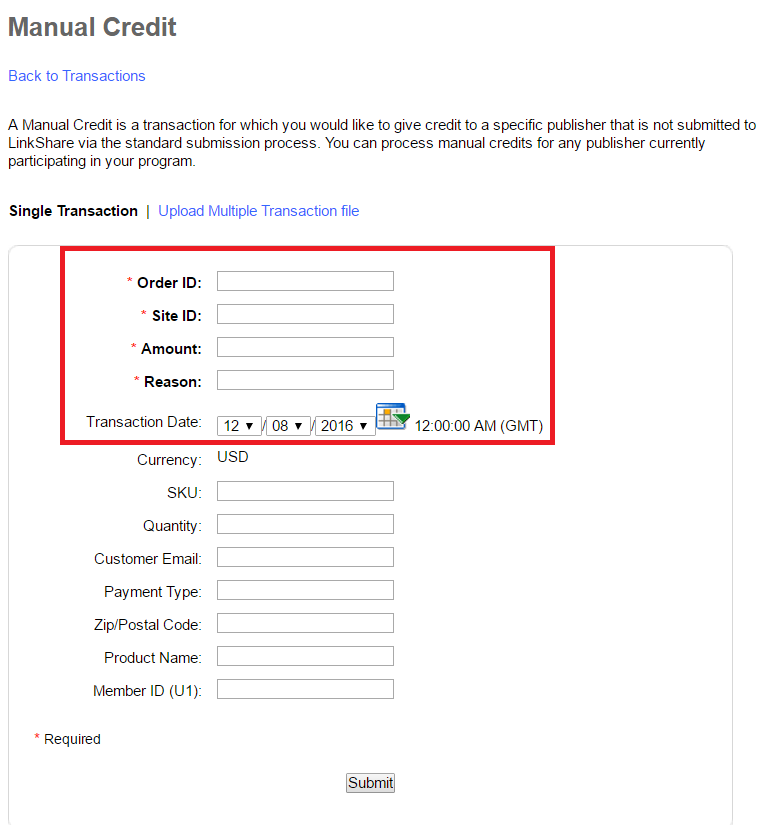
There are a few fields that are mandatory (indicated by an asterisk). The first is order ID (if it is a single transaction), but if you are reconciling a few weeks or a months’ worth of transactions you can make up an ID for your internal data. Next is site ID, this is the affiliate’s ID so that RAN can pay them accordingly. Third, the amount (total revenue NOT commissions). Lastly, the reason for doing this. Make it something that you can recognize and other people within your organization will not question. After the mandatory fields are filled in, hit submit.

ran-3

Step 4 – Confirm Data Entered is Correct

Final step is to confirm that all the data entered is correct. If something is incorrect you can still go back and change. Hit the confirm button and the manual transaction credit is complete.
ran-4

Adding manual transactions is not a daily task, but those affiliate relationships that require it should be nurtured and done as frequently as possible. Some of the best affiliate relationships I have do not use affiliate links, but use the affiliate network for payment processing. These types of relationships do require a little extra time, but can be worth the extra effort in the long run.

How To Group Affiliates in Rakuten Affiliate Network

As an affiliate manager, do you group affiliates or do they all reside in one single cohort (unassigned)? Many program managers do not group their affiliates, but they should be. Do you send all affiliates the same message all the time? I sure hope not. By grouping affiliates, it allows you (as the affiliate manager) to target specific group of affiliates with special promos, exclusive deals, activation incentives, etc. In this post, I will outline how to group affiliates on the Rakuten Affiliate Network.

The first step is to log in to your Rakuten Affiliate Network merchant account. Next, hover over the “Publishers” tab and click “Publisher Groups”.

From there, simply input the group name and click “Add”. This will create the group and it will be shown with the rest of your available groups (if you have any). By default, RAN adds all publishers to the “Unassigned” group until you move them.

ls-1

Next step is to select the publishers you want to move to the newly created group. You will want to go to hover over the “Publishers” tab and click “My Publishers”. You can filter your current affiliates in various ways, but if you want to see the complete list just click “Search” (do not apply any filters). After all your affiliates are listed check the box in the left column of the ones you want to move to the new group. After the box is checked, scroll to the bottom of the page and click the “Move to Group” button and it will give you a drop-down menu to choose the “Selected” affiliates or “All matches”, you will click “Selected”.

linkshare-publisher-search-results

linkshare-publisher-search-results-2

The final step is to choose the group to move the selected affiliates to. The newly created group will be available in the drop-down menu, select it and hit submit. You will get a success message and that is it, you created and moved affiliates to groups.

linkshare-select-a-publisher-group-3

linkshare-publisher-search-results-4

Adding a Product Data Feed to Rakuten Affiliate Network

It is simply amazing how many merchants we have worked with over the years that neglect important aspects of their affiliate program. When we take over management of programs it is disturbing to see the number of advertisers that do not utilize product feeds. There are some advertisers that cannot due to their limited number of products, but it should be a priority for advertisers.

When advertisers do not utilize a product feed they are neglecting a powerful segment of affiliates. Those include price comparison and product engine sites, but also content affiliates can utilize product feeds in the course of their marketing. In today’s post, I am going to include and discuss product feeds on Rakuten Affiliate Network, the requirements for advertisers and how to upload a feed file.

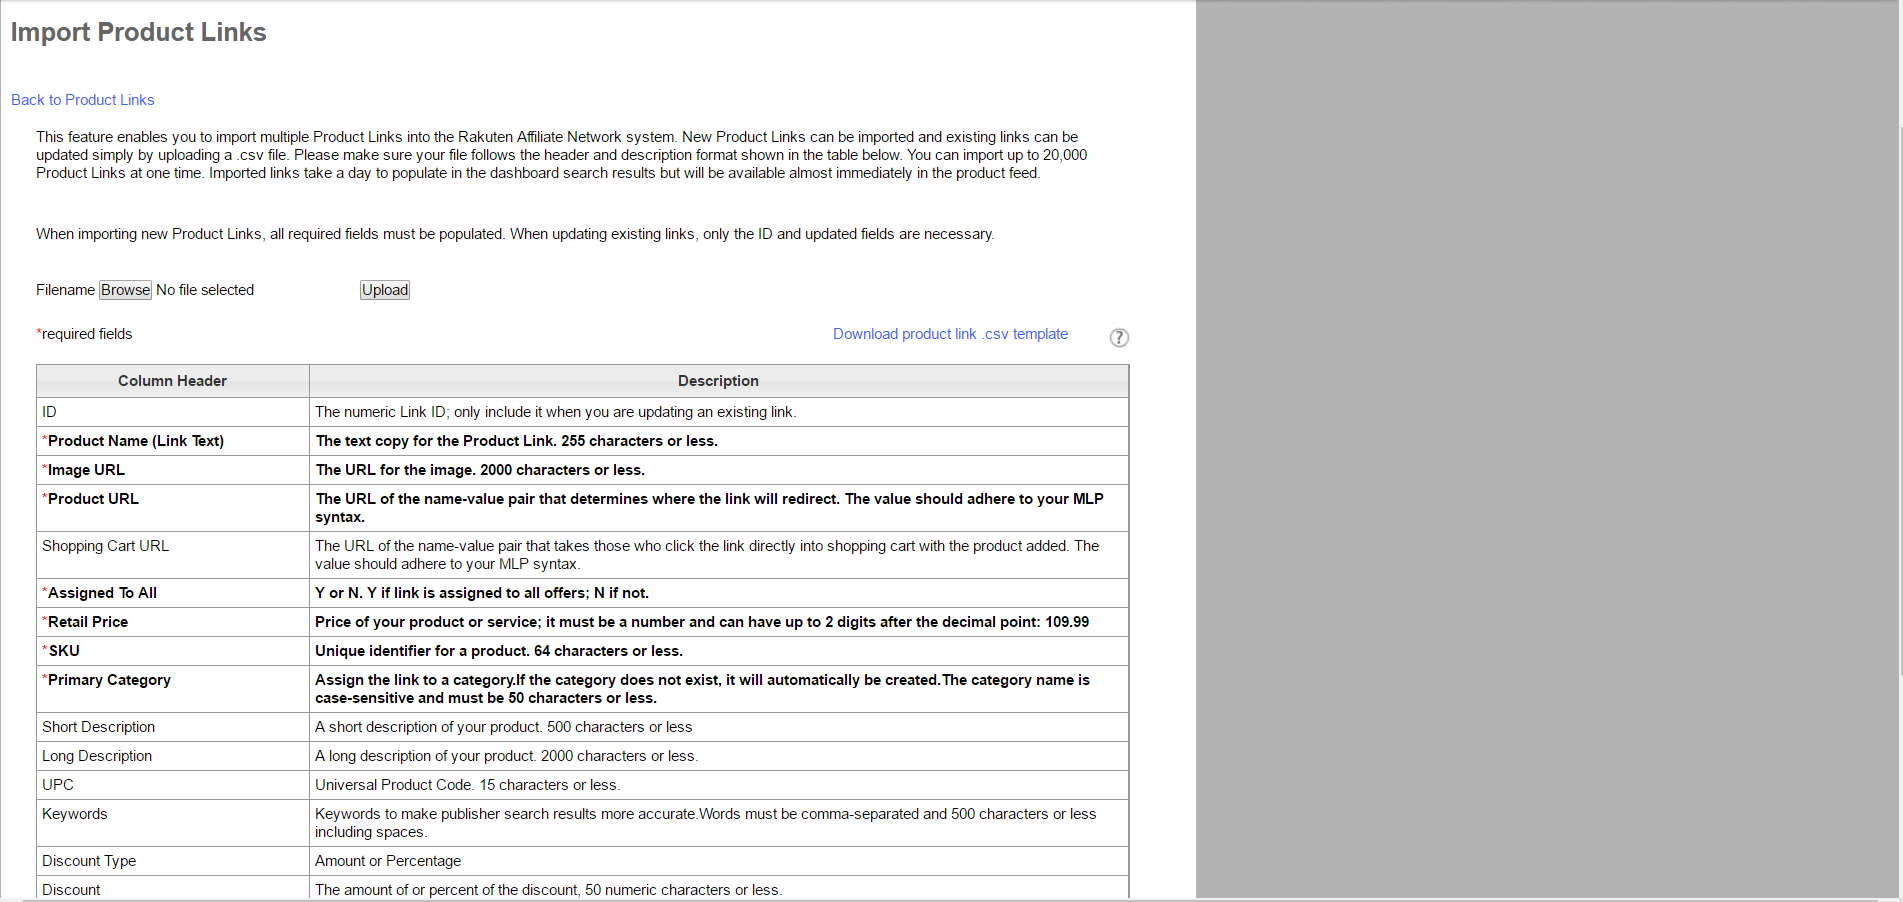
Creating a product feed file for Rakuten Affiliate Network is pretty straight forward, but has to include specific fields in order for it to be approved. The required fields include: product name (link text), image URL, product URL, assigned to all (affiliates), retail price, SKU, primary category, long description, discount, is deleted (in stock or out of stock), currency (USD). All fields titles in the file provided by Rakuten must be included in the file, but only the ones listed above need to be filled in. If there is an issue with the file when uploading a message will be sent.

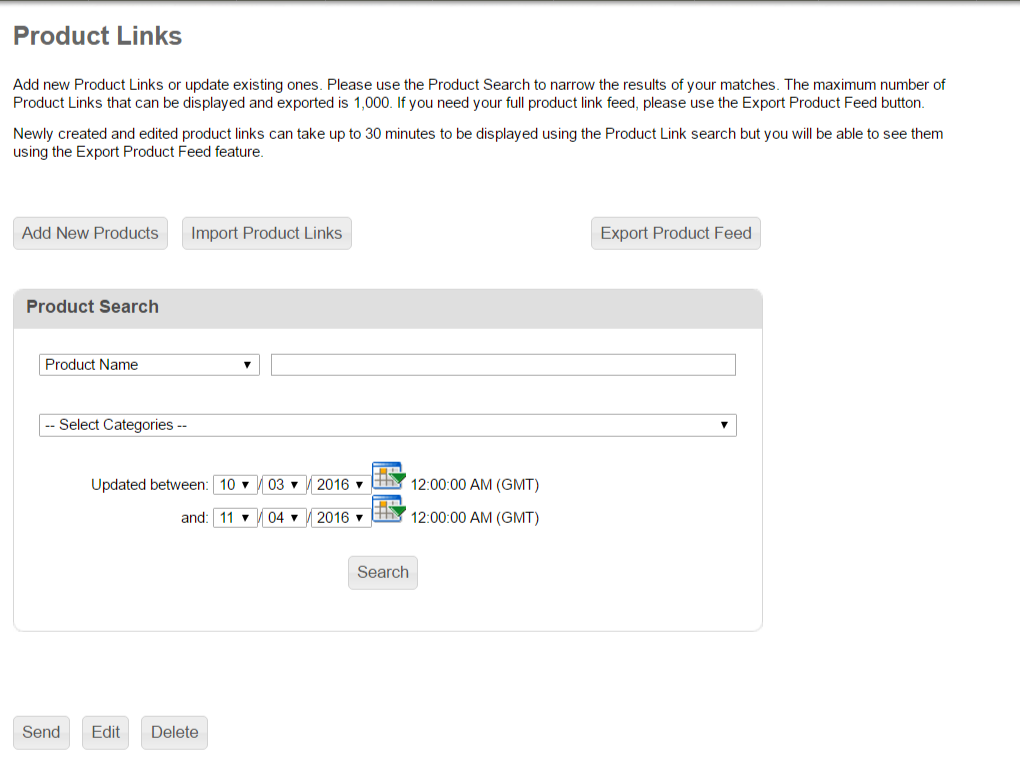
Once the csv file is created with all the products to be available to affiliates you need to upload it within the advertiser interface. Go to LINKS –> PRODUCT LINKS. You will then click the “Import Product Links” button (see image below). This will take you to the screen where you will upload the file and submit it.

linkshare-product-links

To make sure the file you are about to upload has all the correct fields, just reference the table on the page. All the bold text is required, so if it is not in the file correct it before uploading. Next, hit “Browse”, find the file on your computer and hit “upload”.  Note: there is a sample csv file available to download here as well.

linkshare-import-product-links

That’s it. The file has been uploaded and an email will be sent to the person who is on file within the advertiser interface when complete. If there are any issues the person will be contacted as well. Give it about 30 minutes and check the “Product Links” section to make sure the file is there and all images are working. Below is a shot of how the product links (feed) should look when loaded properly.

linkshare-product-links-1


How To Use Rakuten’s Deal Dispatcher

If you are an advertiser that runs an affiliate program on Rakuten Affiliate Network, then this post is important to read. With Q4 officially under way, it is time to start planning for the key online shopping days leading up to Christmas. Getting your deals/coupons in front of your affiliates will be critical and I will show you how to do that with a step-by-step guide to using RAN’s Deal Dispatcher tool. The Deal Dispatcher is a monthly newsletter sent to subscribing publishers that allows you to advertise special promotions and even publisher promotions (ex. Commission increases, bonuses, etc.).

Step – 1

Log in to your RAN merchant (advertiser) account. Navigate to and hover over “Messaging” in the top navigation and click “Deal Dispatcher”.

ran-1

Step 2 –

Now, this is where the deals (consumer facing or publisher facing) are entered. There are a few things to keep in mind when planning to use RAN’s Deal Dispatcher:

  1. All deals must be entered before the 15th of the month.
  2. You can pay a flat fee and be placed as a “Featured Promotion” To inquire about this just contact your RAN account rep.

It is a very straight forward process to enter and submit deals. The following information must be included:

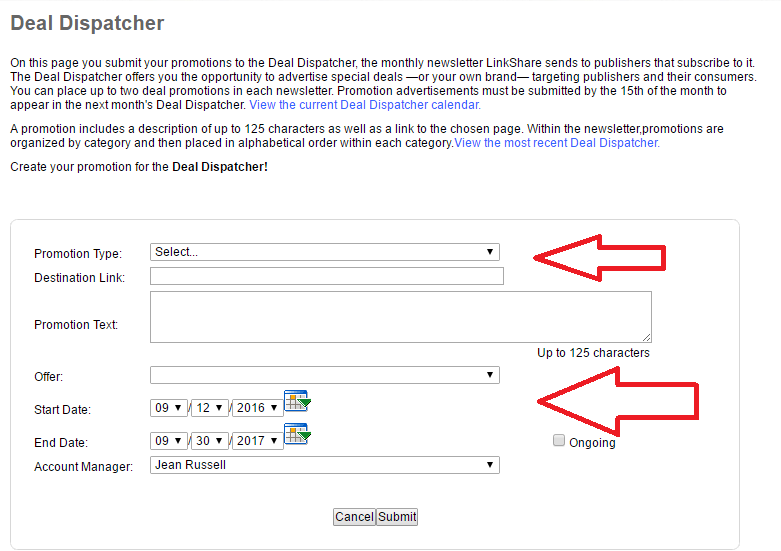
  1. Promotion Type – use the drop own menu to select the appropriate promotion. The options include: consumer – coupons, consumer – free shipping, consumer – sales/percentage off, publisher – increased commissions/return days, publisher – new creative/link type, just to name a few.
  2. Destination Link –  It could be the homepage or a product specific landing page. The link must properly correspond with the offer being entered.
  3. Promotion Text – there is a 125 character limit, but be as detailed as possible and make sure the deal is worded so that it cannot be interpreted a different way.
  4. Offer – This is the offer going to be used for publishers (aka – terms). Will you be using the baseline offer or create a completely new offer for this promo?
  5. Stat and End Date – make sure to make the deal valid for at least 30 days so that affiliates who may have missed it can still act.

Once everything is filled out, hit “Submit”. If anything is wrong it will let you know what needs to be fixed.

ran-2

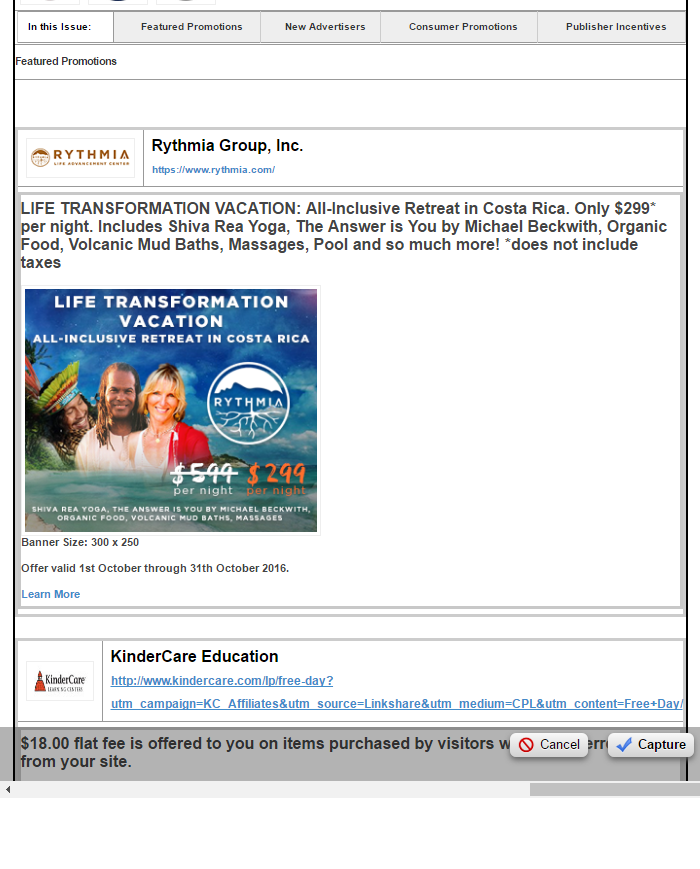
If you want to see a sample of the Deal Dispatcher you can do so by clicking the “View the most recent Deal Dispatcher” (you must be logged in to your RAN account) link . Below is a screenshot of a recent Deal Dispatcher newsletter.

us-deal-dispatcher-publisher-help-center-rakuten-affiliate-networkThis is just one step in the process to making sure you are optimizing your affiliate program for the upcoming holiday season.

Creating an Affiliate Offer in Rakuten Affiliate Network

You are launching your affiliate program on Rakuten Affiliate Network and the set-up process is just about complete with the exception of one item, the affiliate offer (baseline offer). The offer is perhaps the most important part of the program. It houses the program details (e.g. payouts, cookie life, and terms of service). I will be providing a step-by-step guide to creating and publishing offers for your affiliate program on the Rakuten Affiliate Network.

Step 1 – Go to Create Offer Page

Once logged in to your RAN account move over to the “Offers” tab and select “Create Offer”

linkshare-offers-1

Step # 2 – Begin Creating the Default Offer

This is the first step in actually creating it. Name the offer (if you plan to have multiple offers add a V1 or add commission percentage to the name so it can be differentiated), add a start an end date, select if it will be private or public, and cookie length. Once those pieces of information have been added click “Next”.

linkshare-offers

Step # 3 – Add Commission Details

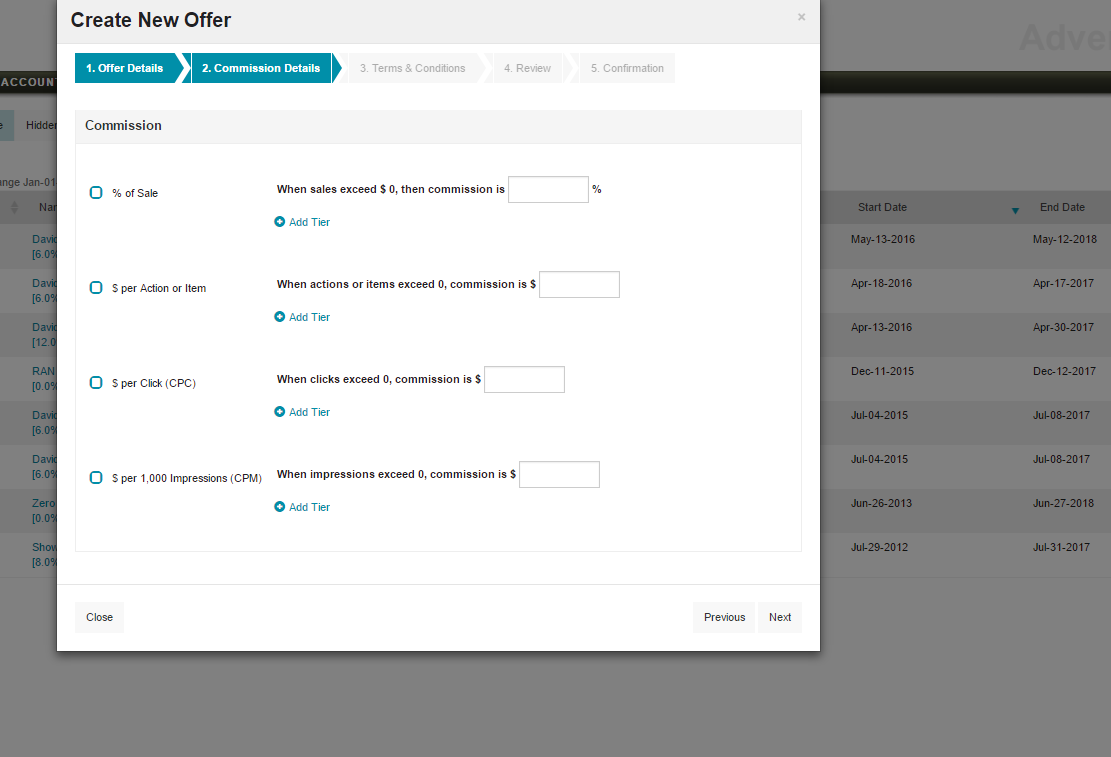
This section is where you will add the payout details for the affiliates. There are four different options, but you must select the one that best fits your business. The most common is “% per sale”. After the percentage is added tiers can be added like if there are 25 sales in a given month from a specific affiliate then the percentage will be X%. Click “Next” when ready for the following step.

linkshare-offers-2

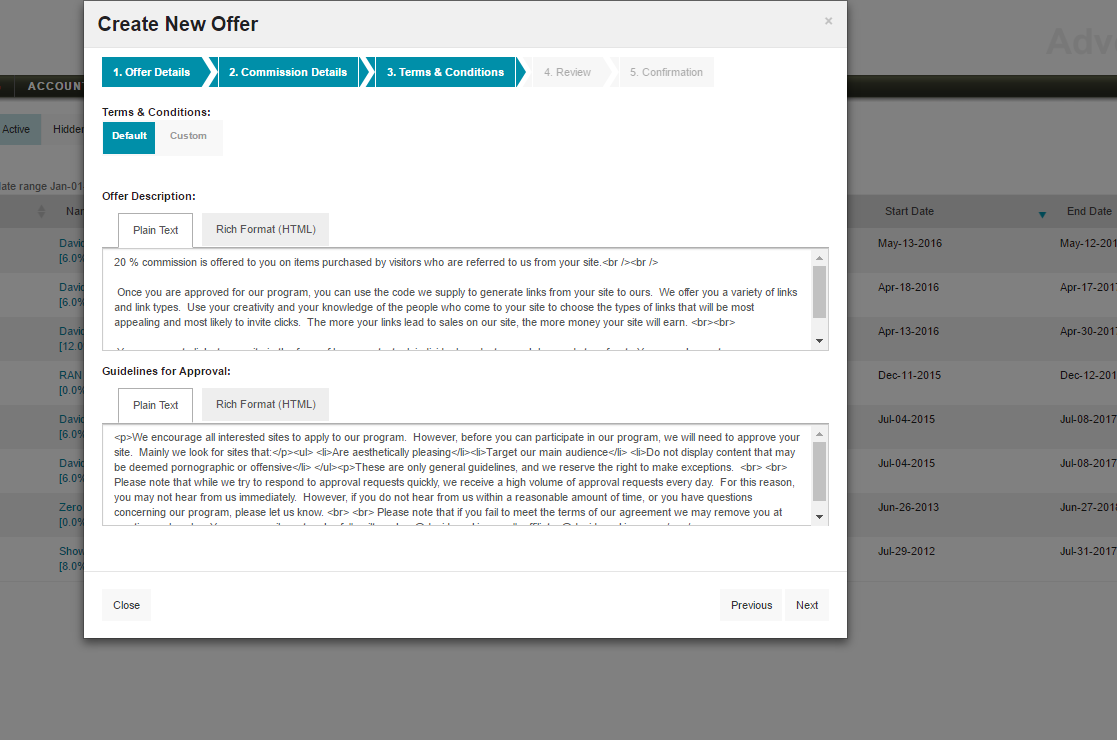
Step # 4 – Adding Terms and Conditions

This is a vital step and needs to be as detailed as possible. RAN provides generic terms and conditions, but I recommend creating your own that include exactly what affiliates can and cannot do and the penalties if they fail to comply. This is where the PPC rules will be added, coupon policy, FTC statement, and any other rules you want the affiliates to follow. Click “Next”.

linkshare-offers-3

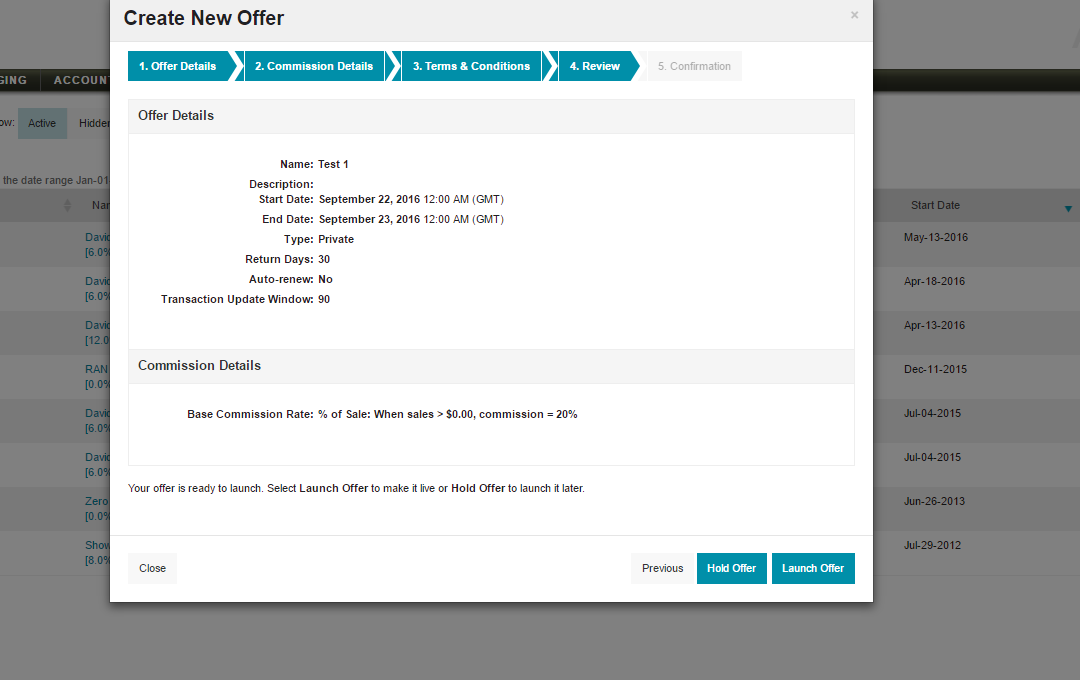
Step # 5 –Review Created Offer

Almost complete! Now, review the offer to ensure accuracy. Once reviewed and verified you can either hold the offer or launch it. By hitting launch, it will go live immediately and holding it will save it and when ready it can be launched.

linkshare-offers-4

When the offer is officially launched go to the main navigation and hover over “Offers” and click “Offers”. It will take you to a page to view all current live offers, any hidden offers, expired offers, or upcoming offers. Here you can also edit the offers, and change the designated default offer to the one of your choosing.

*Note- In order to extend private offers of the baseline to affiliates through the RAN interface a copy (mirror) of the baseline offer needs to be created or else offers cannot be extended using the baseline offer. However, if custom offers are made they can be extended without creating a “mirror” offer. 

Setting up offers is not difficult, but it is a task that need to be completed with precision. Once you set up one the rest are easy (if you decide to have multiple).

How to Pull Year in Review Reporting in ShareASale

In the past I have written posts about the different types of reports available in the merchant interface of a few affiliate networks, but today I would like to talk about a report in ShareASale that is extremely important in many ways. ShareASale offers a dynamic interface that allows merchants to access a plethora of information to help (or continue) to grow their affiliate program, but the one report that I eluded to above the “Year in Review” report.

The “Year in Review” report is good to use for checking MoM and YoY trends, analyzing what challenges were experienced in a given month, successes, and it can also be helpful for testing different strategies. It is also good to use instead of the “Affiliate Timespan” reports.  For example, if a merchant wants to test different landing pages to improve conversion rate in June, they can review the data in the “Year in Review” report in July and compare it to May and make any necessary changes the following month. Want to know how to access this vital report and understands its contents? Of course you do. I will outline the step-by-step process to go through to get you hands on this report.

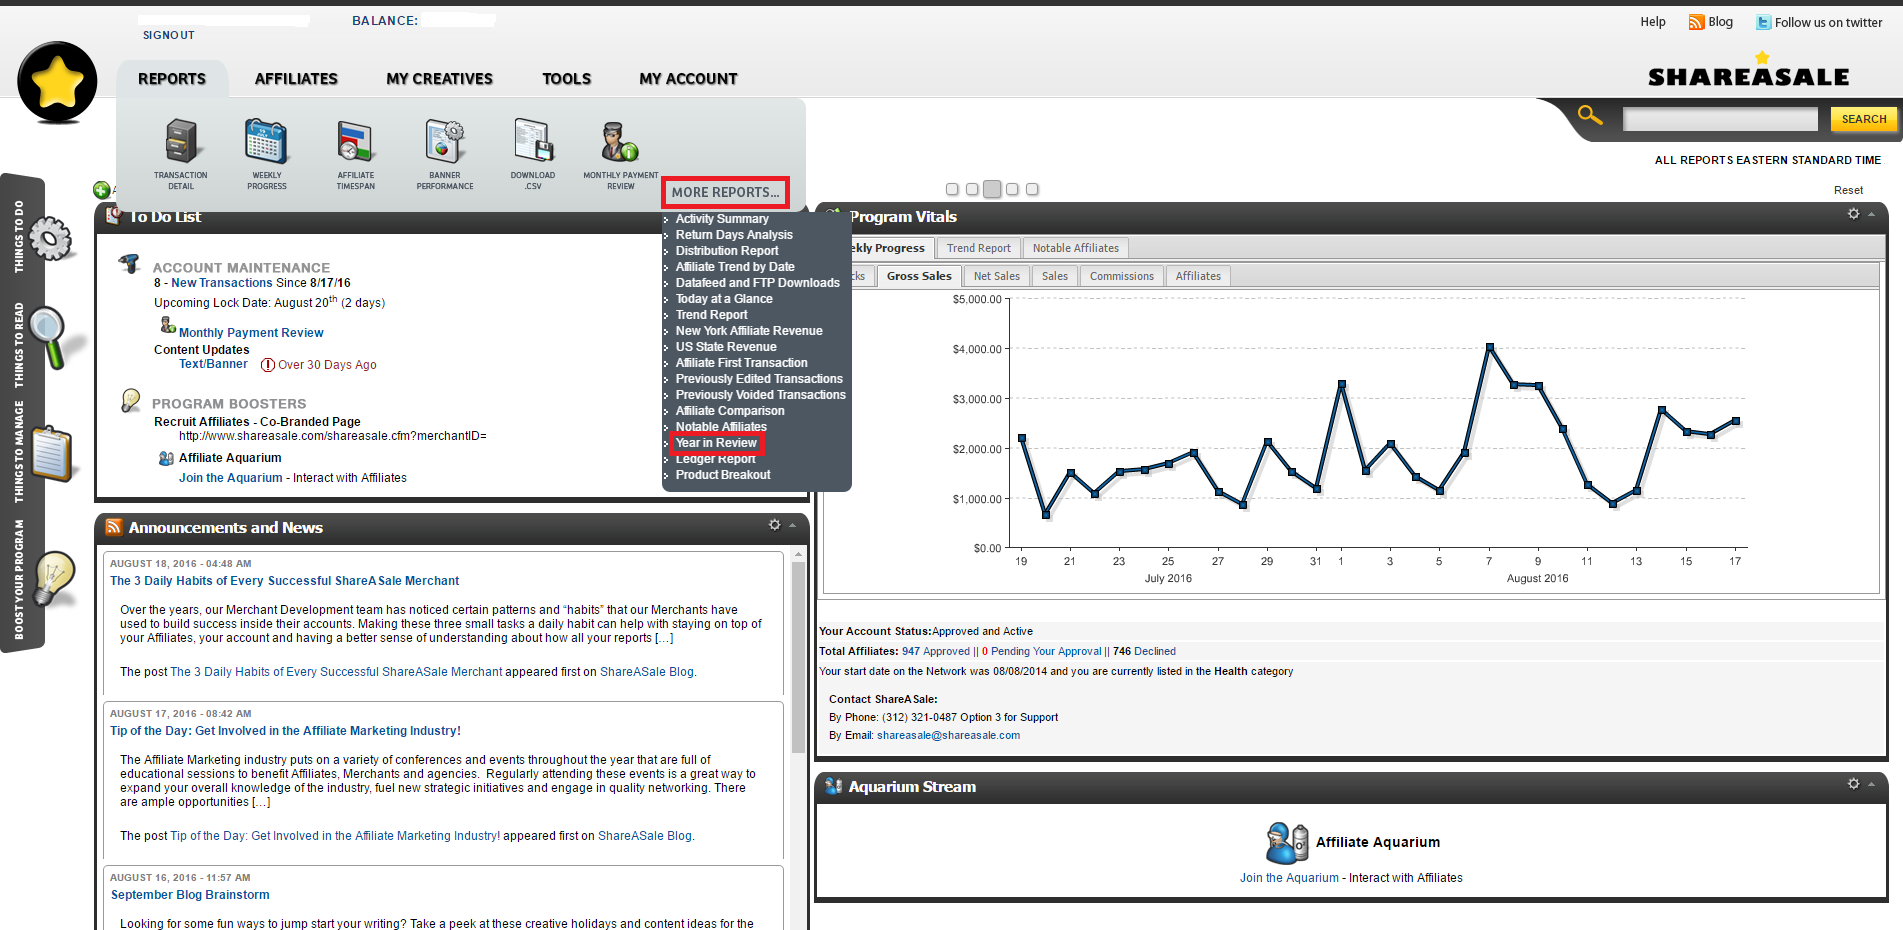
Step # 1 – Navigate to the “Year in Review” Report

Once logged into the merchant ShareASale interface you will navigate to “Reports”, then “More Reports”, then finally “Year in Review”.

Step # 2 – Setting Parameters for Report

This part is the most important. You want to make sure you pull the data you want to analyze in detail. First, select the start date (if you want 2016 data to date input 7/31/2016). Next, you have the option to include all 12 months or a select few. With this you can also include/exclude specific affiliates by using the affiliate filter option (if you want ALL data, just keep it as is). Once the parameters have been set, hit “Refresh Report”. This will then pull up all the data requested and can now be reviewed.

SaS 2

Step # 3 – Reviewing Data

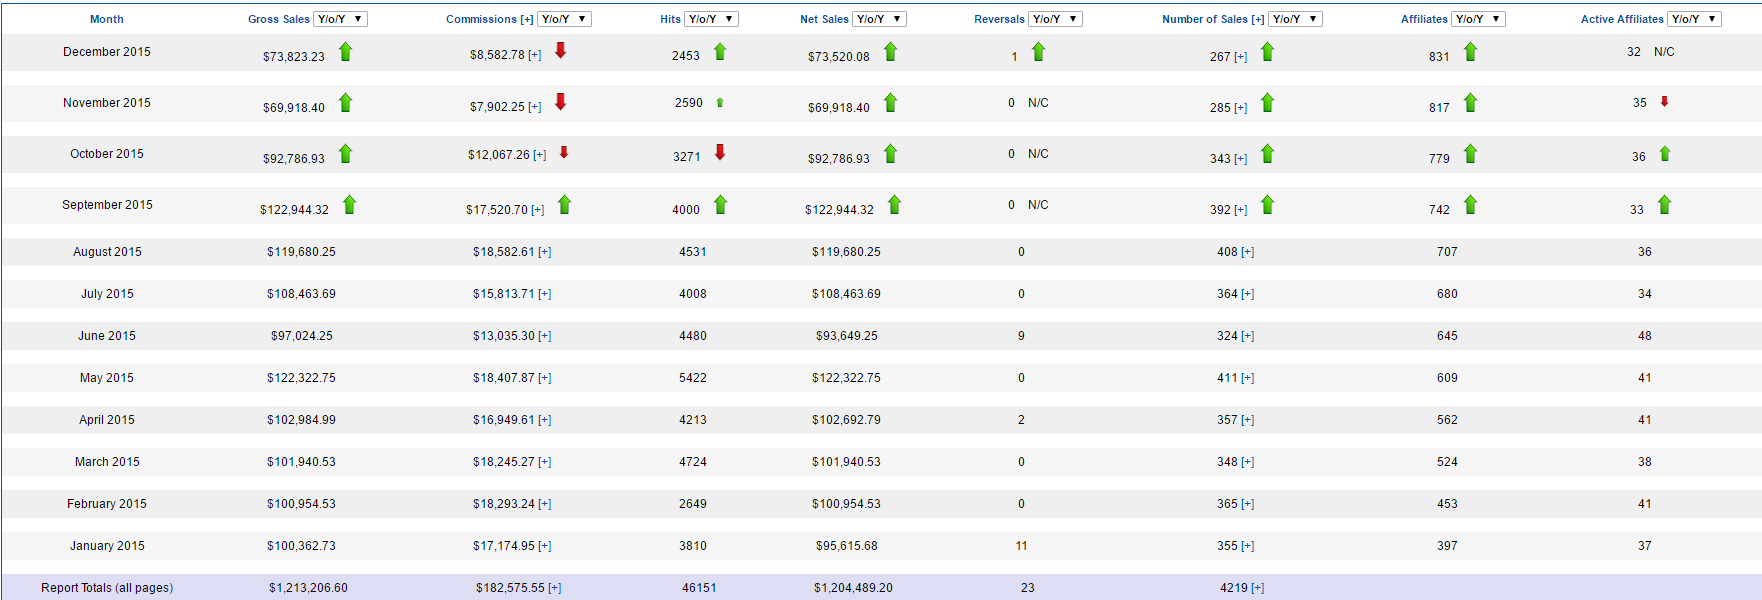
This is the fun part. The amount of data returned is perfect for making business decisions. Provided is gross sales, commissions (excluding SaS fees), hits (clicks), net sales, reversals, number of sales, affiliates in the program, and active affiliates. There is an option to see year-over-year or month-over-month data for all the data lines. Review the trends and strategize for the future, this is why this report is valuable to any affiliate manager.

SaS 3

Does your affiliate program want more active affiliates? Simply analyze the active affiliates column and craft a strategy to engage more affiliates and roll it out via newsletters and/or a blog post. That is just one example of what can be done with this report.

It is a fact that numbers drive decisions and strategies, so now affiliate managers and other marketing team members have access to quality data that can aid in growth and prosperity.