How to Simplify ShareASale Program Management by Segmenting Affiliates

Data is extremely valuable in evaluating affiliate campaigns. It also helps evaluate affiliate performance and allows affiliate managers to make strategic decisions for their future affiliate marketing campaigns.

Many brands that run affiliate programs do not segment or categorize their affiliates, thus missing out on opportunities to manage their affiliate program in more efficient ways. Filtering and sorting affiliates should be a task that every affiliate manager engages in. In this post, I will outline how to filter and sort affiliates in the ShareASale affiliate network.

Step 1: Navigate to “Affiliate List”

Click the “Affiliates” tab in the main navigation, then “Affiliate List.”

ShareASale Affiliate Filtering & Sorting

Step 2: Choose Predefined Filter or Advanced Filters and Sorting

ShareASale offers three (3) predefined filters to use, but to get more detailed and drill down further – the “Advanced Filters and Sorting” option is the way to go. The advanced filters and sorting will be discussed in detail in the next step.

ShareASale Affiliate Filtering & Sorting


Step 3: Utilize Advanced Filters and Sorting Option

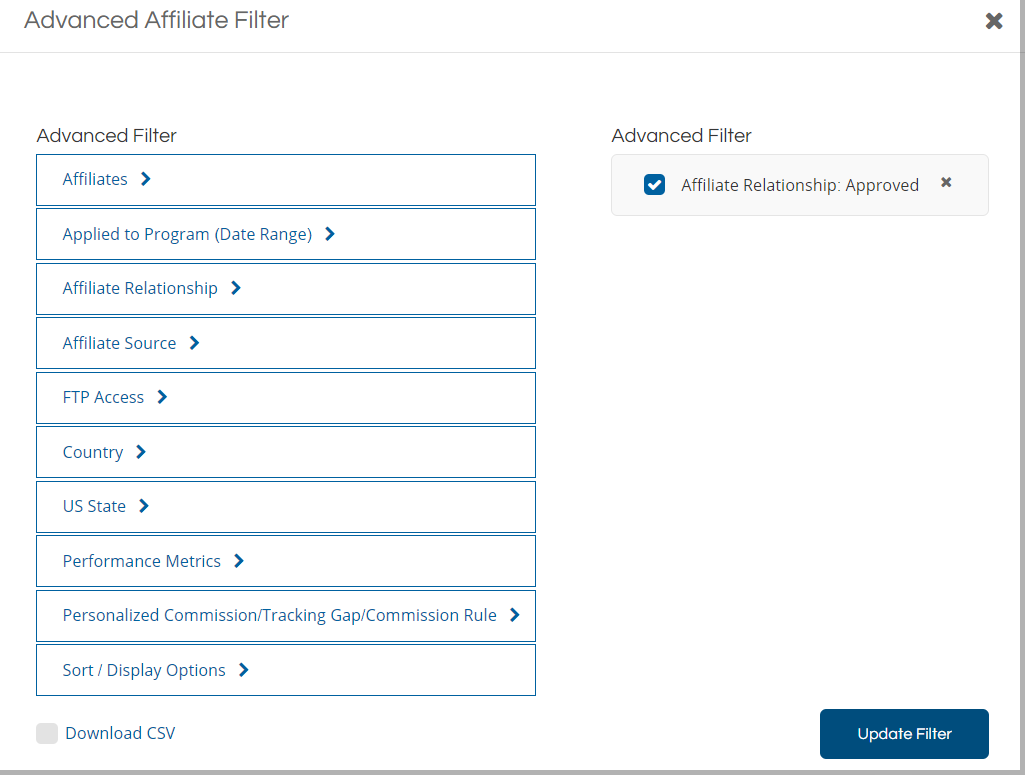
There are numerous ways to filter affiliates, so how do you know what to do? It depends on the what you are looking to do. For example, filtering affiliates that joined the program in the past 30 days. Click “Applied to Program (Date Range) Enter Start Date and End Date and “Click Update Filter“. A list of all affiliates joined in the past 30 days will be shown. From there, affiliates can be placed in groups and/or assigned tags for future campaigns. One of the most common affiliate filtering/sorting options is by “Performance Metrics”. Affiliates can be filtered by sales generated, EPC (or earnings per 100 clicks referred), click volume, commissions earned, etc. Filtering by “Performance Metrics” allows greater flexibility in managing affiliates and does not cast a “one-size-fits-all” approach to managing them.
ShareASale Affiliate Filtering & Sorting


ShareASale makes managing affiliate programs less stressful. Their easy-to-use interface allows program managers to be more efficient with their time. Many affiliate managers are multi-taskers and time is money. Growing an affiliate program requires constant data analysis and having a simple(r) approach to gathering the data is critical. So, make sure you take full advantage of the ShareASale tools at your disposal.
How to Create a Custom Recruiting URL in ShareASale

As an affiliate manager one of the main responsibilities is recruiting new affiliates to grow the program. There are different methods and places to find prospective affiliates, but keeping track of where new affiliates come from can be a cumbersome task. ShareASale offers a way for merchants to “tag” prospects and have them use a custom URL that will allow them to attribute the signup to a specific outreach campaign and create and make the recruiting process more organized.

The following steps are how to create a custom recruiting URL within ShareASale.

Step 1 – Create a Tag for Recruiting

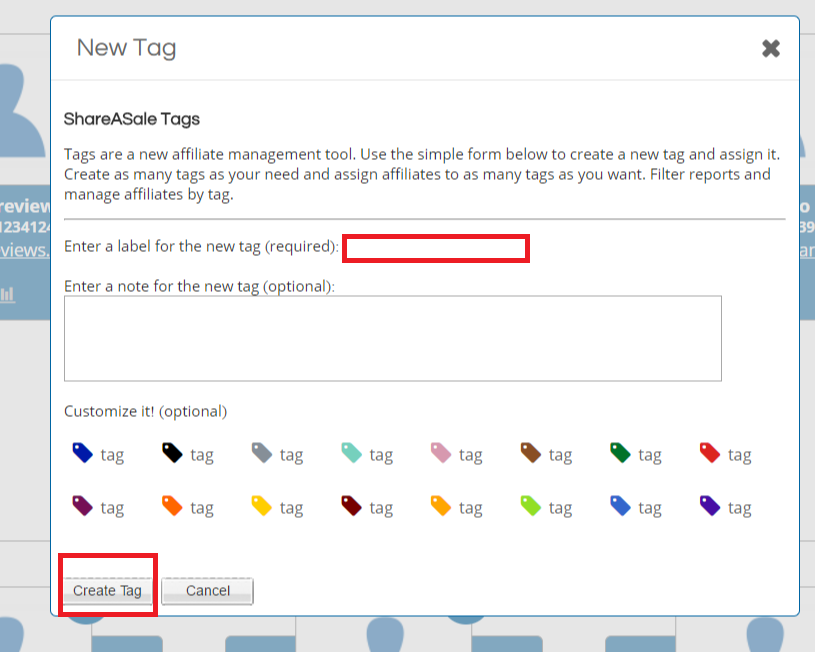
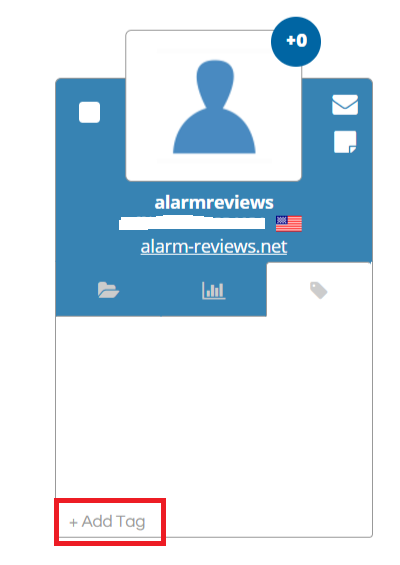
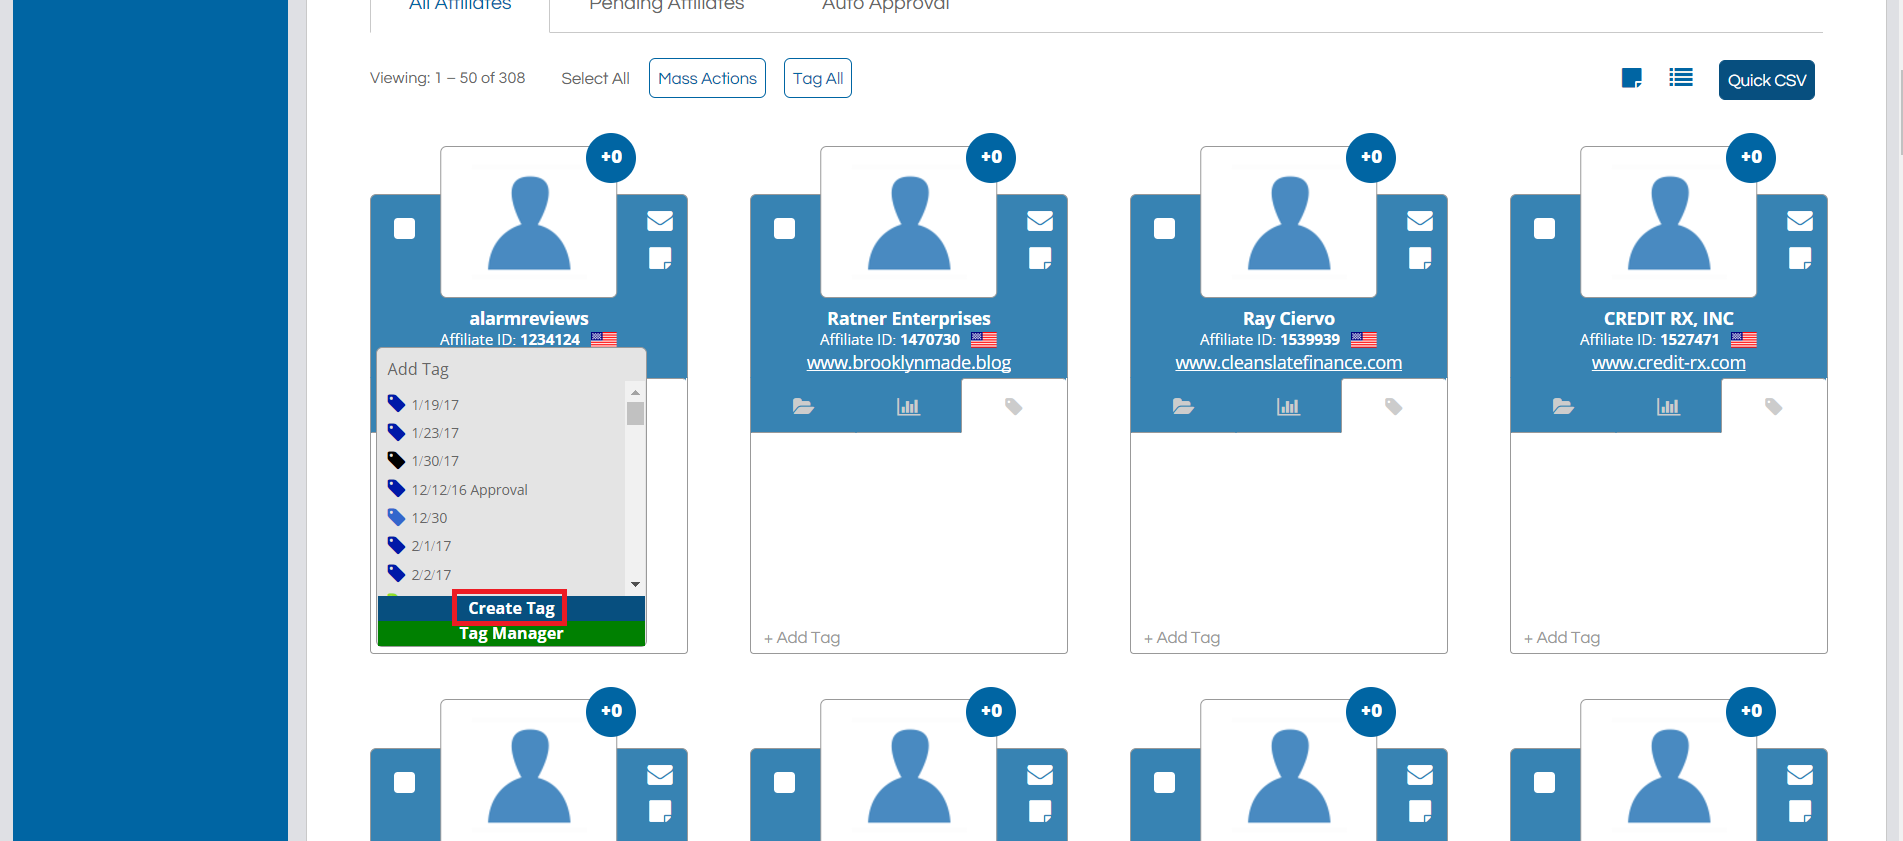
First, navigate to the “Affiliates” tab in the main menu and click “Affiliate List”. Next click “Add Tag” and then Click “Create Tag” (in blue).

Next, the “tag” will want to be specific regarding the recruiting campaign, so in the smaller rectangular box the title of the tag should be entered (ex. SIGNUP FROM CONTENTAFF). Click “Create Tag”, now the tag is created and will be used in the recruiting URL.

Step 2 – Adding the Tag to the Recruiting URL

Below is the standard URL used for affiliates to sign up to an affiliate program.

http://www.shareasale.com/join/XXXXX

Merchants can use the URL above, but the recruiting link with the created tag should look as follows:

http://www.shareasale.com/shareasale.cfm?merchantID=XXXXX&source=CONTENTAFF

The source= should be the tag title minus the “SIGNUP FROM”.

Please note that the XXXXX should be replaced with a ShareASale merchant ID.

Each time a prospect applies to the affiliate program using the custom URL it will indicate that in the application.

Recruiting is one of the most critical components in building an affiliate program, so creating custom recruiting URL’s for all prospects is highly recommended. It will streamline the process and make campaign attribution easier as well.

If you have any questions please contact me at [email protected]

ShareASale Transaction Breakout Report and Why It Is Important

Want a quick way to analyze affiliate transactions to determine their sources? ShareASale merchants are now using the “Transaction Breakout Report”. This report is exactly what it sounds like. It breaks down affiliate transactions within a specific time frame and tells merchants if the transactions are new customers, mobile transactions, or coupon transactions. I will go into detail below on the report and how to access.

Step # 1 – Accessing the Transaction Breakout Report

Once logged in to the ShareASale merchant account, navigate to the “Reports” tab and then “Transaction Breakout” (second row).

Step # 2 –  Adjust Filters to Get Necessary Data

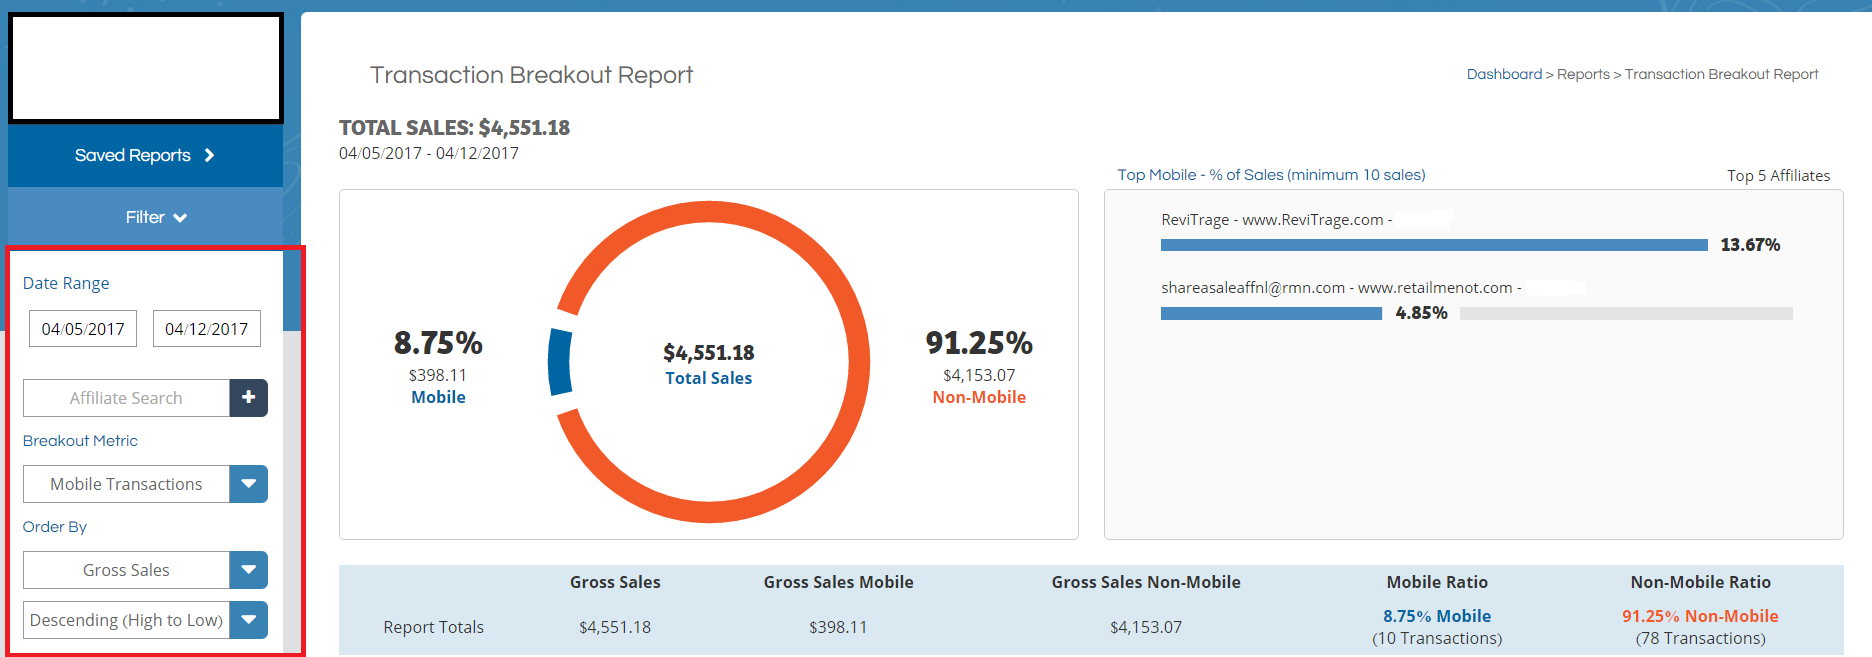
In the image below, the red box on the left has filter options to use. Select the date range you want to review (ShareASale defaults to the past 7 days), a specific affiliate, breakout metric (mobile transactions, new customer transactions, and coupon transactions. The mentioned filters can be ordered by gross sales, number of transactions, commission, or breakout ratio. Hit “Filter” and the results will appear to the right.

Step # 3 – Review Provided Data

As you can see in the image above, over 91% of the transaction during the week were “Non-Mobile”.

Below the graph will be a detailed breakdown publisher by publisher. This example is based on mobile transactions, but some merchants are concerned with the number of new customers being brought in, so when running the report, remember to change the “Breakdown Metric”.

This report is quite valuable. It can show merchants where time and effort should be focused as well as determine if more or less coupons/deals are needed. The report can also assist in affiliate recruitment. How is that? Merchants can determine that they want to spend more time gaining new customers, so reaching out to prospective affiliates that are similar to the ones currently performing in that category. The “Transaction Breakout Report” is not just a bunch of numbers, but a tool to help (or continue) to grow a ShareASale affiliate program.

How to Book a ShareASale Featured Program Placement

Are you a merchant with an affiliate program, but struggling to find quality affiliate to promote your brand? If so, you are not alone. One of the biggest struggles is to recruit quality affiliates. If you are a ShareASale merchant then most likely you tend to see an influx of coupon affiliates applying, but the more valuable affiliates are out there, but may need to discovered. What your affiliate program may need is additional exposure to those affiliates. ShareASale offers different ways, through paid placements to reach affiliates that may be a fit for your program. To help in this I am going to show you how to purchase and set up a ShareASale Featured Program of your Category placement. This particular placement displays a logo and description of your affiliate program at the top of the individual category page for which you belong.

Step 1 – Navigating to the Featured Program of your Category Placement

You will start by navigating to the “TOOLS” menu option, followed by “PROGRAM BOOST”. This will take you to the section where you will make the purchase.

Step 2 – Purchasing the Featured Program of the Category Placement

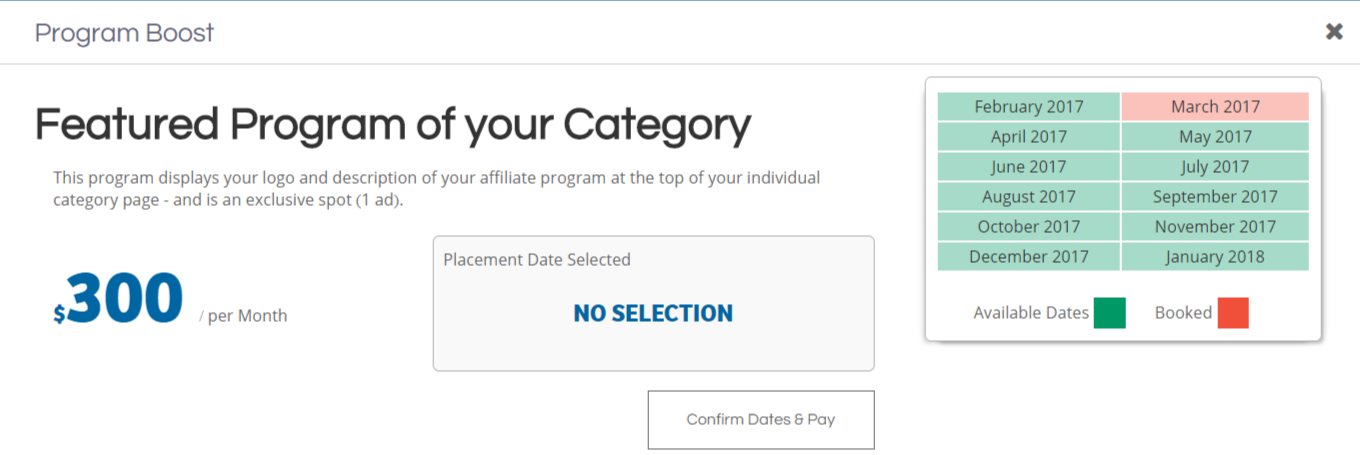
There will be multiple placement options, but you will scroll down and click the “BUY PROGRAM” button for the Featured Program of your Category. The next screen will be to select a month to have the placement run. To the right will be a list of the next 12 months. The green represents “available” and the pink represents “booked”. Click on the month you want to run the placement and click “CONFIRM DATES & PAY”. You will then be asked how you want to pay for it. It can be done from the current ShareASale balance (given there is enough to cover the $300) or credit card.

Step 3 – Setting up the Featured Program of the Category

Now the fun part! Navigate back to the Program Boost page. You will see a tab labeled “MY PROGRAMS”, click that and it will have the placement just purchased. There you will be able to edit the text and add the image needed.

To start creating the placement, click “EDIT”.

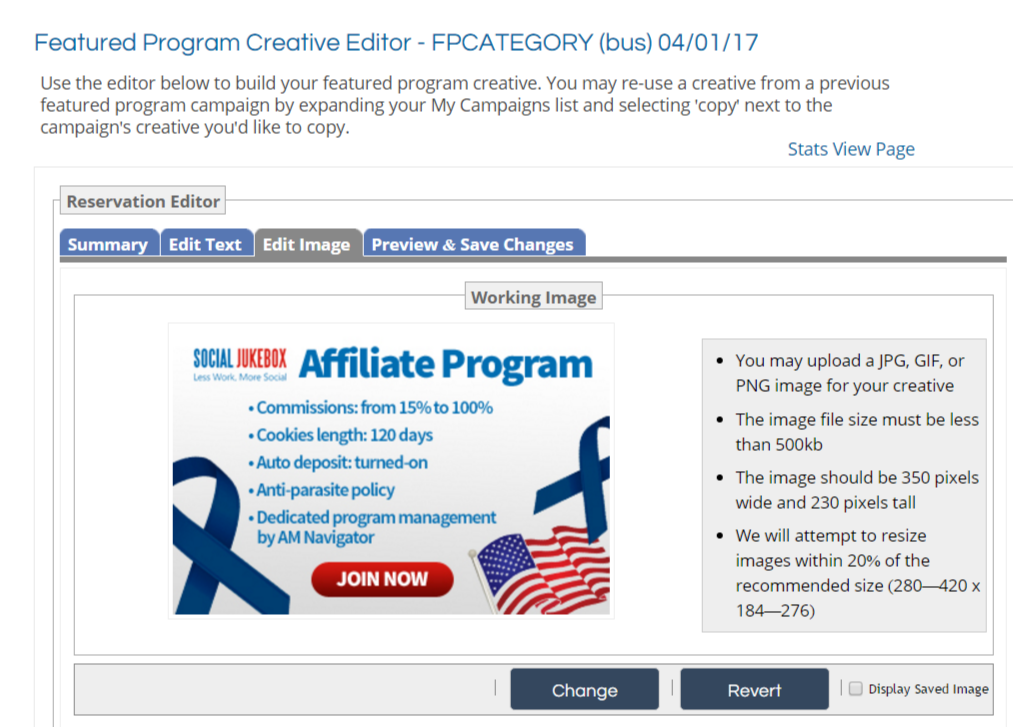
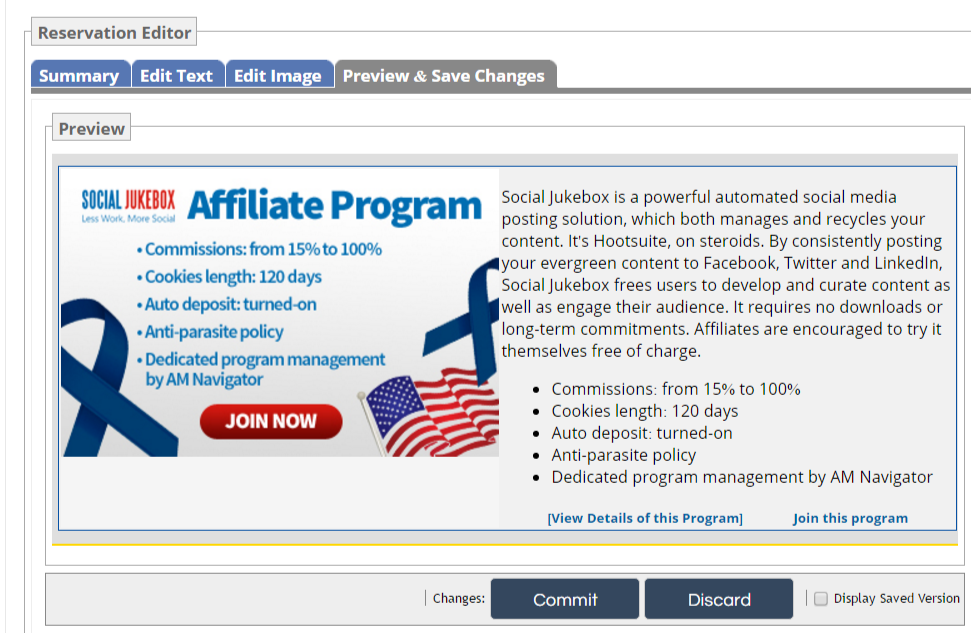
You will be brought to a screen that look like the image below. There are four (4) tabs. In the “EDIT TEXT” tab you will place a description of the program along with up to five (5) bullet points highlighting your affiliate program.

To add the banner image, click the “EDIT IMAGE” tab. The image should be in either JPG, GIF, or PNG form and be 350 px wide and 230 px tall. Once the image is loaded click the “PREVIEW & SAVE CHANGES” tab.

This is the final step. Review everything from the text to the banner. If there are any changes needed make them as soon as possible, but you do have up until the day before to modify the placement. Once all is good, click “COMMIT” and you are finished.

Creating brand awareness is a critical piece to a successful affiliate program, but also aids in attracting quality affiliates. For $300 the Featured Program of your Category can get you in front of highly influential affiliates and help take your program to the next level.

How to Implement an Affiliate Data Feed in ShareASale

Data feeds are an important piece to a successful affiliate program. Keep in mind that not every merchant will be able to utilize data feeds since they are designed specifically for merchants with multiple products. Data feeds are files that include information about a merchant’s products. Information that is included is: SKU, price, image, availability, description, etc. A merchant should include as much information as possible so that affiliates can promote their products effectively. How does a merchant make their data feed available to their affiliates? Today, I am going to outline how ShareASale merchants create and distribute their affiliate data feeds.

Step 1 – Navigate to the Data Feed page

A merchant can either use this link – https://account.shareasale.com/m-productmanagement.cfm or they can get there by clicking the “Creatives” tab and then “data feed”.

Step 2 – Requirements

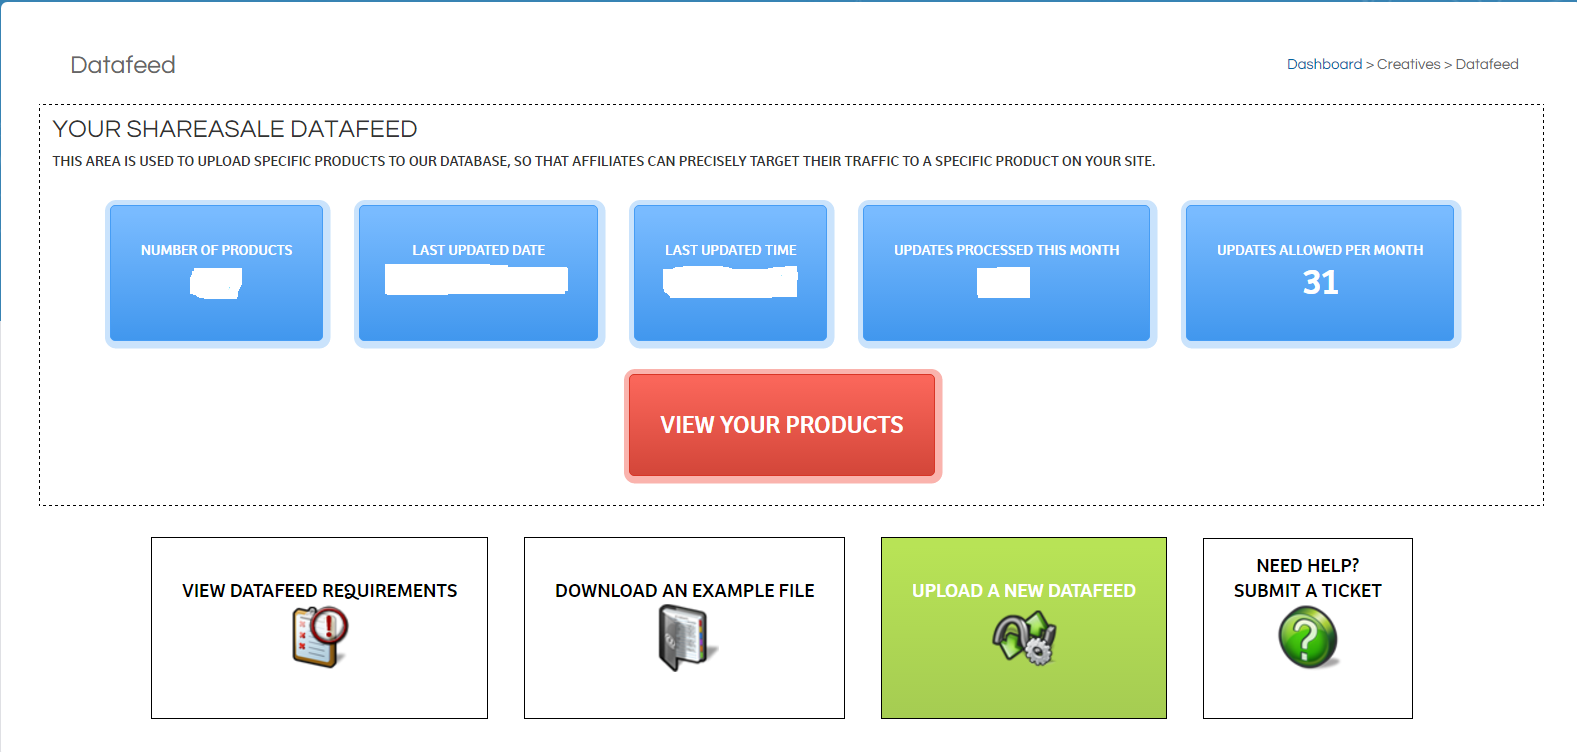
The merchants can now see how what it will look like once a data feed is loaded. It will list the number of products included in the feed, the last date updated, number of times processed during current month, and the number of updates allowed in the current month. By clicking the “View Your Products” merchants can also view their entire product data feed.

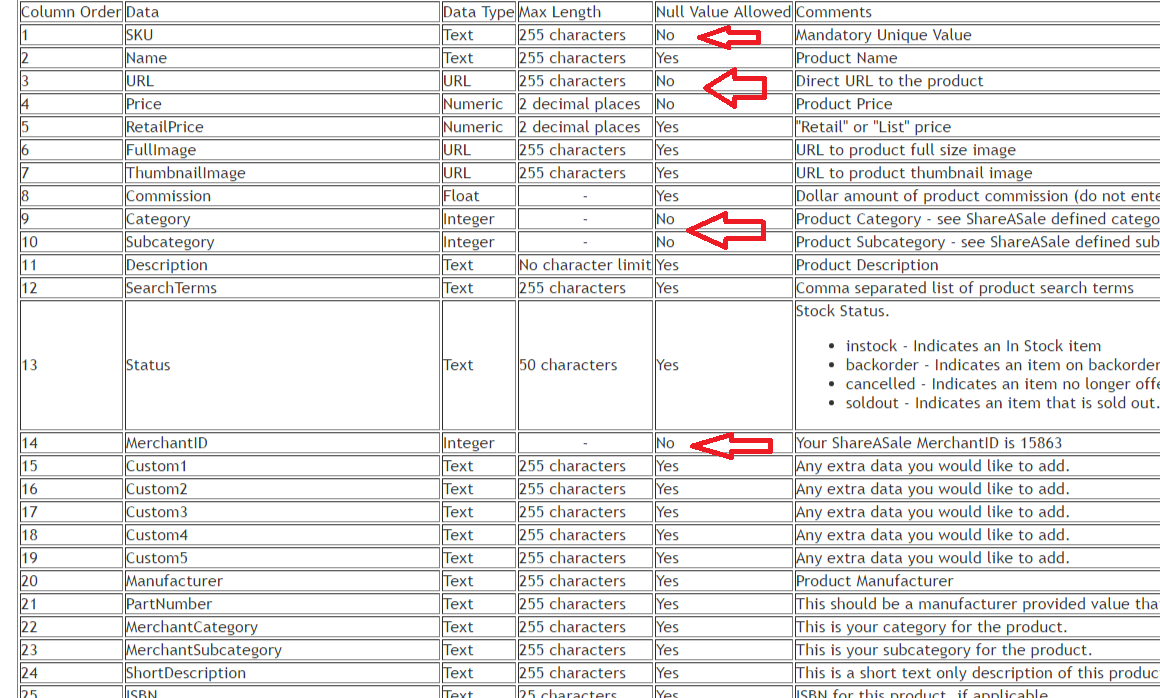
There are specific requirements ShareASale needs merchants to include in their data feeds, but not every piece of information presented in their requirements is necessary. By Clicking the “View Data Feed Requirements” merchant’s will see specifically what needs to be included.

The required fields are designated below with a red arrow.  In the column “Null Value Allowed”, No means the field is required. Merchants will want to fill in as much data as possible even if it is not required. The more the affiliates have the better they can promote the products.

After reviewing the requirements, merchants should download the sample file and use it as their guide. Please note that all column headers must remain in the sheet even if they are not complete. If not, the uploaded it will not be successful.

Step 3 – Upload the Data Feed

The data feed file has been completed based on ShareASale’s requirements, so the final step is to upload it.

Click the green “Upload a New Data Feed” button on https://account.shareasale.com/m-productmanagement.cfm.

Click “Choose File” and then “Upload Data feed”. If there is an error, it will pop up and will need to be addressed. To be safe we ask merchants to reach out to ShareASale directly to ensure the data feed properly loaded.

Merchant’s should be updating their feed as often as new products are introduced, removed, changes in pricing, and availability. Affiliates should be armed with the most up to date information in order to successfully market the products.

An Overview of the ShareASale Affiliate Recruiting Tool

Earlier this month ShareASale opened to public their Recruiting Tool (https://recruiting.shareasale.com/), along with a face lift of the merchant interface. It has been a long wait, but finally ShareASale allows merchants to invite affiliates into their respective programs through the ShareASale merchant interface. They now have a similar tool like CJ Affiliate and Rakuten Affiliate Network. This is great news for merchants as well as affiliates.

The new recruiting tool is set up to provide merchants that are exclusive to ShareASale more “affiliate invites” than merchants who have their program on multiple networks. A merchant exclusive to ShareASale is entitled to 30 invites per month, whereas, merchants on multiple networks are entitled to only 20. Also, if a merchant has multiple programs on different networks the affiliate invite list is not allowed to be used on the other networks. Without further ado, let’s get in what this tool looks like and how it works.

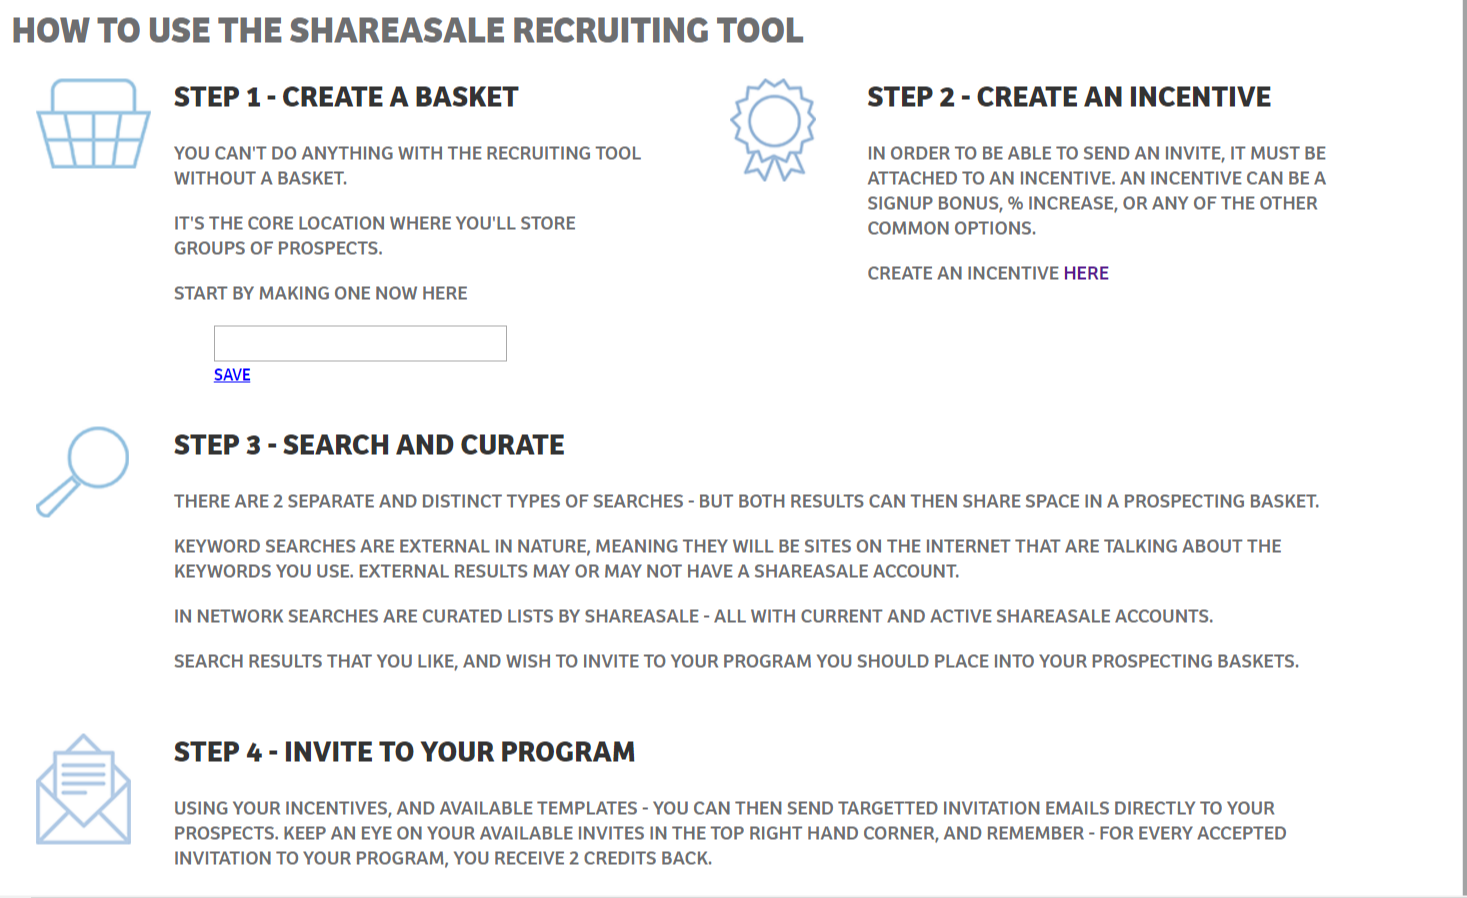
The layout is easy to understand and maneuver, with each section clearly marked. There are four steps to be completed in order to search for prospective affiliates and send invites.

Step 1 – Create a Basket – Merchants should name it something related to the affiliates being targeted. The goal is to be able to distinguish each basket month to month and not be targeting the same affiliates.

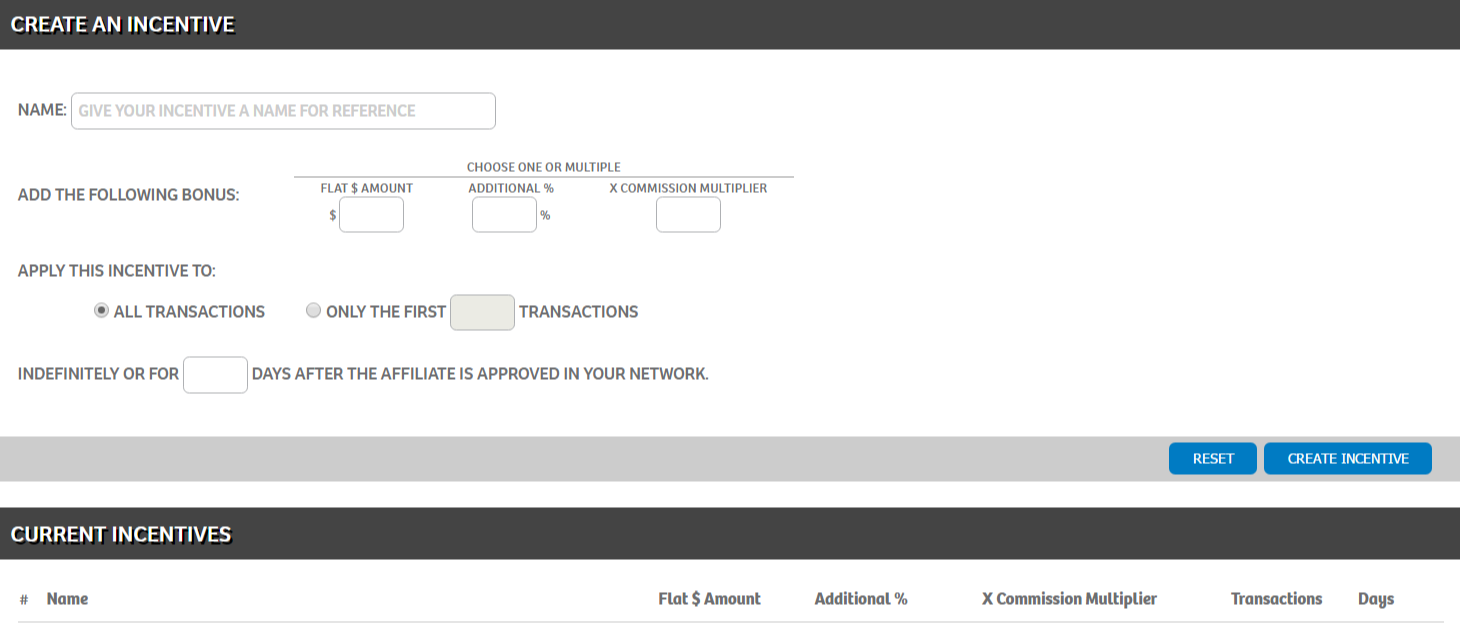
Step 2 – Create an Incentive – ShareASale requires an incentive to be attached to each invite, recruiting campaigns tend to be more effective if it includes an incentive in some form. Merchants can offer a first sale bonus, a commission increase on “X” amount of sales, etc.

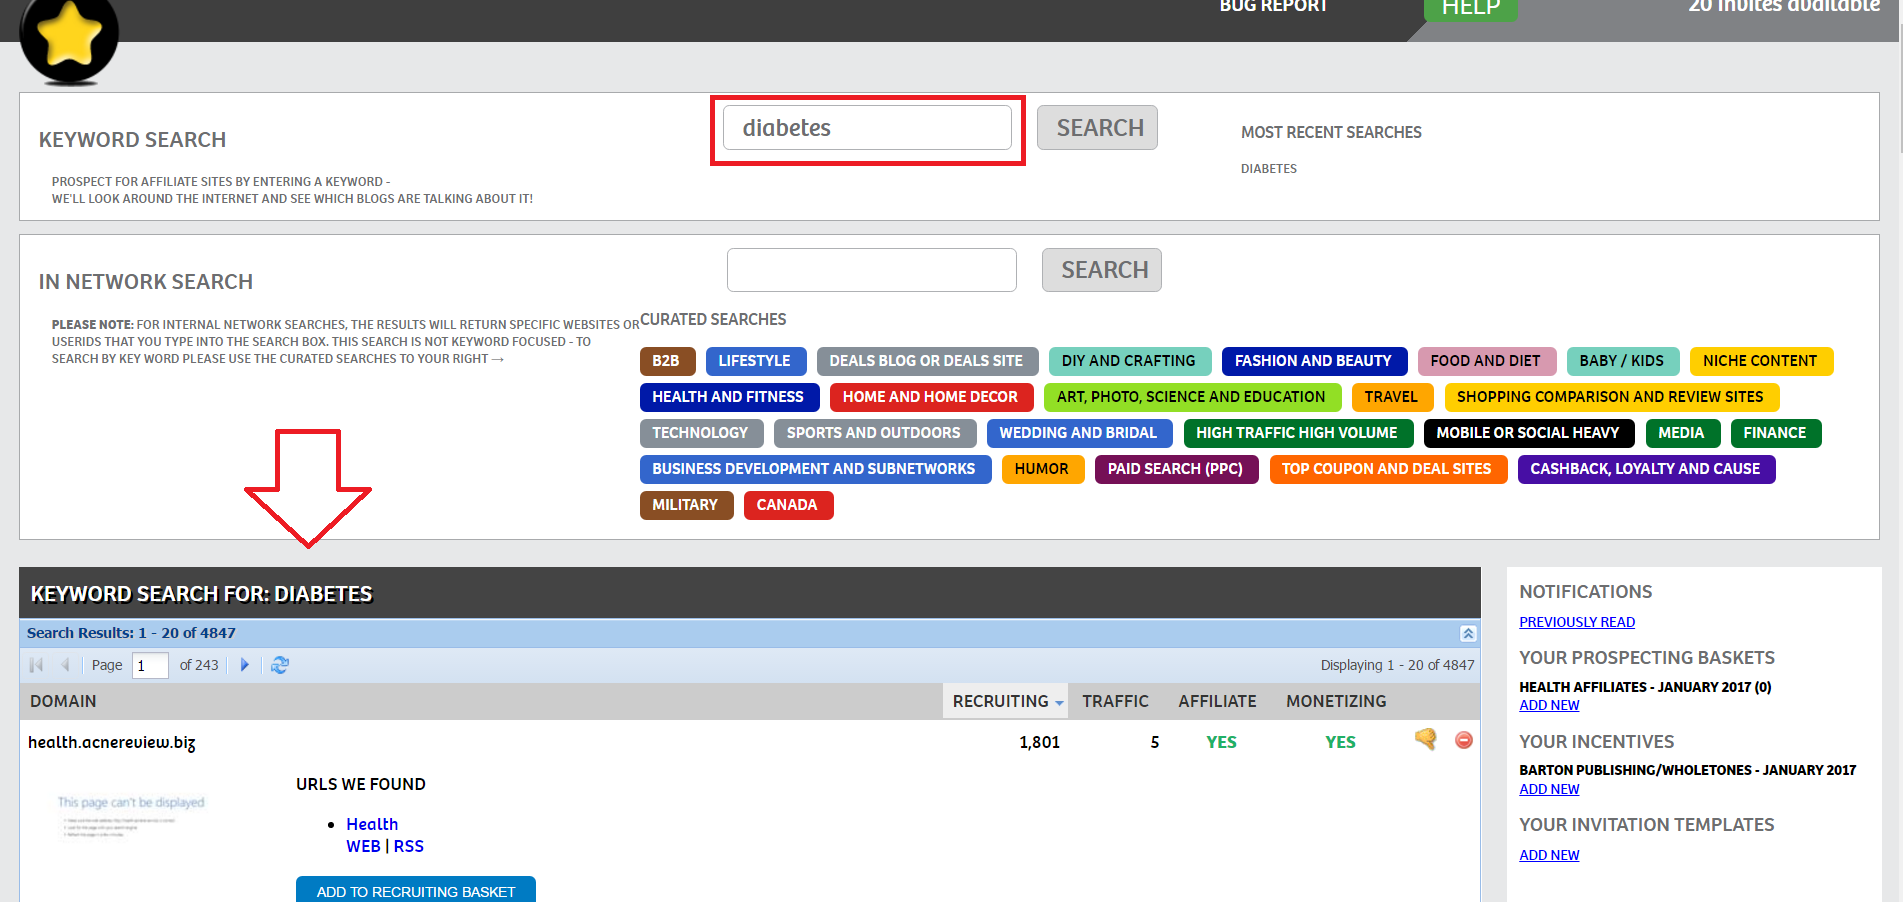
Step 3 – Search for Affiliates – There are two ways to search for prospective affiliates (screenshot below), first, a “Keyword Search” and then an “In Network Search”. For the “keyword search” simply type in a phrase in the search box and hit search. ShareASale will look around the internet for blogs that are talking about the keyword used and then provide the results below. Next, the “In Network Search” allows merchants to browse niche categories already provided by ShareASale. Simply click on the category and the results will be placed directly below. What is nice is that the tool sifts out affiliates that are already in the merchant’s program so that an invite is not wasted.

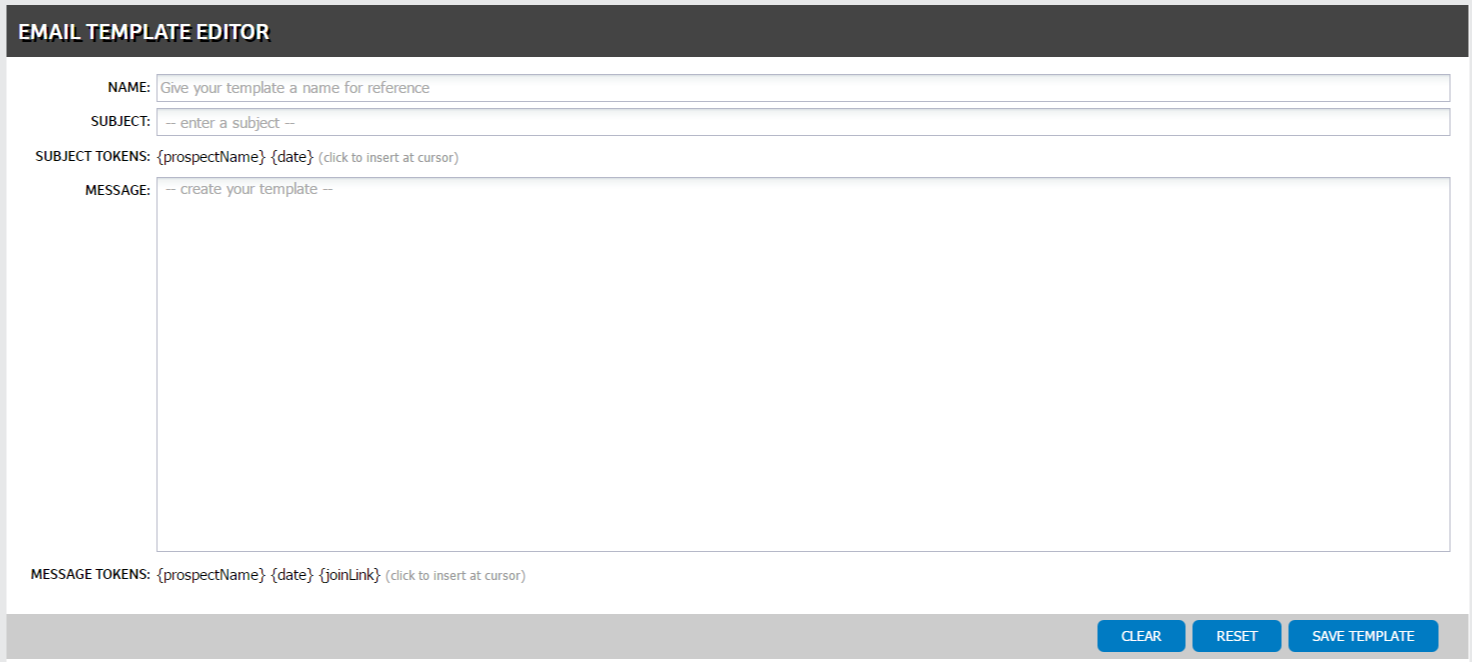
Step 4 – Invite Affiliates  This is where the email is created that will be sent out on merchant’s behalf. Make sure the subject line is catchy and the message includes: the prospects name, information about merchant’s business, the program terms (commission, cookies length, etc.) and the incentive. After the invite is complete it will be available directly under the editor so that it can be modified at any time.

After all four of the previously mentioned steps are complete merchants can now send invites. Using the search functions described above merchants will create their prospect list and then invite them. The final step to this is inviting affiliates to participate in a merchant’s program.

On the right side of the page there will be a group of four sections that include: notifications, prospecting baskets, incentives, and invitation templates. To send the invites click one of the “Prospecting Baskets”.

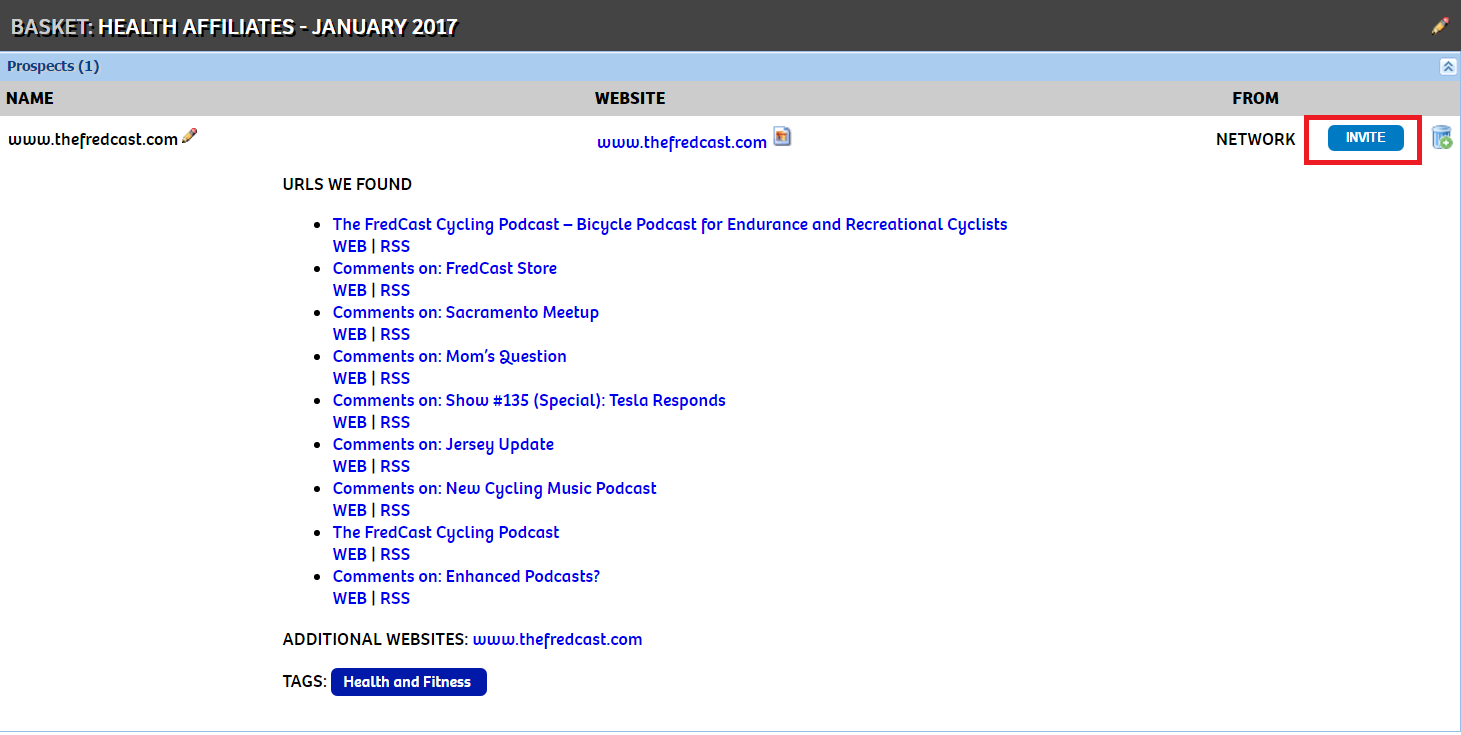
In the prospecting basket will be all the affiliates to be contacted. Simply click the invite button to the right and the invite will be sent directly to the prospective affiliate. Once an affiliate accepts an invitation to join the merchant will receive two credits back to their balance.

There you have it ShareASale merchants, an overview of the new recruiting tool. If there are any questions please email me.

How to Pull Year in Review Reporting in ShareASale

In the past I have written posts about the different types of reports available in the merchant interface of a few affiliate networks, but today I would like to talk about a report in ShareASale that is extremely important in many ways. ShareASale offers a dynamic interface that allows merchants to access a plethora of information to help (or continue) to grow their affiliate program, but the one report that I eluded to above the “Year in Review” report.

The “Year in Review” report is good to use for checking MoM and YoY trends, analyzing what challenges were experienced in a given month, successes, and it can also be helpful for testing different strategies. It is also good to use instead of the “Affiliate Timespan” reports.  For example, if a merchant wants to test different landing pages to improve conversion rate in June, they can review the data in the “Year in Review” report in July and compare it to May and make any necessary changes the following month. Want to know how to access this vital report and understands its contents? Of course you do. I will outline the step-by-step process to go through to get you hands on this report.

Step # 1 – Navigate to the “Year in Review” Report

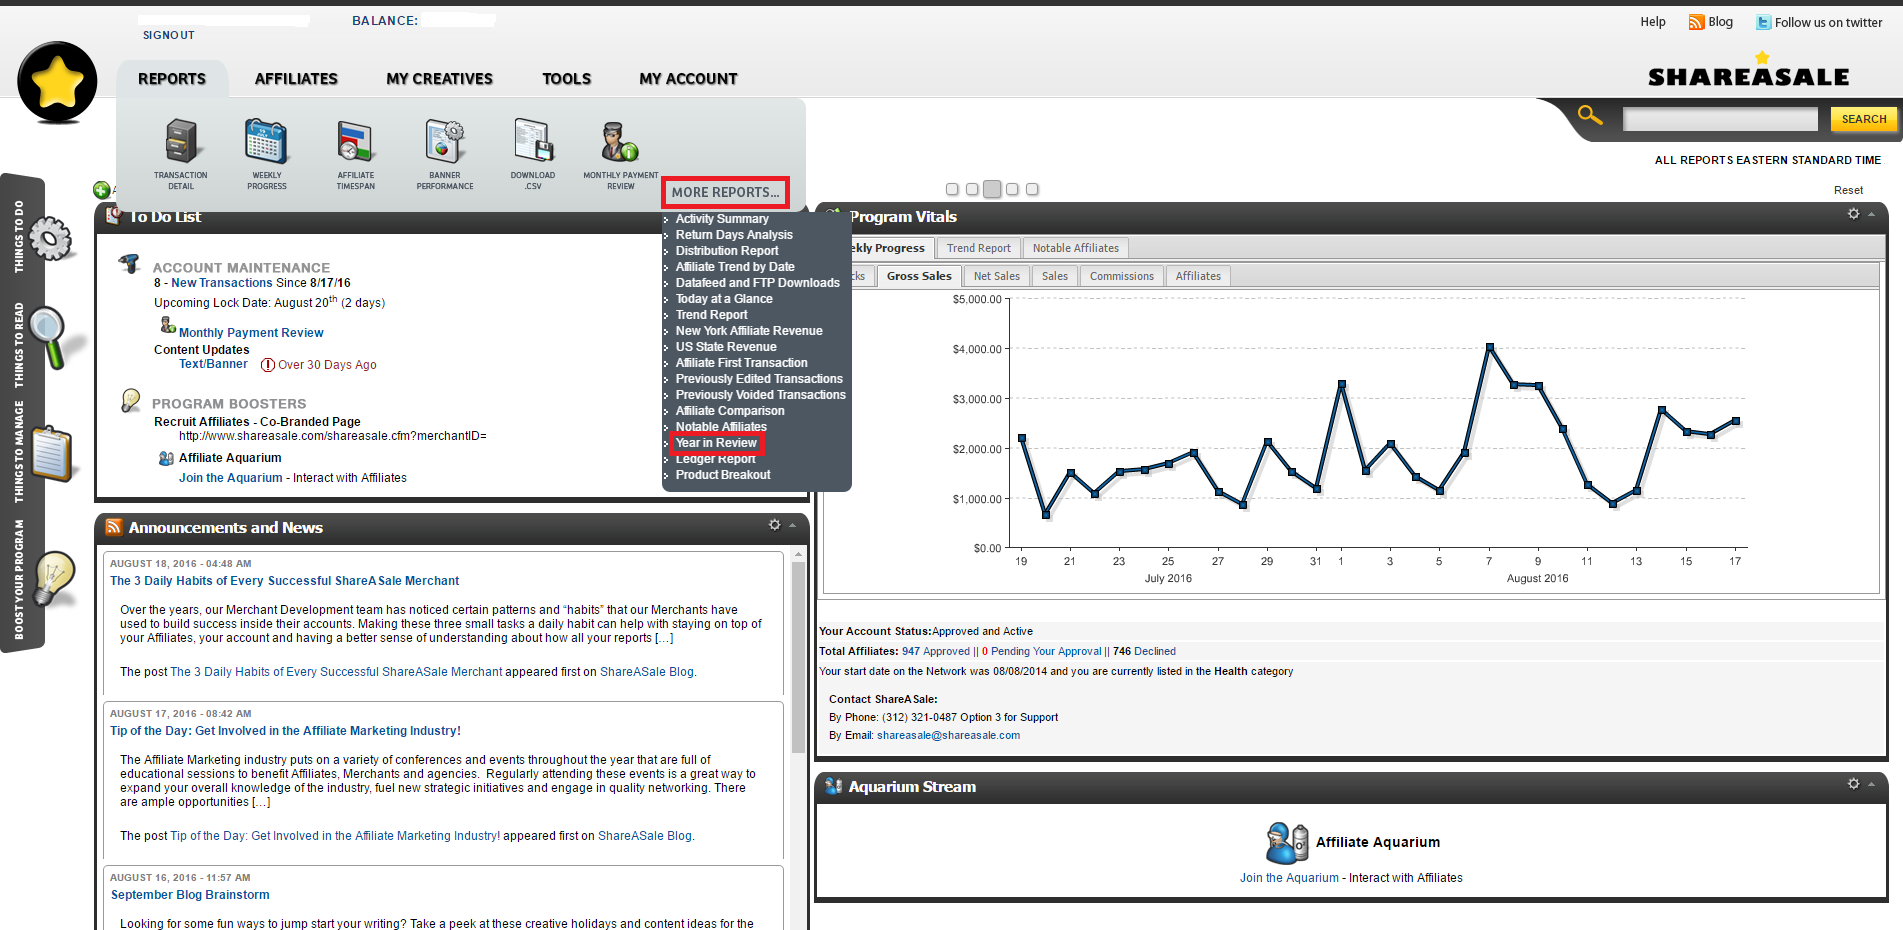
Once logged into the merchant ShareASale interface you will navigate to “Reports”, then “More Reports”, then finally “Year in Review”.

Step # 2 – Setting Parameters for Report

This part is the most important. You want to make sure you pull the data you want to analyze in detail. First, select the start date (if you want 2016 data to date input 7/31/2016). Next, you have the option to include all 12 months or a select few. With this you can also include/exclude specific affiliates by using the affiliate filter option (if you want ALL data, just keep it as is). Once the parameters have been set, hit “Refresh Report”. This will then pull up all the data requested and can now be reviewed.

SaS 2

Step # 3 – Reviewing Data

This is the fun part. The amount of data returned is perfect for making business decisions. Provided is gross sales, commissions (excluding SaS fees), hits (clicks), net sales, reversals, number of sales, affiliates in the program, and active affiliates. There is an option to see year-over-year or month-over-month data for all the data lines. Review the trends and strategize for the future, this is why this report is valuable to any affiliate manager.

SaS 3

Does your affiliate program want more active affiliates? Simply analyze the active affiliates column and craft a strategy to engage more affiliates and roll it out via newsletters and/or a blog post. That is just one example of what can be done with this report.

It is a fact that numbers drive decisions and strategies, so now affiliate managers and other marketing team members have access to quality data that can aid in growth and prosperity.

How to Submit a Support Ticket in ShareASale

There are many tasks an affiliate manager needs to complete on a daily basis and their time is precious. When a problem comes up or there is an issue that cannot be solved, where do  ShareASale affiliate managers go? ShareASale has one of the (if not THE) best support centers among the major networks. They reply quickly and offer detailed solutions to the issue being faced and are extremely willing to help in any way possible. Here is a step-by-step guide to submitting a support ticket within the merchant interface.

Step # 1 – Click the Help Link

SaS1

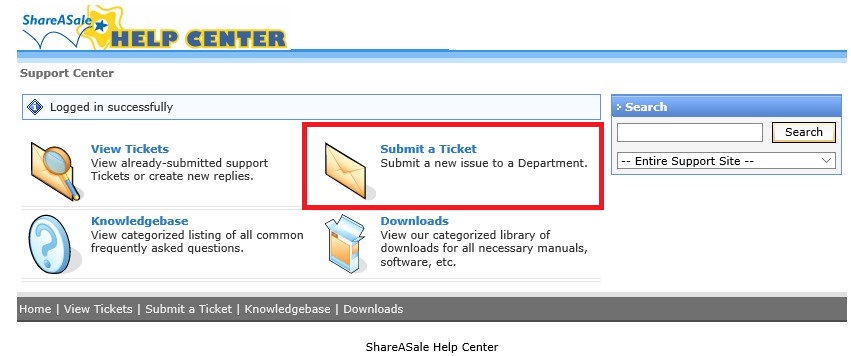
Once logged in to the ShareASale merchant interface you will navigate to the top left corner of the page and click the help link. The link will direct you to “Help Center” where you can begin the process of submitting a ticket, but also view old support tickets and view FAQ’s that may help answer your question before submitting a ticket.

Step # 2 – Submit a Ticket

Click the “Submit a Ticket” link and it will take you to the page where you  start creating the ticket.

SaS2

Step # 3 – Complete the Support Ticket

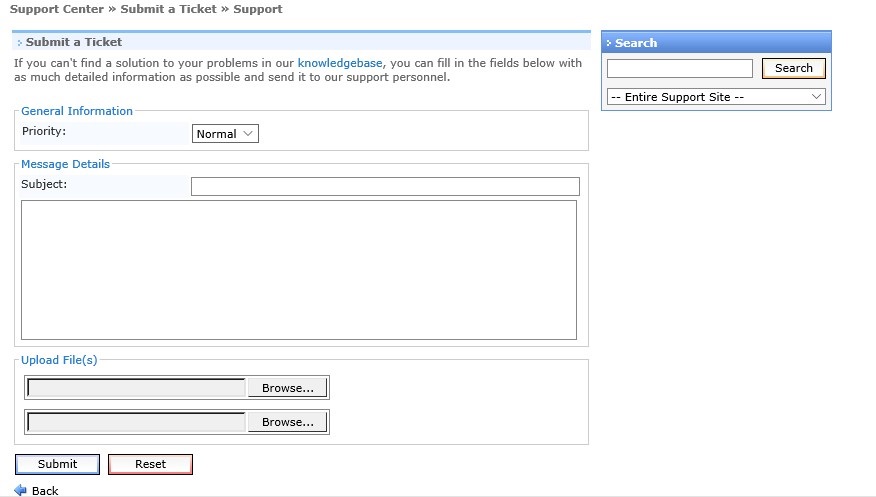
The “Priority” drop down box should be left at “Normal”  and the subject should be as descriptive as possible (what the issue is).

Within the body of the ticket it is imperative to explain the issue/problem that is being experienced so that the ShareASale Support team can provide recommendations/solutions as quickly as possible. If there are any documents needed to support the issue they can be attached as well. This is ideal if you have screenshots of the issue in question. Once you have completed the ticket message, click “Submit” and the ticket will be queued up within ShareASale and should be answered within a few hours.

SaS3

The support inquiries can be a simple as how to create a text link or as complex as setting up tracking for new and existing customers. No matter the issue or problem ShareASale will be there to help and guide you through it. They have people in dedicated roles to ensure proper handling and results. If you want to save some time for minor issues you can call their support team on the phone too.

Setting Up Affiliate Bonus Campaigns in ShareASale

Are you looking to jump start your affiliate program? Is it new or just not producing the results you want? You are not alone; there are many affiliate programs (new and established) that are looking for ways to increase sales through their affiliate program. It takes a lot of hard work to grow an affiliate program, but if you are a ShareASale merchant they make it easy for you to arm affiliates with the tools they need to be successful.  A popular way to get traction with an affiliate program is offer bonus promotional campaigns. ShareASale offers a simplistic way to set up bonuses (recurring or one-time) with affiliates so you can concentrate on continuing to grow the program. Here is a step-by-step guide to setting up bonus promotional campaigns in ShareASale

Step #1 – Navigate to the Bonus Promotional Campaigns Page

After you logged in to the ShareASale merchant interface, go to “Tools” then go to “More” and click “Setup Bonus Campaigns”. It will take you to – https://account.shareasale.com/m-transactionrules.cfm

Step #2 – Define Your Rules for Bonus Payments

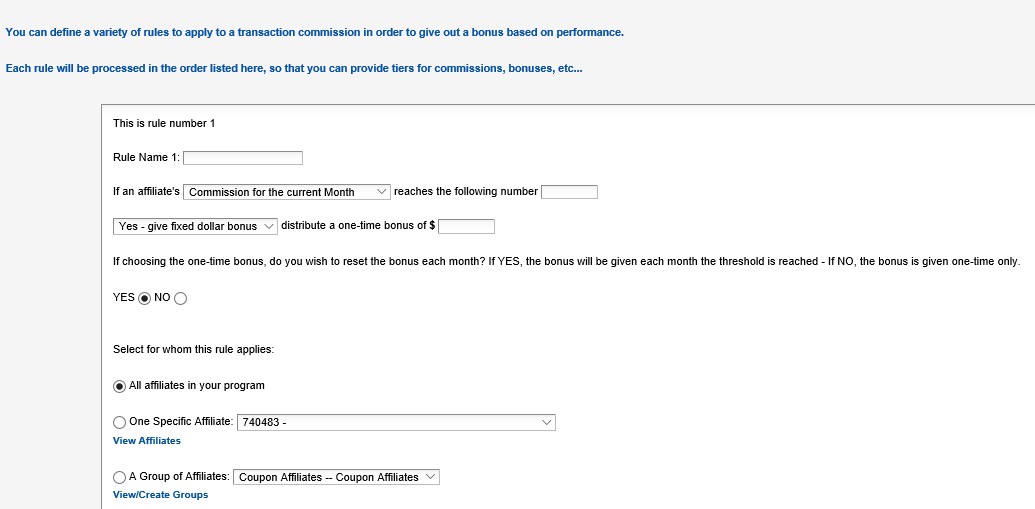
As I mentioned previously, this is a very simple process, but you have to make sure you are careful and review your choices. The first half of the page is where you want to name the rule (so you can identify it), what the threshold is (amount of commissions in a month, sales or clicks), whether it will be a flat dollar amount of a percentage, recurring bonus or one-time, what affiliates are to be included.  This is what makes this tool great, you can include or exclude whoever you want. If you do not want to include coupon affiliates in the bonus, simply do not add them.  A quick tip: if paying bonuses by group or types of affiliates make sure you have groups set up so you do not have to go in and manually remove/add affiliates.

ScreenHunter_707 Mar. 31 09.40

ScreenHunter_709 Mar. 31 09.41

Step #2 (cont.) – Define Your Rules for Bonus Payments

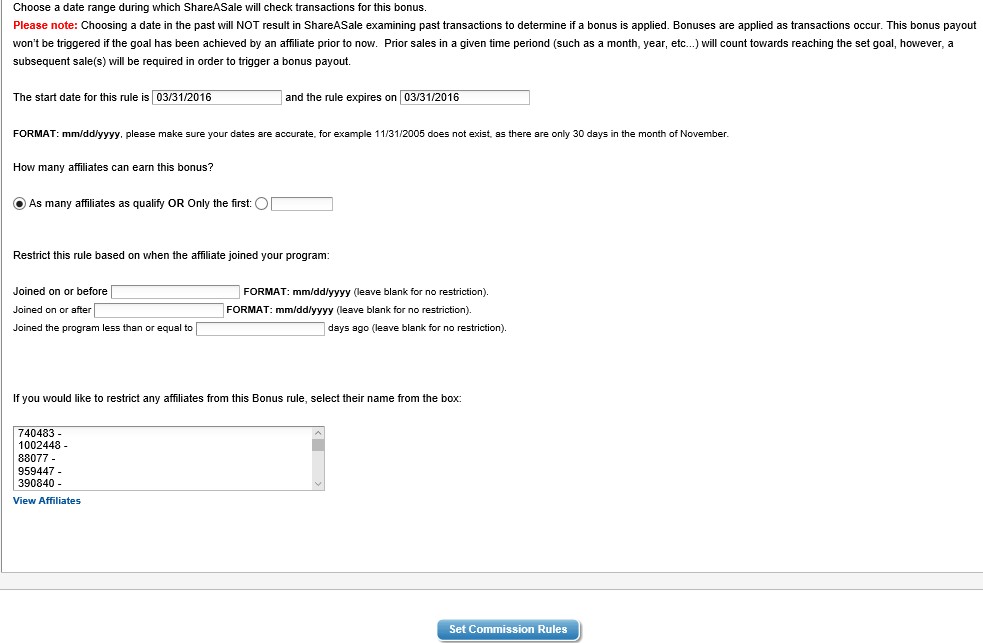
Continuing down the page and finishing up the set up process, next choose the date you wish to start (and end) the campaign. This is important because the bonuses will only be paid within the period you select and it cannot go back in time and credit affiliates. If you do wish to go back and credit affiliates you can “Post a Manual Transaction”, but that is a topic for a different day.  You can restrict affiliates based on their join date (when they were approved in the program) or you can simply select their affiliate ID from the box and they will be excluded. There are multiple ways to customize this tool to ensure you have the best bonus campaign available with who you want to participate.

Once all the fields are complete, hit the “Set Commission Rules” box and it will be saved and activated on the date you input as the start date.

ScreenHunter_708 Mar. 31 09.41

Activating affiliates in your affiliate program is a must (new or existing program). With ShareASale’ s “Bonus Promotional Campaigns” tool it allows you to fully customize an activation campaign based on the metrics you choose, and they best part of it is that ShareASale handles everything. With all the time you will save you now can focus on recruiting new affiliates and growing the program to new levels.

Top 5 ShareASale Affiliate Program Setup Mistakes

As an Outsourced Program Manager (OPM), I manage accounts in a variety of verticals and on all the major affiliate networks, but merchants seem to encounter the same issues when setting up their affiliate program on their own. Whenever we (AM Navigator) get a new client (with an affiliate program) we perform an audit to determine what needs to be fixed in order promote the affiliate program in the proper light and there seems to be the same items most (not all) merchants either neglect or complete partially. This post will cover the top 5 items merchants on the ShareASale affiliate network neglect to include or complete partially when setting up their affiliate program.

#1 – Program Agreement (AKA Terms of Serivce)

This document is probably the most important as it is the “rules” by which affiliates need to follow. Important points to include are:

  • PPC (Pay-Per-Click) guidelines – Be specific on what words are off limits and what words can be used.
  • FTC policy
  • Coupon policy (if applicable)
  • Fraud policy

#2 – Emails sent to affiliates during the sign-up process

This is another piece that many merchants do not capitalize on. The 3 emails affiliates receive from ShareASale on the merchant’s behalf are:

  • Apply Email – This is sent to an affiliate once they apply to join a merchants affiliate program. This should tell the affiliate that their application is being reviewed and they will be contacted within 24 hours with a decision.
  • Decline Email – This is similar to the apply email. It only gets sent to affiliates that merchants reject from their program, but in fairness to the affiliate it should include reasons why they may have been declined and give them an opportunity to contact the program manager and/or re-apply .
  • Approval Email – Merchants get this one wrong the most of the three (3). This email should include information about the program (description of the company and main selling points of the affiliate program), PPC guidelines (like outlined in the program agreement), links for them to use immediately (have the code available for them to simply copy and paste), and contact information for the affiliate manager.

#3 – 88×31 Logo

You may be asking yourself, a logo? The 88×31 button banner is important because it is one of the most popiular sizes affiliates use, but it also provides additional exposure when affiliates are looking for merchants to promote. In the merchant search section affiliates view potential matches and a logo is included with many of them and it helps to “convert” the prospect into an affiliate. A simple logo can be the difference.

#4 – Banners

I have seen merchants have over 50 banners available and then I have seen a few that have 5. There is no “magic number” for banners, but having the most popular sizes available is critical. Merchants need to provide sizes that affiliates can use. I have seen obscure sizes and then the most popular sizes are missing and I scratch my head, but here is a link to the most popular banner sizes.

#5 – Newsletters

Last, but certainly not least, newsletters. A good majority of merchants I have done audits for either send newsletters out infrequently or not at all. The latter is most common. How are merchants supposed to communicate with affiliates? The newsletters should be sent out bi-weekly, but at the very least monthly. They should include any news about the program, coupons/deals, links to creatives, and contact information.

I could have gone on forever, but I gave the top 5 items many merchants either neglect or do halfhearted when setting up their affiliate programs. Every aspect of an affiliate program should be completed fully, no matter how relevant a merchant thinks it is. Affiliate managers jobs are to “WOW” affiliates and get them to promote their products/services and having a fully integrated and set up program is the first impression to all.